Sewing for children is SO much fun! (Especially when they’re too little to complain about what you make for them, ha!) It’s been a few, ahem, years since I’ve had the pleasure of sewing for a little one belonging to me, so I’ve been polishing up my rusty sewing-for-bitty-bodies skills again.
I love knits for kids. (And me too, for that matter.) I really don’t love putting embroidery on knits. I love all those wee things I can put embroidery on. I really don’t love figuring out how to hoop those wee things. I have a dilemma, wouldn’t you say?
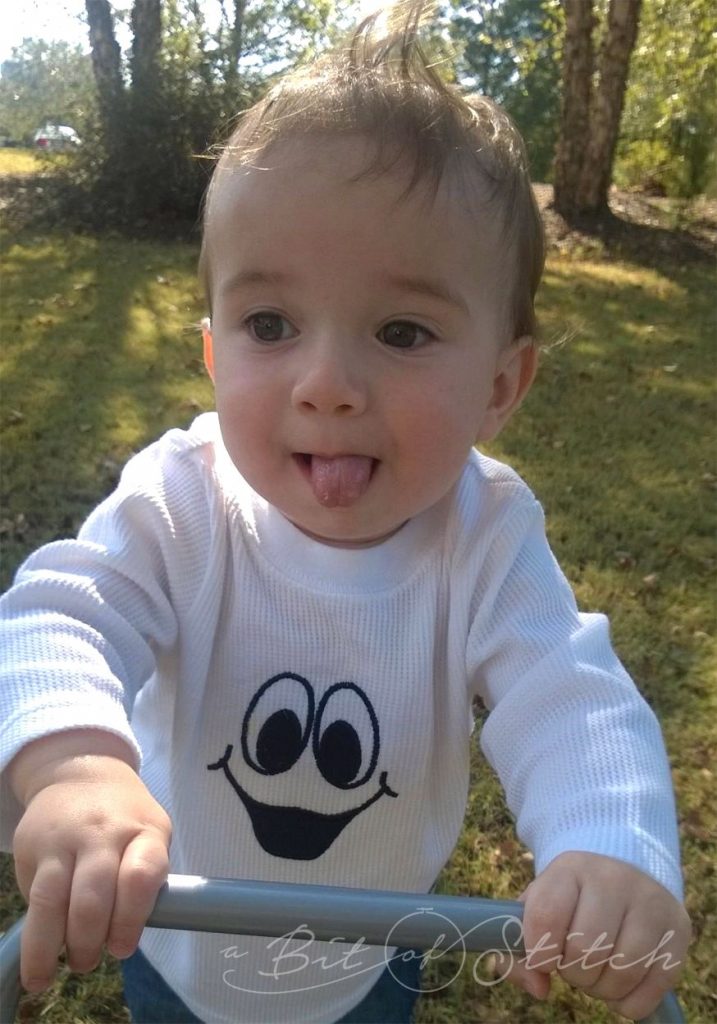
Well, Gramma really wanted to make a special little boy a Boo shirt with this cute ghost face design. So I steeled myself against my knit-garment-phobia and got busy.
Here are some things I’ve learned through the years about knits:
They stretch. Embroidery doesn’t. Putting embroidery on a place that has to stretch over a body part is a disaster in the making. The embroidery will NOT stretch but the fabric around it will and it will look pretty awful. I learned to choose my spots wisely. No elbows, shoulders or – worse – bosoms. (Ask me how I know THAT?)
I find that thin knits with a smooth surface seem to work best for embroidery-only designs but appliqué designs will usually work very nicely for any knit unless the knit has cables, defined ridges or other surface bumpies.
I finally got over the idea that I needed knit stabilizer for knit fabrics. Knit stabilizer is stretchy. Embroidery designs need to be sewn on non-stretched fabric. (I knew that, so what took me so long to apply that rule to knits? Gah!) I absolutely love using my thin Sheer Cut-Away Fusible Stabilizer with knits. This one will easily peel away later if you don’t iron the mess out of it. (Some fusible sheer cut-away stabilizers are hard to peel back up. TEST to be sure the brand you have will do so.) Check out my big pack of this stabilizer HERE. And as you probably know, when you apply fusible stabilizer to your fabric, it must cover an area larger than the hoop in order to do its job properly!
Knits have loft. As tempting as it is to over-stabilize knits, I’ve learned that all I usually need is one layer of thin, sheer fusible and one layer of a soft regular tear-away. Some cut-away, non-woven, opaque stabilizers can add too much loft, which can cause design distortion or misalignment. If I’m putting a monogram or a design with a lot of satin stitching on a knit, I usually add one more layer of regular tear-away, but that’s it. And I’ve come to the conclusion that some designs are just not suitable for knits. Too high a stitch count, too big of a design, and too many tiny lines that must line up? Yep, I have found that these designs are best left to woven fabrics.
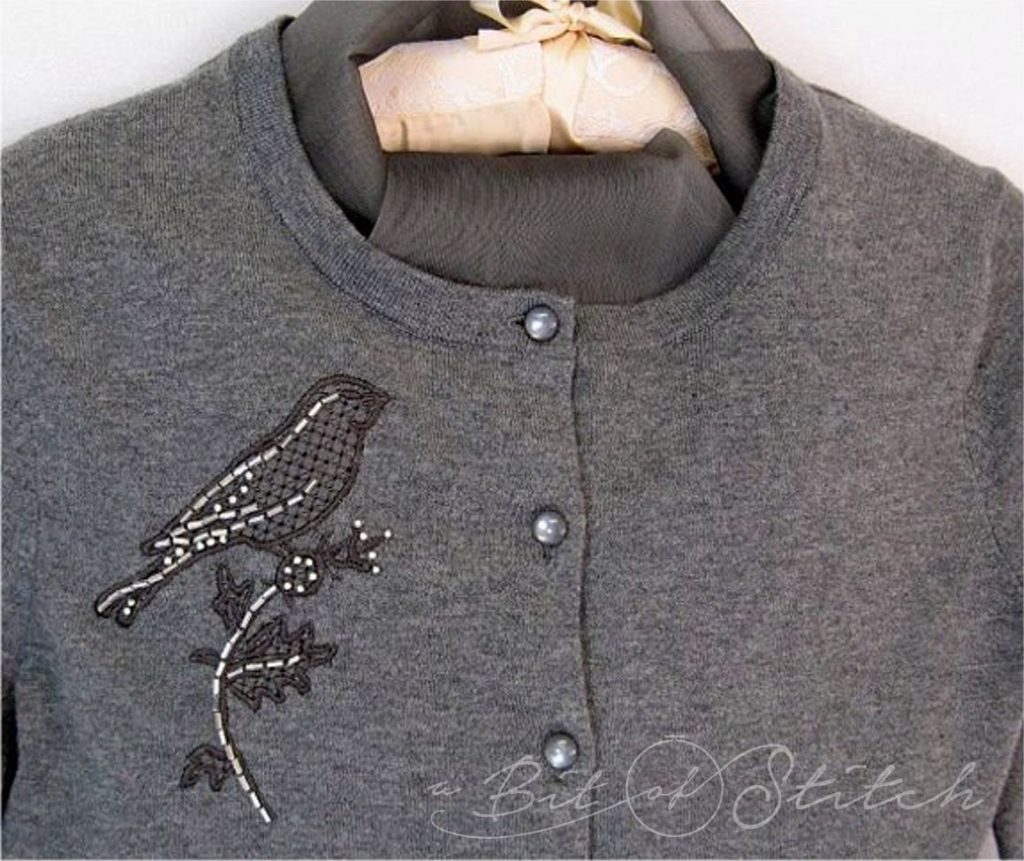
Toppers? Well, most things (especially for children) must be washed. Wash-away toppers wash away. That seems to defeat the purpose, wouldn’t you say? I mean, if there is a texture under that embroidery Murphy’s Law says it WILL worm its way back up again anyway. When I really need to use a topper I like to use silk organza. Check out the cardigan below. I used gray silk organza under the little bird embroidery design on this soft knit cardigan. This sweater is several years old, well washed, and yet the embroidery still looks pretty awesome. (Read my earlier post – “Going undercover!” – for more about toppers!)
Things I’ve learned about hooping wee things:
Don’t hoop them. AND, sometimes taking out a seam or two so I can get the thing to lay flat without throwing it against the wall is actually worth the time and trouble of sewing it back up later. (Sewing is easier for me than painting walls after all, heh.)
Painter’s tape, masking tape, Wonder Clips, binder clips – these things are my friends!
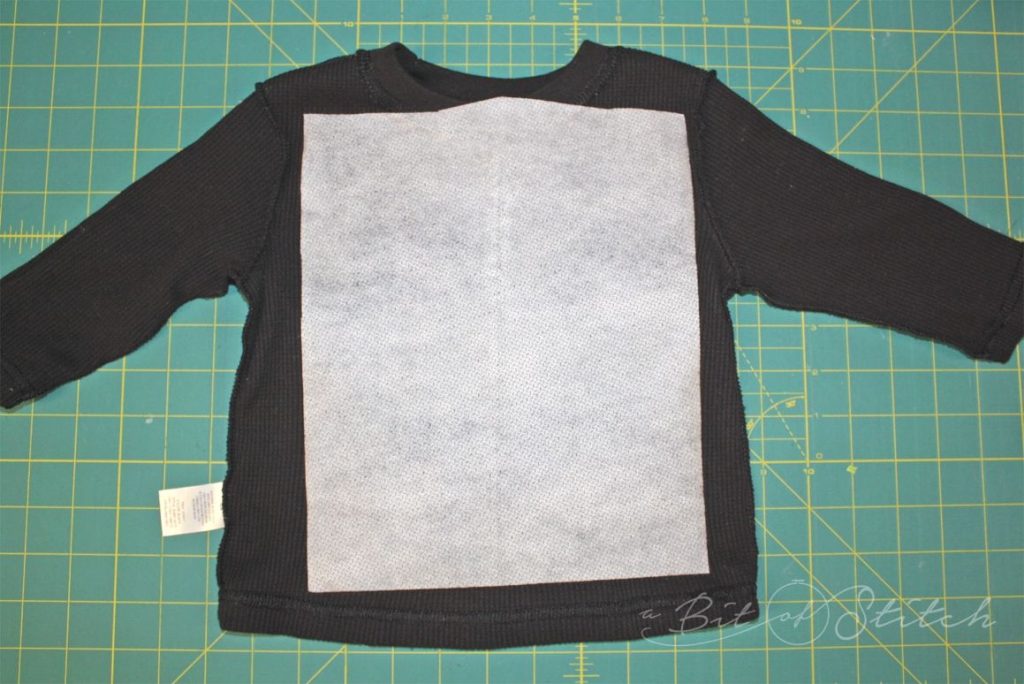
So, let me show you how I made my Boo shirt. First, I lightly ironed a piece of fusible sheer cut-away stabilizer (cut bigger than my hoop) to the wrong side of the shirt front.
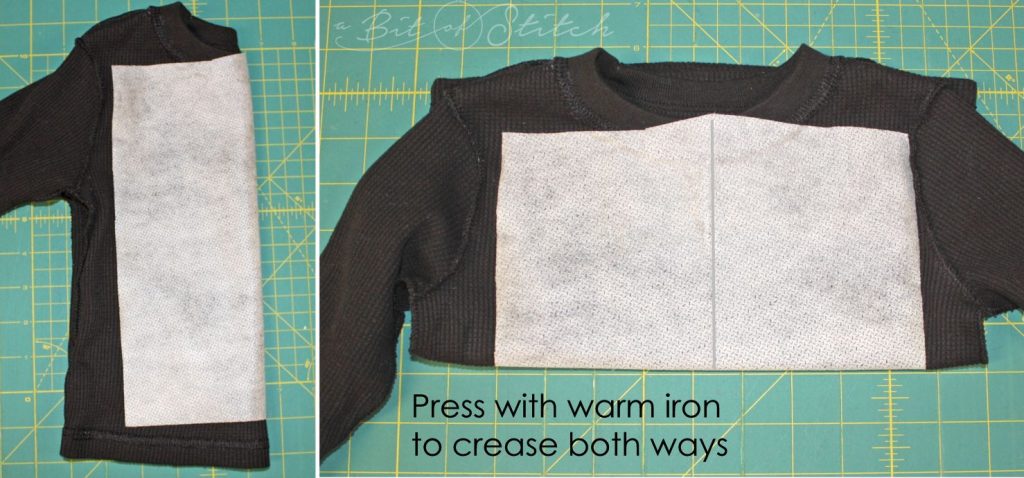
I wanted the appliqué to sit right in the middle – centered – on the front of the shirt. So I folded the inside-out shirt in half (as exact as I could get) both lengthwise and widthwise.
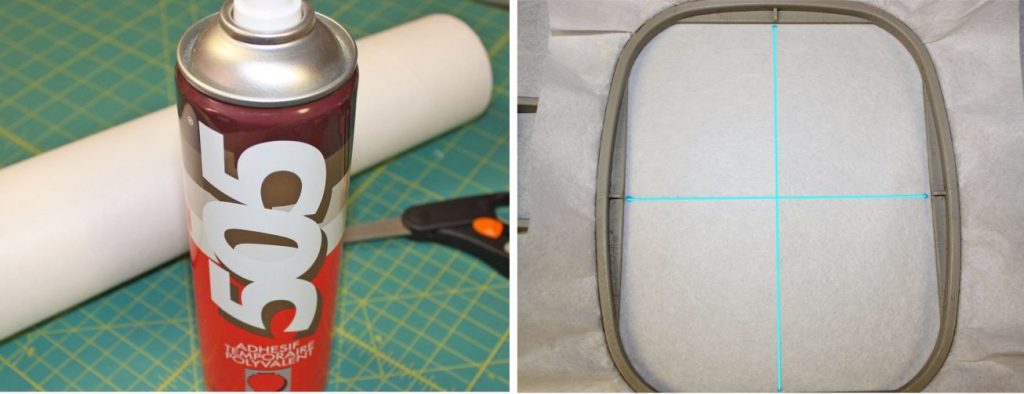
Next I drew an even cross-hatch on a piece of soft tear-away stabilizer with a water-soluble pen and sprayed it with temporary spray adhesive. I hooped the stabilizer, aligning the cross-hatched marks with the centering marks on the inner hoop. (It’s a good idea to check your hoop grid and be sure that these hoop marks coincide with the center marks on the grid.)
NOTE! I am not a big fan of temporary spray adhesive. Had this shirt been a little bit bigger, I probably would have hooped it. Another option is to hoop a piece of self-adhesive (sticky) wash-away instead of the soft tear-away.
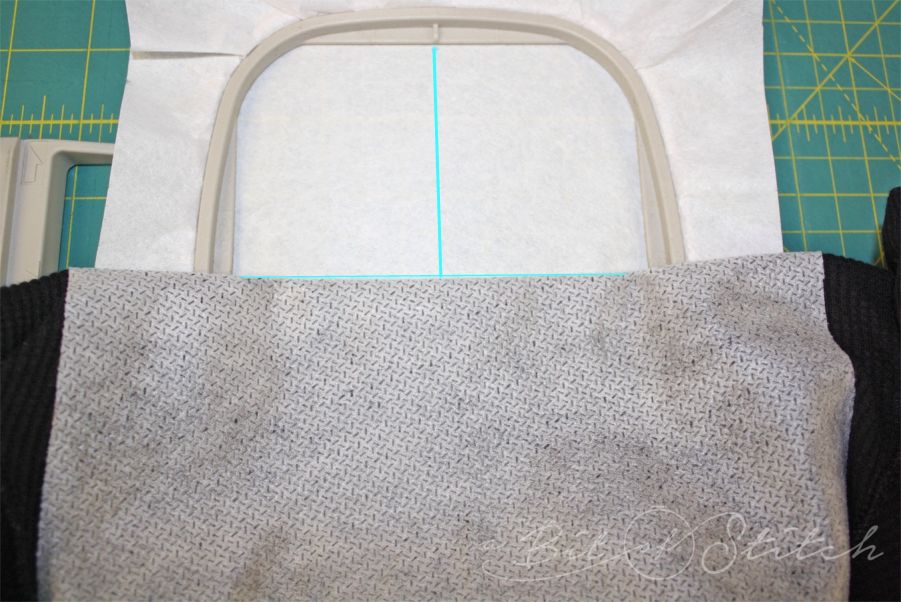
Still working with the shirt inside-out, I fold the shirt on the horizontal crease and align that crease with the marked horizontal line on the stabilizer. Before I patted the shirt down on the stabilizer, I made sure that the vertical center mark on the stabilizer and the vertical shirt crease were aligned too. Those of you who know me well know that I am a fan of printed paper templates. When you can’t hoop something it’s hard to use a template and hoop grid properly, so what to do? This method – marking the design placement on the hooped stabilizer and the wrong side of the project works very well for me.
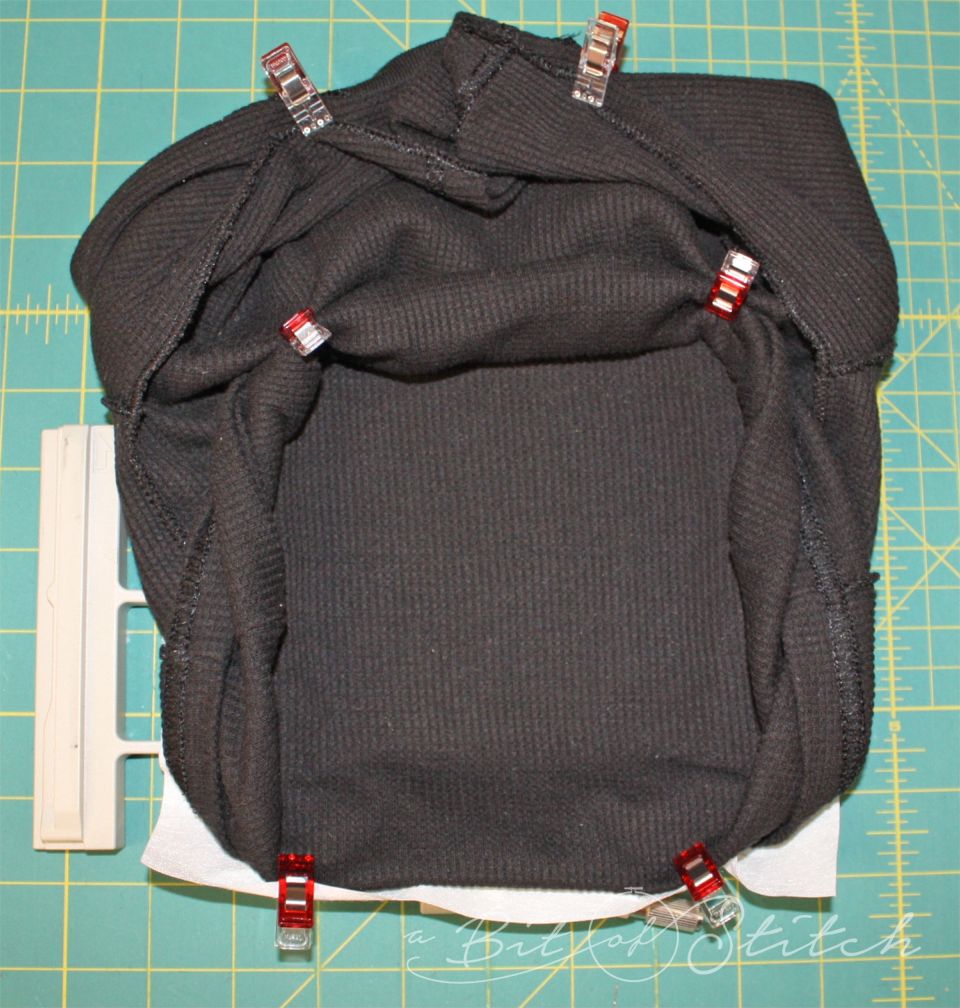
Once I was sure everything was lined up nicely, I patted the shirt down on the stabilizer firmly; rolled up the shirt-back and secured them with Wonder Clips. I tried to catch the clips on the extra stabilizer bits that stuck out around the hoop. That helped keep the knit fabric from popping back. (Sometimes I take a few basting stitches or use pins to further secure the fabric to the stabilizer. If you use pins, be sure to keep them away from the path of the needle/foot.)
Then I got a cuppa tea and sat right there WATCHING as the design stitched out. (No wandering off to do something else – I might have ended up with an escaped sleeve flopping around wreaking havoc and anyway it was the perfect excuse for a tea break!)
Once the appliqué was finished, I removed as much of the soft tear-away stabilizer as I could. (If you used self-adhesive wash-away, you would need to soak it away at this point before proceeding.) Then I gently peeled up the excess sheer mesh cut-away stabilizer and used my sweet little Snips to trim it away around the design. I left a little in places where I was in danger of poking a hole in the shirt if I tried to trim too close.
THEN I used my knit stabilizer to cover the back of the design making it soft and smooth for delicate baby skin. CLICK HERE to find Farmhouse Fabrics’ French Baby Interfacing – my favorite product for this use! To make sure it doesn’t peel up before baby grows out of the shirt I apply a layer of fusible webbing to it first, and then cut it to the shape I need and iron it down. It may seem redundant to add fusible to a fusible, but after two or three washings some products want to peel away. This helps to prevent that.
Easy-peasy, eh? I may have conquered my dislike of knits and wee little bitty garments in-the-hoop. You noticed that the shirt I took photos of is black and the one my little sweetie is wearing is white? Yep. Gramma is already on to the second knit shirt!
Happy Knit Stitching!
Evy
P.S. Since this blog post was written, my grandchildren have really grown! Their shirts are nice and big and easily hooped. I’ve discovered that now I can apply our sheer fusible cut-away stabilizer over an area slightly larger than the design I wish to embroider. Then I fuse a piece of fusible tear-away stabilizer over that, covering an area larger than the hoop. Then I hoop and follow the same steps for trimming and finishing the back of the project as listed above.

3 replies on “Nitpicky Knits – Embroidery Tips!”
Thank you Evy, Cute as a button 🙂
I wish I had read this a few years ago! I do use Sulky’s Tender Touch, and after some washings have to re-iron it back down. How brilliant to use fusible webbing on the Tender Touch and then iron it to the back side of the embroidery. Thank you Evy!!
You are welcome Barbara! I got so tired of my nice soft covering coming off after a couple of washings…it was desperation that brought the inspiration! Haha!