I’m on a roll here making stuff for myself. I know! What a change of pace! How about you? Do you manage to find time to make yourself a pretty or two now and then? Well, why not? I hereby give you permission to make yourself a pretty something today!
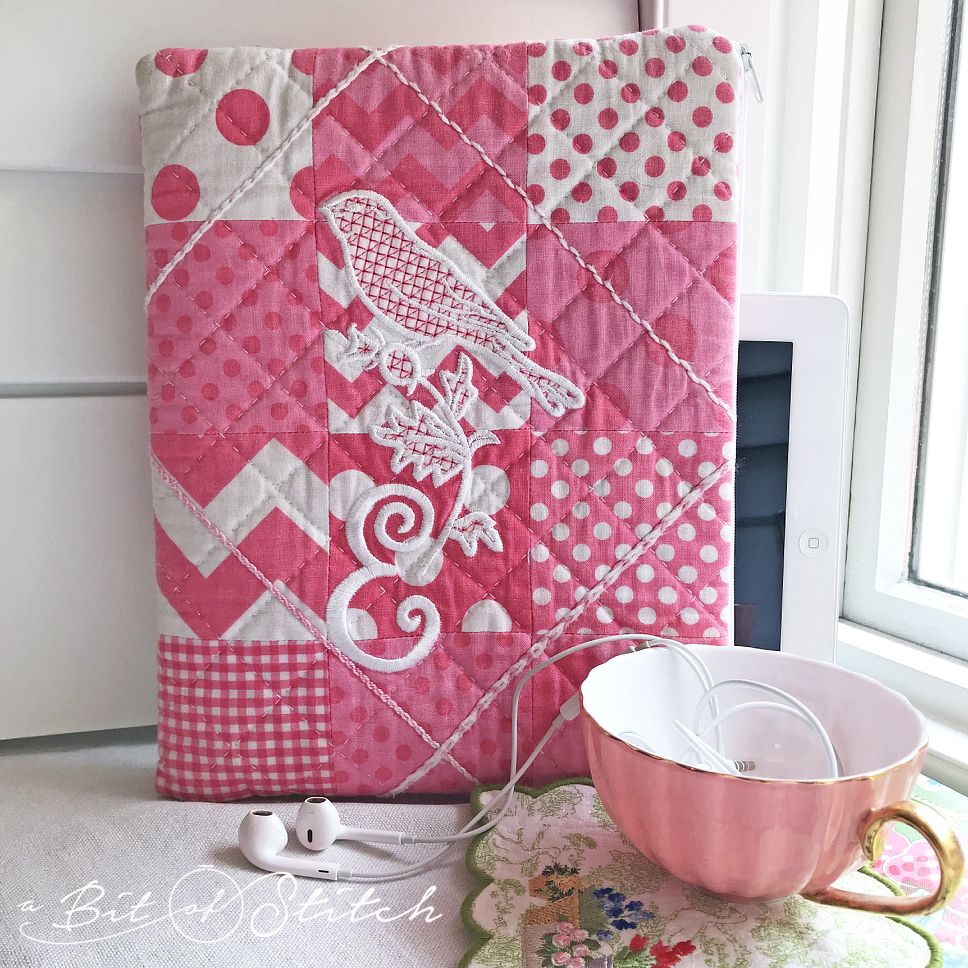
I decided that I needed a new iPad case. While I was scouting around for just the right fabric I ran across a little 3.5” Bitty Stacker of Riley Blake’s basic Variety Assortment in pink. This had been a gift tucked inside a goodie bag from a recent Baby Lock event I had attended and I was saving it for “just the right thing.” Well, I found my thing! Woot!
Want to make one? Here’s what you’ll need to make one like mine:
- Cotton fabric blocks (3.5” or whatever you have)
- ByAnnie’s Soft and Stable foam stabilizer twice as big as your iPad (or a similar product)
- 14” zipper (or 3 – 4″ longer than your tablet is tall)
- Lining fabric
Sew your 3.5” blocks together with a ¼” seam allowance. I laid them out first into the pattern I wanted keeping in mind the size and shape I would need to make a cover for my iPad. One Bitty Stacker turned out to be just enough blocks to make a cover for my 7.5” x 9.5” iPad. You could use other pre-cuts to do the same thing. Check out your stash!
Note – Measure your tablet and make sure that you create a pieced rectangle that is at least 1” larger all around than your tablet when the rectangle is folded in half. You’ll need the extra room for seam allowance and for ease in getting your tablet in and out of the case.
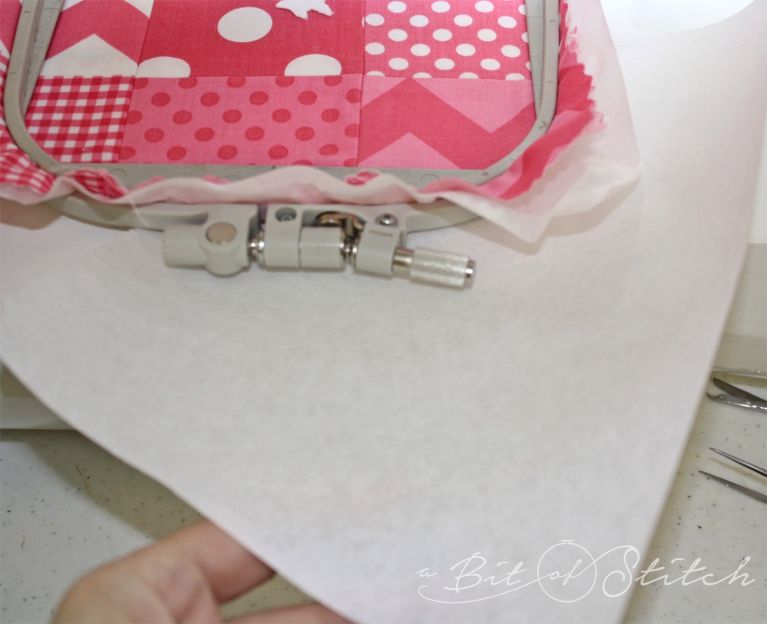
Press all the seams open. Want to put embroidery on it? Now’s your chance! (I used my “Little Bird Scrolls” & “Zora’s Font” embroidery designs.) For best results, stabilize your fabric with one layer of a lightweight iron-on tear-away stabilizer, hoop the stabilized fabric, and then float an additional layer of soft tear-away under the hoop once the hoop is attached to your machine.
This works well for monograms or appliqués. (I love Sulky’s Totally Stable iron-on tear-away. It’s economical, user friendly, and you can buy it by the bolt. However, there are a lot of nice iron-on tear-away stabilizers out there. Use what you have!) When you are finished stitching, remove the stabilizer and give the fabric a good press from the wrong side.
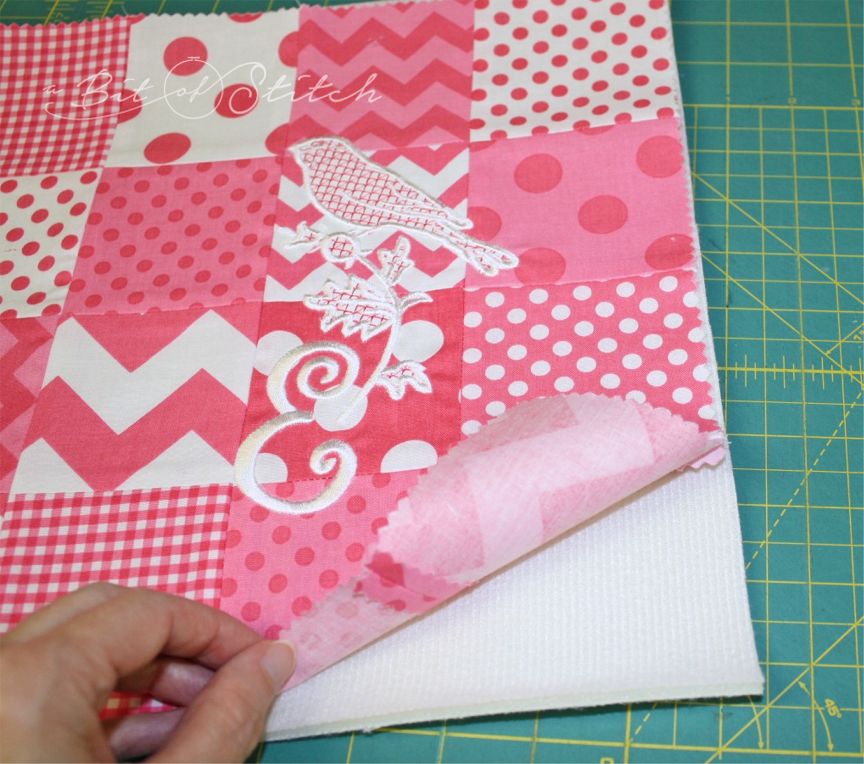
Have you discovered byAnnie’s Soft and Stable? This stuff is awesome. It’s double sided fabric covered thin foam. What I love about it is that it’s soft yet really stable. (Hmmm, is there an echo in here?) It’s so easy to stitch with. MUCH easier than most of what I usually use for creating firmness in my bag, tote, purse and case projects. AND, best of all, it’s very friendly with my Baby Lock Sashiko machine! As it’s actually foam, it works really well for this iPad cover. Protection and padding! I used one layer of byAnnie’s Soft and Stable in white for my case, cutting it the same size as my finished rectangle.
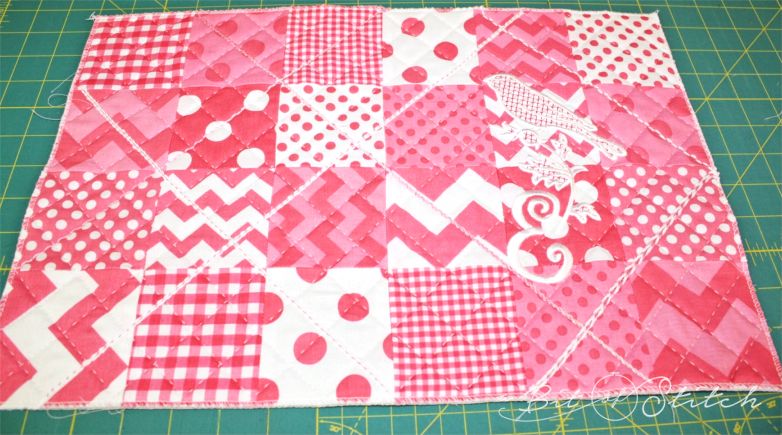
Now quilt your fabric to the stabilizer anyway you like. Use your quilt guide to create even rows (see the Scrappy Quilt post #2 for info about that) or just free motion stipple it as you wish. (This is a great chance to use some of your built-in pretty motif stitches if that floats your boat.) But you know me – when there’s a spot that needs quilting I’m going to head to my sweet, sassy Sashiko! I couldn’t resist adding a few flip-stitched rows of yarn and cord too. Once I was finished I evened up my rectangle and serged all edges to secure the ends of my Sashiko quilting.
Check to make sure your finished rectangle is still going to fit your iPad. You may have to adjust the length or width. For best results you want it to be about 1” to 1.25” larger all around.
Cut one piece of lining fabric the same size as the finished rectangle. Fold the lining in half short end to short end and then cut along the fold. You should now have two blocks of fabric that are the same size as the folded rectangle.
This will be the easiest zipper you have ever put in something. I promise! It helps to have a narrow zipper foot. Did you know that Baby Lock makes a narrow zipper foot for their machines that is actually skinnier than the “regular” zipper foot? It’s awesome and if you don’t have one you need one.
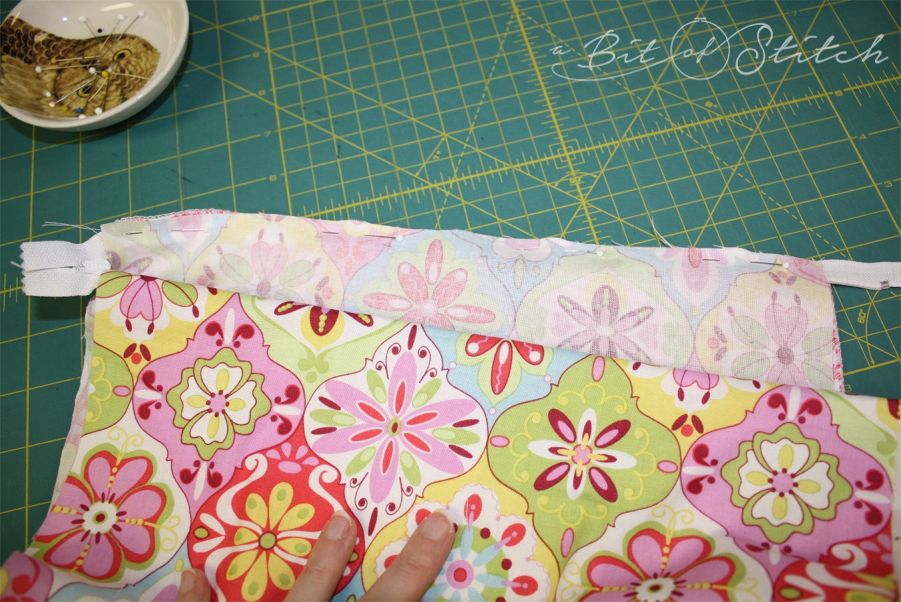
Pin the zipper to one short end of your finished rectangle right sides together. Allow the extra zipper to hang off each end as shown in the photo below.
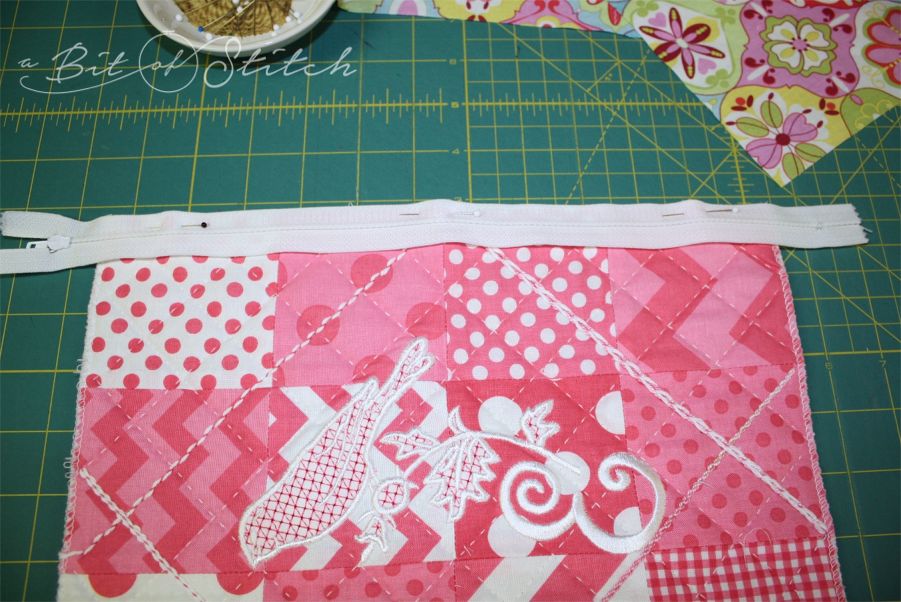
Sew the zipper to the edge of the fabric right at the edge of the zipper. You don’t need to sew close to the teeth – not yet.
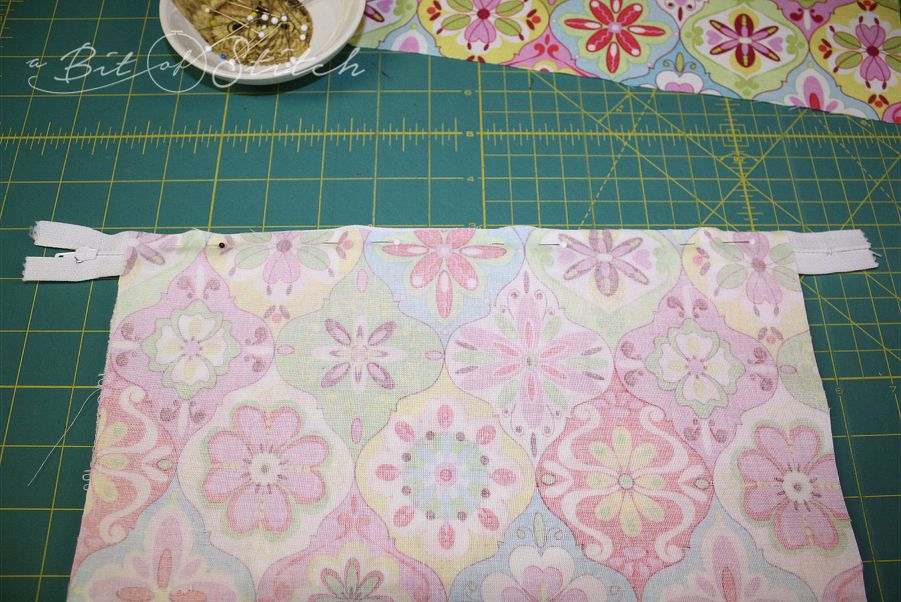
Next, place one block of lining fabric over the zipper as shown below and pin it in place. The zipper is now sandwiched in between the quilted fabric and the lining fabric. The lining’s right side is against the zipper’s wrong side.
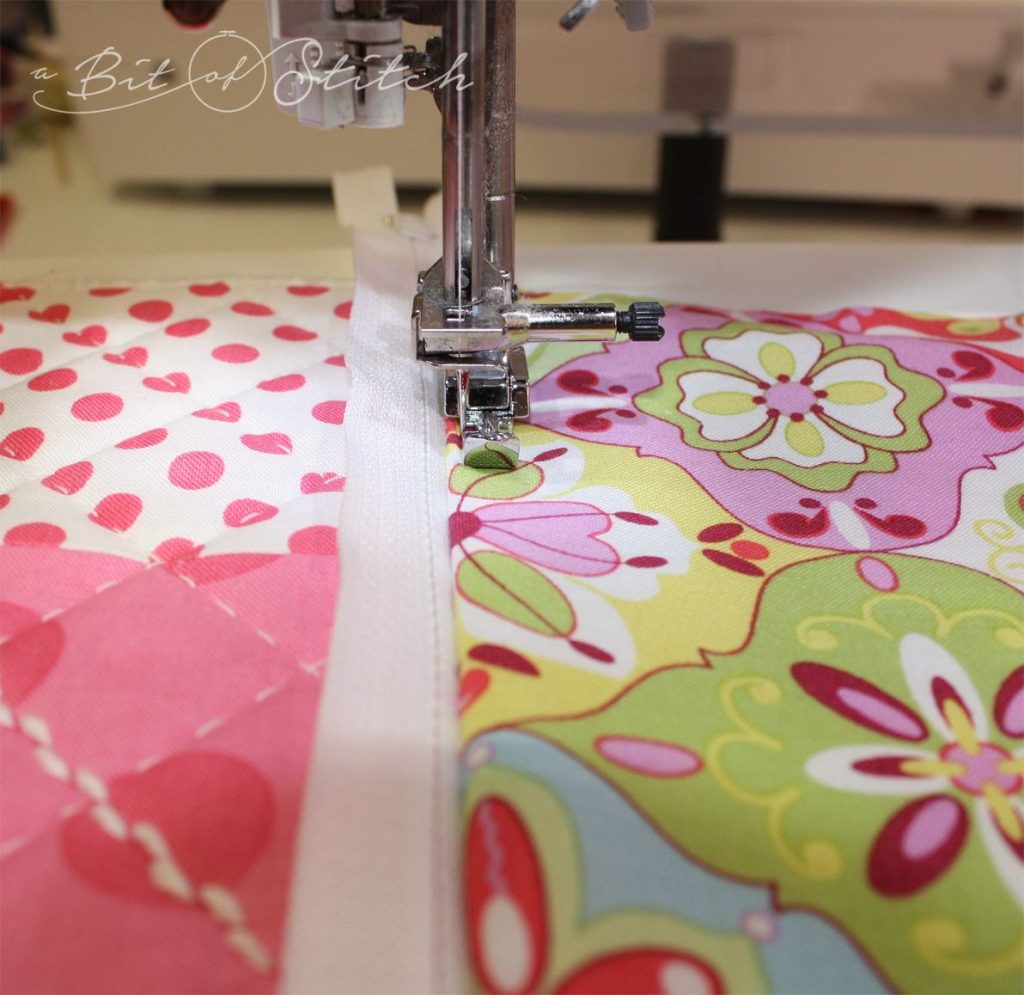
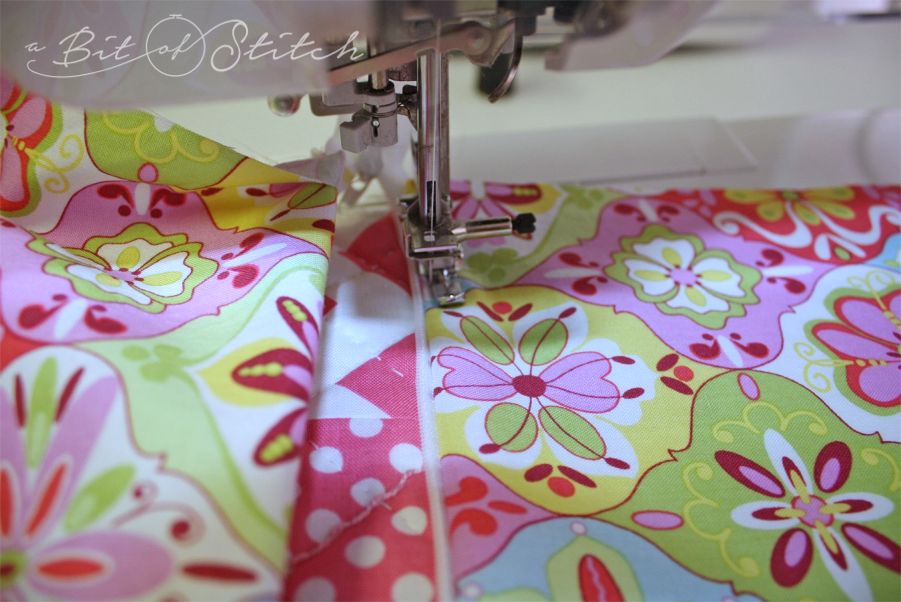
Now sew through all layers (quilted fabric, zipper and lining) and DO sew close to the zipper teeth. I should make a note here to tell you that while yes, you can do both those steps as one, it is ever so much easier to do it in two as I’ve outlined them – especially if you are leery of zippers anyway. If you are a pro, well go for it! I know one friend who will go to her serger and put her zipper in with that! (Uh-huh, you know who you are!)
Open the lining out pulling it firmly away from the zipper teeth and top stitch through all layers approximately 1/8” to 3/16” away from the seam. Keep that lining pulled firmly away from the zipper teeth as you sew. All of the seam allowance selvages should be facing to the right under the lining. The zipper will be facing wrong side up and you are sewing on the lining’s right side.
Zip the zipper and pin the other side of the zipper to the other end of the rectangle. Once again, your quilted rectangle is wrong side out; your zipper and the right side of the rectangle are right sides together.
Sew the edge of the zipper to the edge of the rectangle without unzipping the zipper. Just squish it flat and make sure you don’t catch something under the foot that shouldn’t be caught.
Open the zipper all the way and place the remaining fabric lining block wrong side up over the zipper aligning the edges. Pin the fabric in place and then sew close to the zipper teeth.
Open the lining out flat and top stitch through all layers of seam allowance selvages just as you did for the other side. Keep that lining fabric pulled firmly away from the zipper teeth as you stitch.
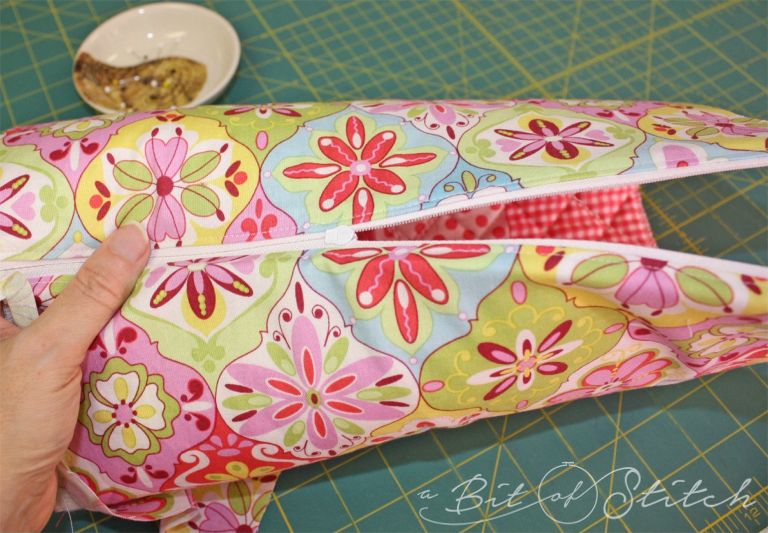
Smooth the lining blocks over the wrong side of the quilted rectangle and press each end along the zipper.

Zip the zipper until it is just halfway closed.
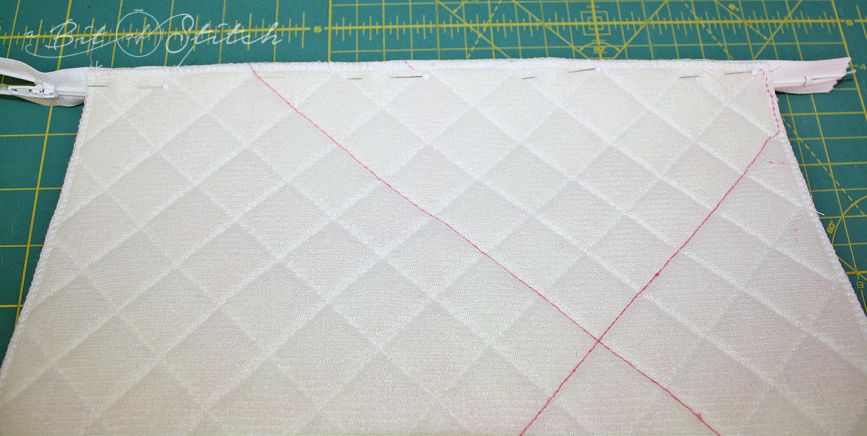
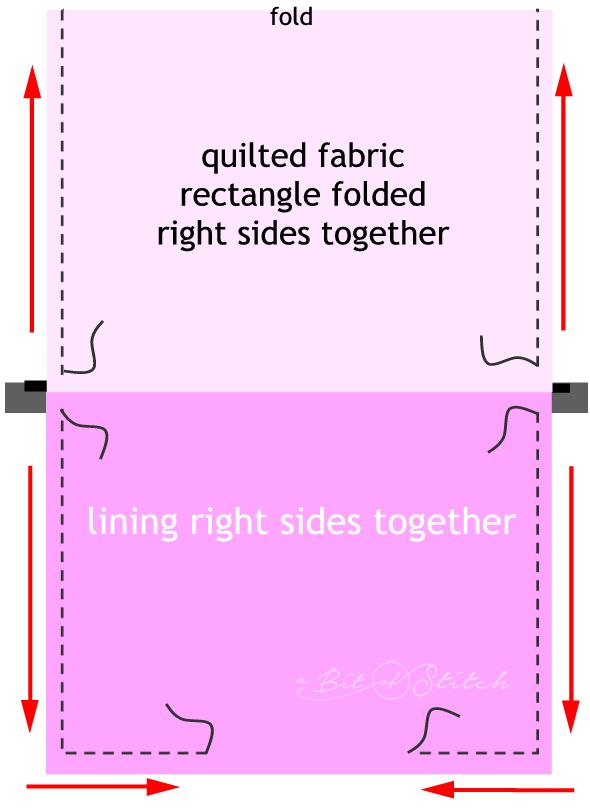
Open out the lining flat, right sides together, and fold the quilted rectangle in half at the center. Align the lining blocks with each other and the open zipper ends with each other. Pin the open end of the zipper tabs flat against each other to keep them even. Make sure the quilted fabric rectangle is folded neatly and is not off kilter.
The red arrows in the picture below show the stitching path. For best results begin at the zipper and sew to the fold on the quilted fabric side, first one side, then the other. On the lining side begin at the zipper again and sew to the corner, turn and sew toward the middle stopping about 3” away from the center of the lining. Repeat for the other lining side. Use a 3/8″ to 1/2″ seam allowance.
Don’t worry if you can’t get really close to the zipper. Leaving at least ½” of un-stitched space on both sides of the zipper is just fine and actually helps the case lay nicer when turned right side out. Use your regular sewing foot for this. (Baby Lock owners, that’s your “J” foot.) Depending on the stabilizer you have used for your case it might be hard to begin sewing 1/2″ away from the zipper. If that’s the case, begin where you need to; once you have stitched the sides go back and sew TOWARD the zipper so that you can get a little closer. Make sure you back-tack where you begin and send the seams.
Don’t trim the zipper, but do clip the corners a little.
If you wish, stay-stitch the opening by sewing on the selvage edge of the fabric on each side to help keep it from stretching all out of whack when you turn your case right side out.
Reach inside the opening in the lining and open the zipper all the way. Turn the case right side out. Sew the opening in the lining closed either by hand or with your machine.
Now YOU have a new pretty iPad cover! (Warning – if you show this off, your friends and family are going to be twisting you arm to make them one!)
Evy