Do you have a quilt top just waiting to be quilted? Want to quilt it with your Baby Lock Sashiko machine? 🙂 Follow along with me while I show you my favorite Sashiko quilting tips!
If you haven’t already made your quilt sandwich, you will need:
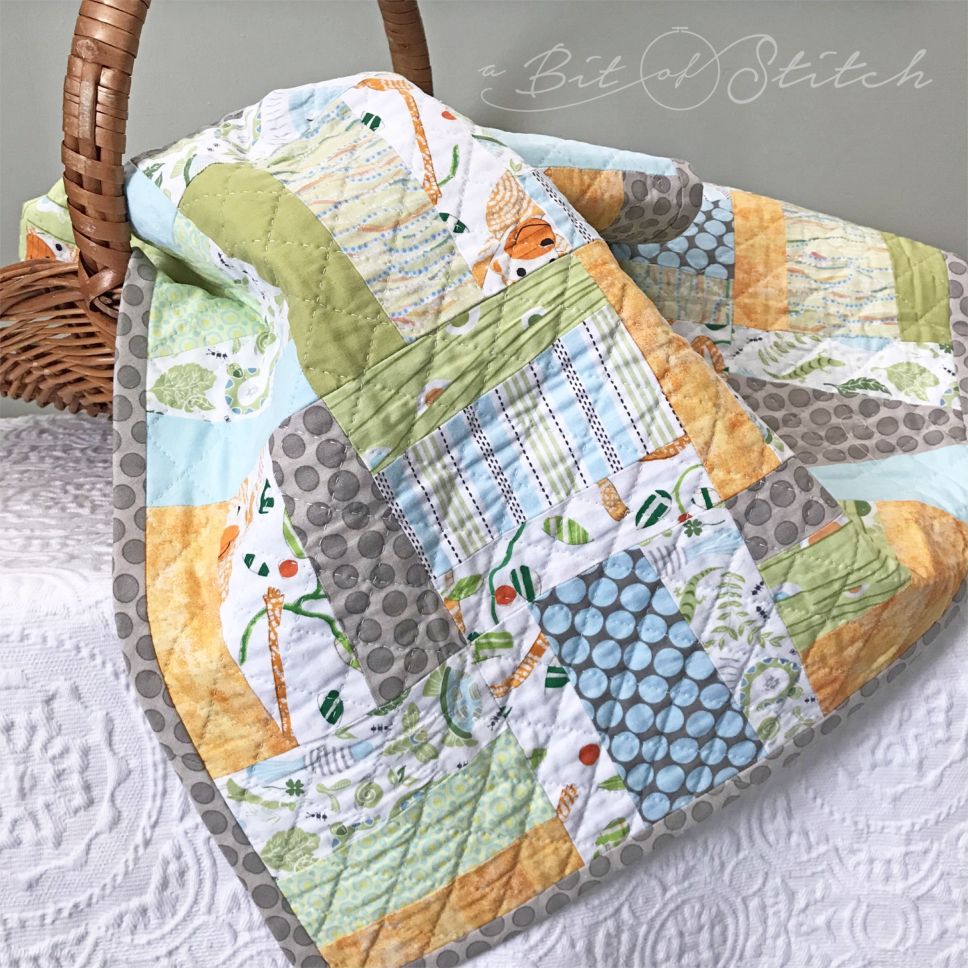
- Fabric for your quilt back – I cut mine approximately 1” larger all around than the size of the quilt top
- Batting for your quilt – I used Quilter’s Dream cotton batting as it has a smooth, low loft and works very nicely with my Baby Lock Sashiko which is what I wanted to use to quilt my new scrappy quilt! (Of course, you can use a regular sewing machine and the quilting method you love best, but if you have a Sashiko machine, this is a great quilt to try it out with!
- Sewing thread
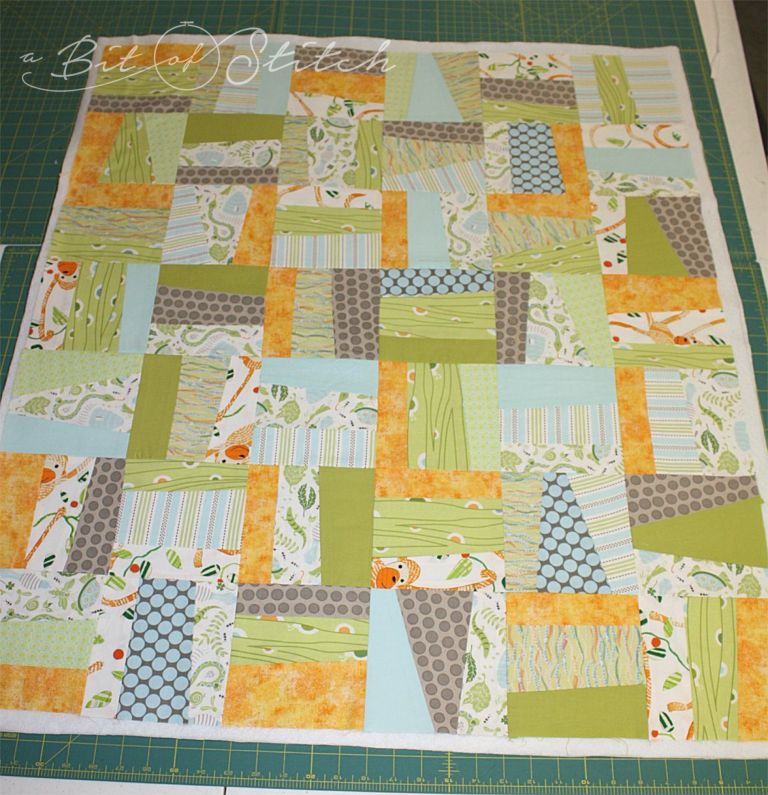
Just so you know, I pressed all my seam allowances open on my scrappy quilt top. I do this whenever possible for projects I plan to quilt on the Sashiko machine; it helps keep the bulk of the fabrics evenly distributed. I know that it’s common practice to press the seams toward one side and “nest” them at the corners… but for Sashiko quilting I’ve had much more success in avoiding skipped stitches, thread breaks, etc. when I press the seams open.
To make a quilt sandwich, stack the quilt top, batting, and quilt backing together on a flat surface. Make sure all three are nice and smooth – quilt top on top, batting in the middle, and quilt backing on the bottom. I like to cut the batting and backing pieces the same size, slightly larger than the quilt top.
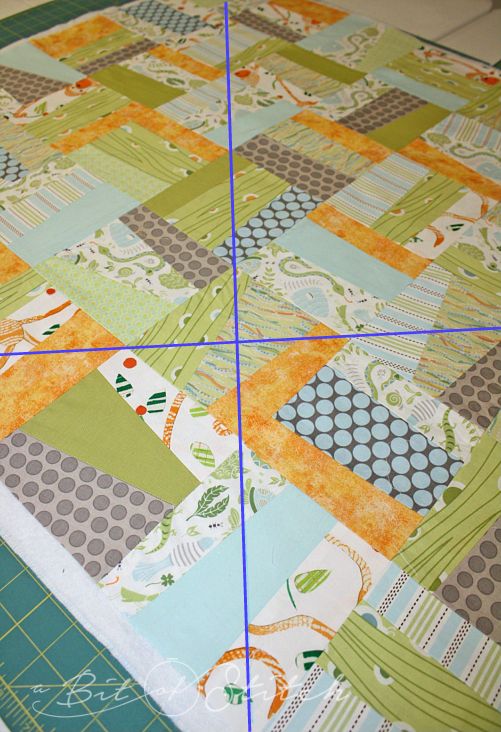
I chose to quilt my scrappy quilt with rows of stitching spaced 1” apart in a grid, which meant I needed two perpendicular base lines to follow. (I had to use a few rulers placed end to end to reach across the whole quilt top.) I used a water-soluble marker as I find that easier to see than a chalk pencil and less likely to rub out before I’m done with it.
Now it’s time to secure the layers together here and there so they will not shift around while you are quilting them. Some folks use quilting safety pins. Some folks like to hand tack the layers together with a stitch or two placed at regular intervals. I like to baste my layers together with rows of long running stitches spaced 6 to 8” apart. Whatever you find easiest will work just fine. Just remember that whatever you use needs to be removed as you quilt over it. That’s a moot point for pins – I mean, GA! You definitely don’t want to stitch over a pin. But what about thread, why does it need removed too? Well you can pick it out later, but it is ever so much easier to do it while you quilt. Stitched-on-top-of thread can really be a pain to get out. If you are using your Baby Lock Sashiko machine to quilt with you might not want to sew over basting thread. It probably will be just fine, but then again it might get caught between the latch wire and the needle and create havoc. I tend to be safe rather than aggravated and just clip and pull the threads as I get to them.
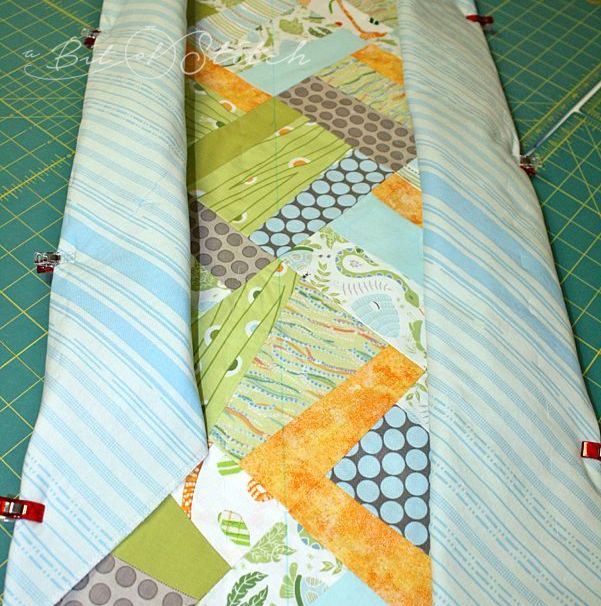
I love Wonder Clips! I use them instead of pins to keep my quilt sandwich rolled into a manageable bundle when I’m quilting. If you don’t have Wonder Clips you can also use binder clips. As I quilt I unroll, re-roll and then re-clip.
Do you have an extension table for your machine? You might have a nice big table or cabinet that gives you a large, flat space to drape your quilt over while you work. If you don’t have such a thing, consider getting an extension table for your machine. They are awesome. Baby Lock makes extension tables for their machines, including the Sashiko. Yay!
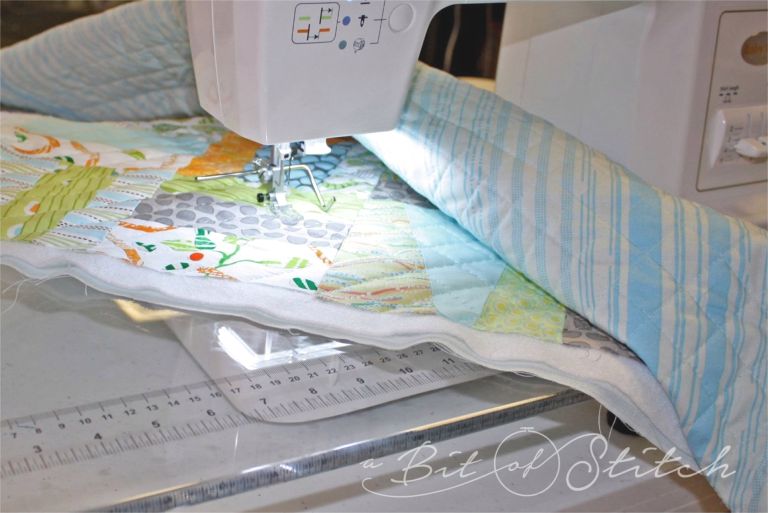
Note – Sashiko users need to remember that for even stitches you must allow the feed dogs to do the work. Don’t push the fabric or hold back on the fabric as you sew. I find it helpful to use the biggest table I have with nothing behind or to the left of my machine.
Also, here are a couple of dial adjustments you need to make before beginning:
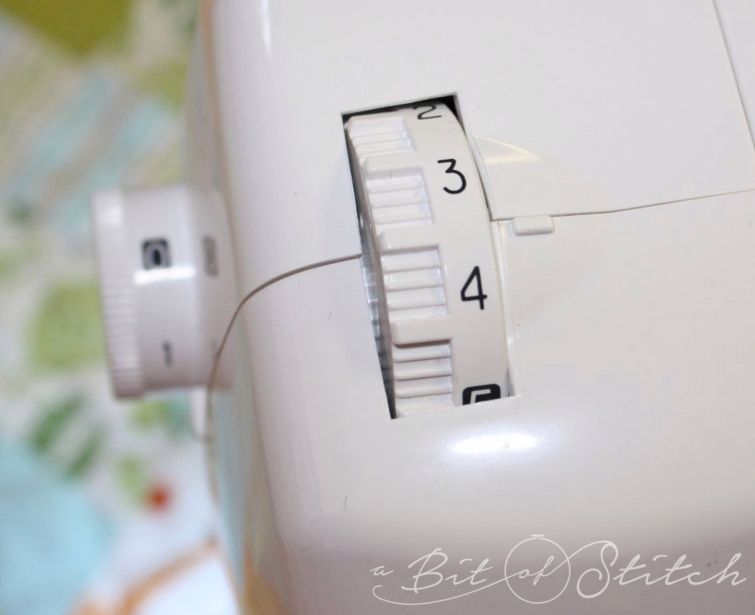
Set the presser foot PRESSURE dial to 3.5 or 4. This takes some of the tension off the presser foot allowing it to act more like a built-in walking foot. (Aren’t those BL machine inventors clever?) Depending on the thickness of your batting you may need to adjust that dial even lower. For best results, do a few test runs on scraps of batting and fabric to see what setting will work best for your choice of batting and fabric. I find that somewhere between 3.5 and 4 works great for most of my quilting projects.
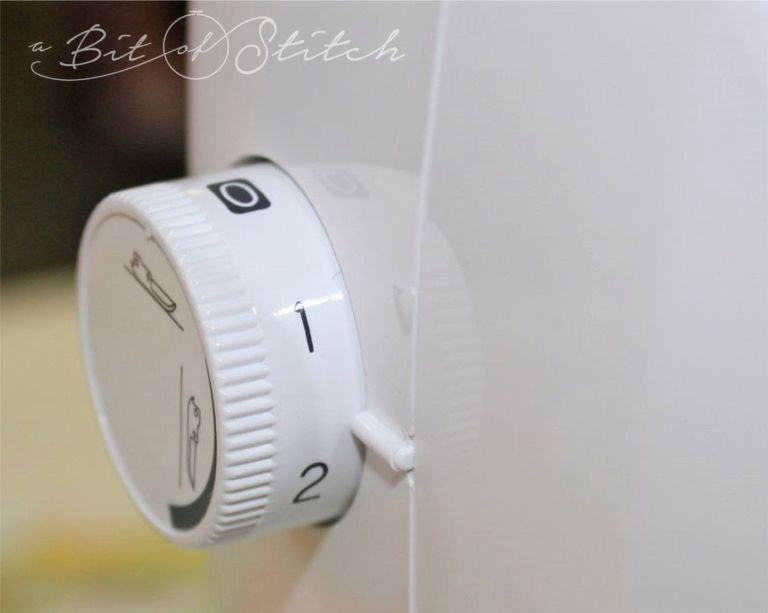
Next, adjust the presser foot height dial slightly up. A higher number allows the foot to “lift” off the fabric when the needle is engaged. I’m not sure why, but a setting of 1.5 or a little less seems to help keep the fabric from wrinkling and crawling when I’m quilting layers with batting. You might want to experiment with that too so that you can find what your quilt sandwich likes best. (This applies to straight stitching, not contour stitching for which you would need to swivel the fabric while the needle is engaged. For that method, you’d need a presser foot height setting high enough to allow you to swivel the fabric easily. I’ll write about that method soon!)
The Baby Lock Sashiko machine comes with a quilting guide. It looks like a weird hockey stick with a handle. This little attachment is really easy to use and makes it possible to create even rows of quilting. Check your machine’s manual to find out how to attach this guide should you wish to use one for this project. Make sure it’s firmly attached. I like to quilt my rows 1” apart.
The first row of stitching should be placed ON one marked line. Sew from one end to the other on top of the marked line. Then go back to the beginning and align the business end of the quilting guide with the line of quilting you just stitched. Allow the guide to “ride” along the stitching line. It should not press into the fabric, just rest on the fabric so that it can glide easily along. Now – this is the hard part for me – watch the QUILTING GUIDE and not your needle as you sew the next row of stitching. Yeah, I know. That can be a challenge because our eyes are automatically drawn to that needle! But keep your eye on the guide. That will allow you to keep your rows straight and even.
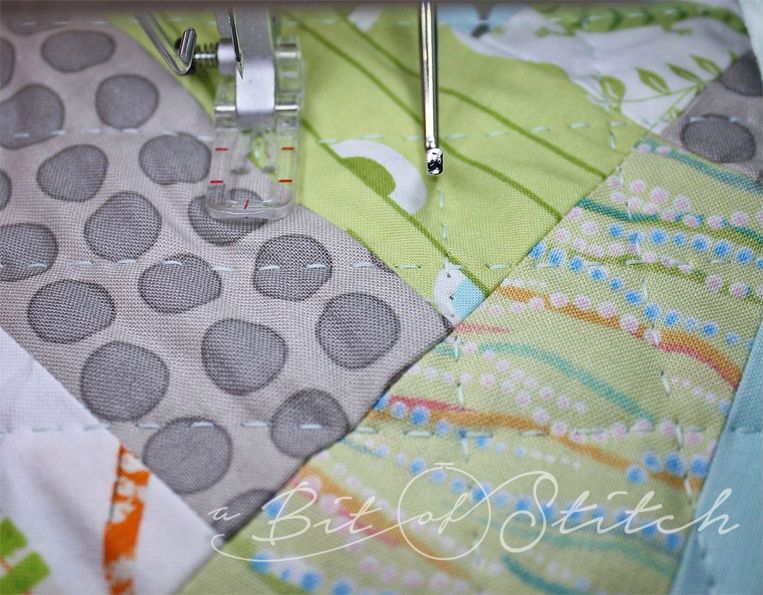
If you are a new Sashiko machine user, you need to know that you should always BEGIN and END stitching on the fabric. Do not stitch on air. Don’t forget to catch, clip and hold the thread in the thread cutter at the end of each row of stitching.
If you run out of thread or break the thread in the middle of a row, re-thread your bobbin and begin by aligning the needle hole in the presser foot with the exact spot the next stitch should begin. (You need to get your nose down there so you can see that!)
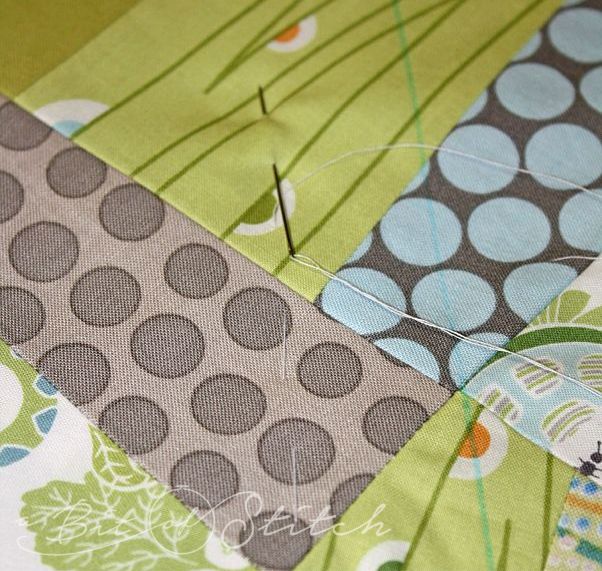
After you have finished that row, stop and secure the thread tails on the wrong side. You can simply knot them together and clip the tails short. But for a nice neat, clean finish, thread them into a hand sewing needle, take a couple of tiny stitches in place, and then hide the tails between the layers. Do this every time you have to stop and start in the middle of a line of stitching and your quilt back will be pretty and neat when you are finished quilting! Plus you’ll prevent stitching over those thread tails too. Don’t worry about the thread tails at the ends of the rows. You will be trimming those off when you even up the quilt edges and they will be secured and covered in the bias binding.
Once you have quilted the entire quilt one way, use the other marked line to begin quilting the other way, if that’s your game plan.
Isn’t that pretty?
Evy
15 replies on “Sashiko Quilting Tips”
Thanks for the tutorial!
The Sashiko adjustments worked for me and Sassy is my friend again!
So glad! 🙂
I'm going to get one of these Sassy girls one day!
Evy, do you find that the stitch on the back when done with the Sassy girl is durable? Does it look ok?
Hugs,
Gina
Thank you so much for the tutorial. I want to use this on my first jelly roll quilt I've made.
I really appreciate the settings recommendations.
Thanks for your instructions on how to make the quilt, awesome.
You’re welcome! We’re so glad you found the blog post useful!
I enjoy your you tube video on Sassy and what it can do. I have had my machine for years before there were any videos. So I love seeing what you are doing with it. I have a question: Can you tell what Serger attachments go on Sassy? And what do these attachments help Sassy do. I own several Baby Lock machines including the new Solaris. I also I have had my scanNcut for years. I am a quilter and a fabric collector. So I am really interested in getting all of these machines to play together and do new things. I am looking forward to your reply.
Thank you for your comment! I also am a fan of getting all of my machines to play nicely with each other. It’s so fun to see what they can do in harmony! There are three Baby Lock serger attachments that I love to use the most with my Sashiko: Double Fold Bias Binder 28MM (BLE8-S3) and 36MM (BLE8-S2) and the Belt Loop Binder 1.5″ (BLE8-S11). The Single Downturn Feller works nicely too, but you do need to remember than unless your fabric is non-raveling or has a finished edge, the folded under edge will be raw. As for the belt loop binder, there is only a single needle on the Sashiko, so I flip the tube around in order and re-enter it in the binder which lets me sew another row of stitching down the other side, making it a double row. Feel free to email us via the website contact link – Rach will forward it to me and I’ll be happy to help you if I can with your Sashiko adventures!
Hi Evy, thank you for all this great information on the Baby Lock Shishiko machine! I really really want one! But before I jump, I’ve read a few reviews that say the stitching on the back of a Shishiko machine-quilted quilt is a chain stitch. I wonder if you could post a picture of what a quilt back looks like after quilting on this machine? And I will appreciate your thought on this. TY!
I’m glad you found this post helpful! As for the stitching on the back of a Sashiko quilted project, it just looks like straight stitching – like you would see on the back of a project made with regular machine sewing. If you would still like to see a photo, let me know and I’ll try to email you one. 😊
Your Sashiko videos have been very helpful! You explain things very clearly!
Any tips on making circles all over a quilt ? How do I meet the ends so that they don’t overlap but end perfectly spaced? Thank you!!
Thank you for your kind comments! The best I can tell you for making a circle meet evenly with the stitch/space ratio the same where it meets is to stitch out a few test circles on a scrap of your project fabric, stabilized or sandwiched as your project will be. Experiment with different stitch/space lengths until you get it to meet correctly. You may need to adjust the size of your circle a bit, but it should work with a bit of patience. Good luck!
Hi there! Thanks for your videos. I just received my Sashiko 2 today and want to use it almost exclusively for quilting (three layers). Can you tell me if I need a walking foot for that? I understand there is a quilting guide but want to be sure everything feeds through smoothly. Thanhs!!
Congratulations! I know you are going to enjoy your Sashiko machine! Hopefully you also received Baby Lock’s “Sashiko Inspirational Guide” book. That book happens to include my own Sashiko Techniques book within it and will explain to you exactly what the settings on the machine do. The only foot that comes with the machine is the one attached; however, you can adjust the height and pressure of the presser foot to act like a walking foot. The top dial on the machine is the presser foot pressure. A lower number eases the pressure of the foot. This keeps the foot from plowing through multiple layers of fabric. The dial on the left of the machine is the presser foot height. A higher number will raise the height of the foot. You’ll have to experiment with those two settings until it works for the fabric combo you are working with. There’s a lot of helpful info on Baby lock’s website in their “SEWED” classes section, so be sure to check that out. If you search for “Evy Hawkins” in the search bar, it will bring up all my classes that I’ve done for BL. Hope you have fun!