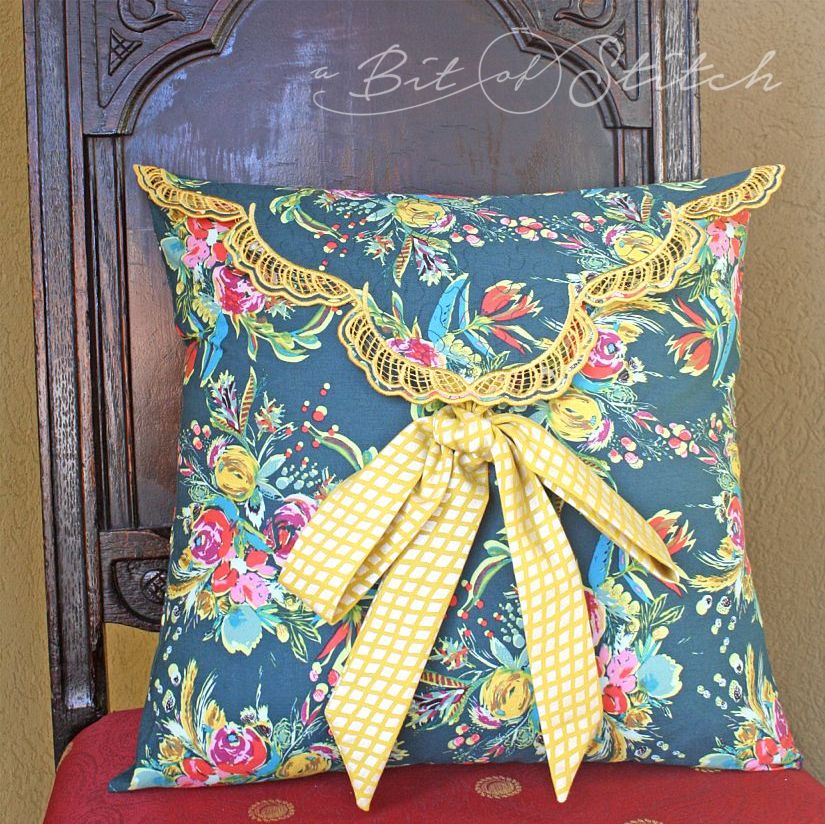
I love cutwork, don’t you? Especially when my embroidery machine is doing most of the work! Here’s a fun project if you’d like to follow along – let’s make a winged pillow!
I used my new “Winged” cutwork designs for the flap on this pretty pillow. Click HERE to see that set. However, you could use any suitable border cut work designs that you may have on hand. Here’s what you will need to make a pillow cover for a 15” pillow form:
- 31” x 17” quilt-weight cotton for the pocket portion (where the pillow is inserted)
- 18” x 18” quilt-weight cotton for the flap
- 18” x 18” quilt-weight cotton for the flap lining (use same fabric or a contrasting print)
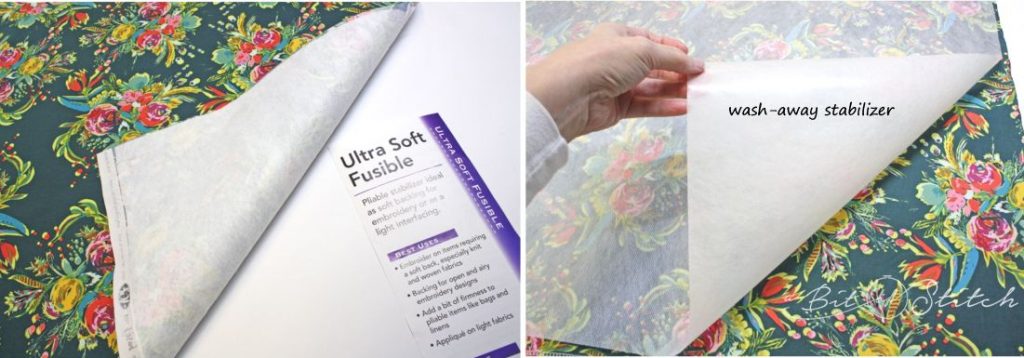
- Baby Lock’s Ultra Soft Fusible or Evy’s Soft Loft Fusible stabilizer (enough to cover the wrong side of the flap fabric)
- Wash-away stabilizer (Vilene, fabric type, either sticky or non-sticky)
- Border embroidery designs (with corner design)
- Embroidery thread
- Sewing thread
- 15″ pillow form
Don’t you love it when you find just the right fabric for the project you want to make hiding in your stash? This pretty “Joie De Vivre” print from Art Gallery Fabrics by Bari J was exactly what these designs needed! However, because this fabric is only quilt-weight rather than the heavier fabric that these designs are intended for (such as wool, canvas, or home décor weight), I needed to add something to give the fabric extra sturdiness. Baby Lock’s Ultra Soft Fusible worked perfectly!
Let’s get started!
Back one 18” x 18” piece of quilt-weight fabric (the one that will become the right side of the flap) with a layer of Ultra Soft Fusible. Take your time fusing it so that it is well adhered. Please note: the flap fabric needs to be sized so that the pointed flap design layout will easily fit within.
Back the other 18” x 18” piece of fabric (the one that will become the flap lining) with one layer of wash-away stabilizer placed on the RIGHT side of this fabric piece. Two notes! If you use a heavier fabric such as wool, canvas, or home décor linen, you won’t need to add the Ultra Soft Fusible; just back the fabric with the wash-away stabilizer. If you wish to use a sticky stabilizer, go for it. Just bear in mind that sometimes sticky stabilizers can cause more thread breakage as the needle tends to get gummy during stitching.
Now lay the flap lining fabric wrong side up (wash-away stabilizer underneath) on your work surface, and place the Ultra Soft Fusible backed flap fabric right side up on top of it.
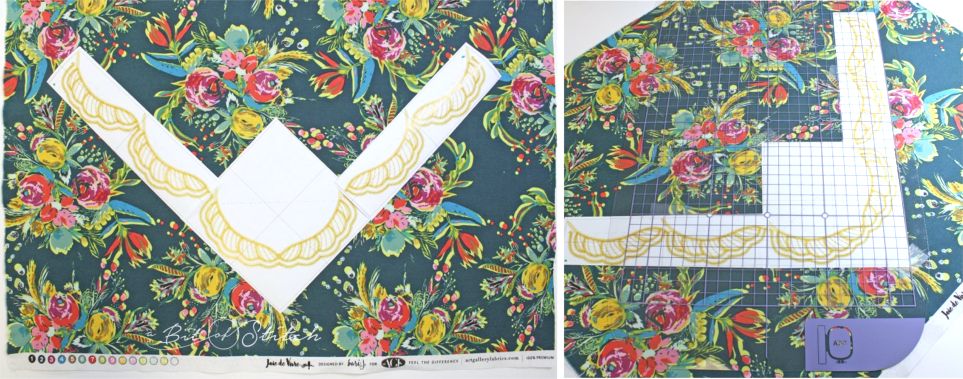
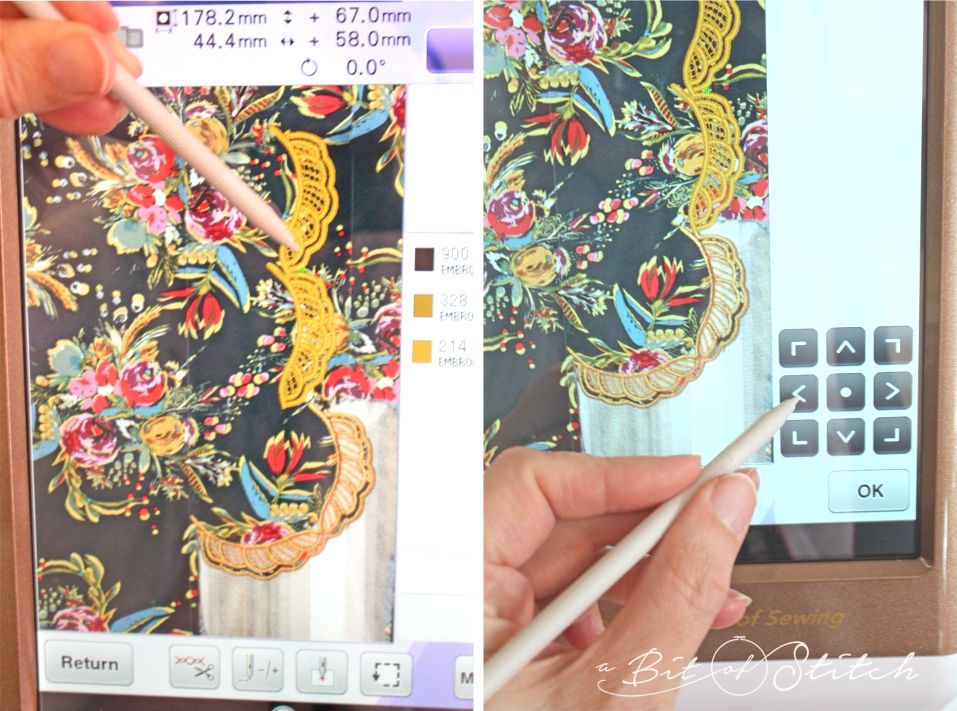
Print paper templates of all the designs you will need for your design layout. Audition them on the flap fabric sandwich. Use either a light coat of temporary spray adhesive or cellophane tape to hold them in position while you work. By placing your hoop’s clear plastic grid on top of your design template layout, you can tell how many designs in your layout will fit in the chosen hoop. For instance, I can tell in the photo above on the right that my corner design and one 5×7 border design will fit in my Destiny’s 9.5” x 14” hoop.

Loosen your hoop screw generously and hoop the fabric sandwich, using the hoop grid to correctly align the design you will stitch first. Make sure the designs fit within the stitching field, which is noted by the grid marks on the hoop grid. Tighten the hoop screw a bit, and then remove the grid and all templates except for the first one you will stitch. I started with the corner design as I find it easiest to align border designs by working first one way and then the other.
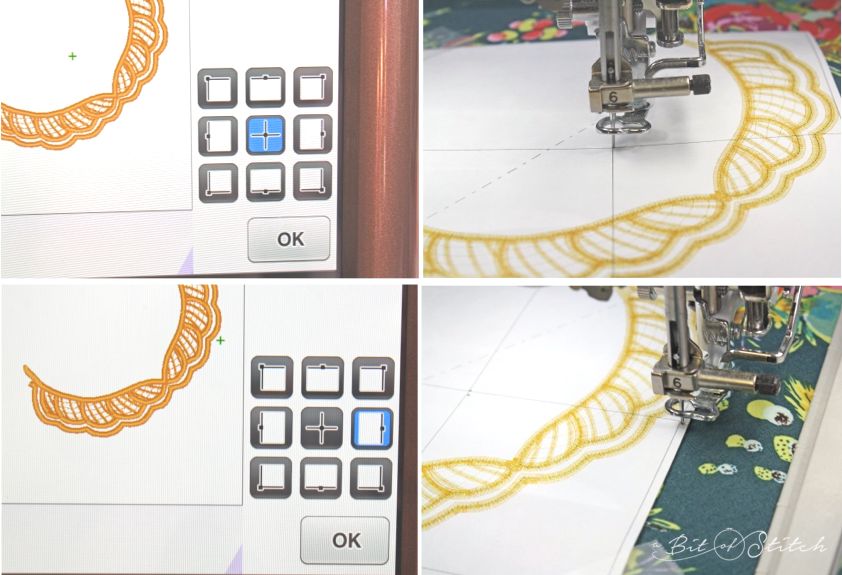
Baby Lock Destiny owners – you can use your on-board camera to scan the fabric/template in the hoop and then align the design with the photo on your machine screen! Just grab the design right on your screen and drag it in place or use the “move” tool in the edit box. Use a bigger hoop than you need so you’ll have plenty of move room. Otherwise (non-camera users), use your move tool to locate the design correctly and check your placement by using your machine’s on-board design perimeter finding tool. Just click on the center location, drop the needle to be sure it ends up in the center, and then check the north, south, east and west points. Dropping the needle (unthreaded) into those points will show you if the design is correctly positioned. If not, you can adjust and check again.
Follow the design instructions to stitch out the first design. You will want to use the same color and type of thread in the top and bobbin.
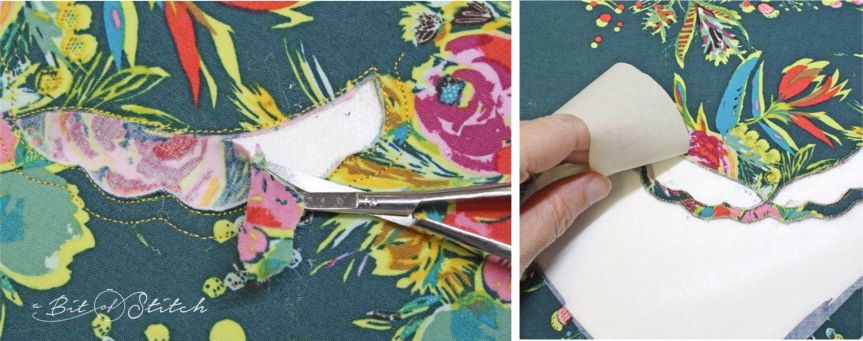
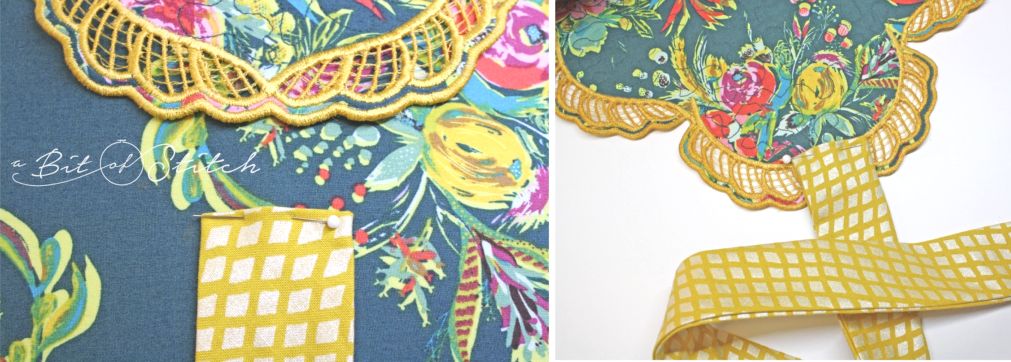
I found it much easier to trim away the top Ultra Soft backed layer first and then trim away the lining layer. It’s a bit of a challenge NOT to cut into the stabilizer, but if you use little scissors with short, curved blades you can do it. (Click HERE to find the “snips” I love to use!) If you accidentally cut into the stabilizer it’s okay. You can patch it with a bit of extra stabilizer stuck to the back. Use cellophane packing tape or masking tape to clean up the fuzz so you can see how well you are trimming. Like most cutwork designs, these designs require you to cut very, very close to the stitching!
Baby Lock Destiny owners – this is where you machine will shine! The next border placement will be a snap because you can scan the fabric in the hoop and drag or move the next design easily into place perfectly. I LOVE THIS FEATURE!!!! Makes borders so easy! 🙂
Otherwise, follow the same steps as before using the printed design template for the next design to be stitched and your machine’s on-board design perimeter tool to correctly place the design. Finish stitching the border on the pillow flap, and then follow the manufacturer’s instructions for removing the wash-away stabilizer. (I like to rough cut away as much of the stabilizer as I can and then give the fabric two long soaks followed by one last short soak in water that has a tiny bit of detergent in it – sometimes a drop of fabric softener too. Then I give it a quick rinse, squeeze it in a towel, and hang to dry.)
Once the flap fabric is dry, you are ready to construct the pillow. For a 15” pillow form you will need a piece of fabric cut about 17” wide and 31” long. My finished design ended up being exactly 15” across from side to side at the top. If your design is different, you may need a different sized pillow; make sure to adjust the measurements accordingly. You’ll just need one piece of fabric big enough to wrap around the pillow with at least ½” seam allowance at both short ends.
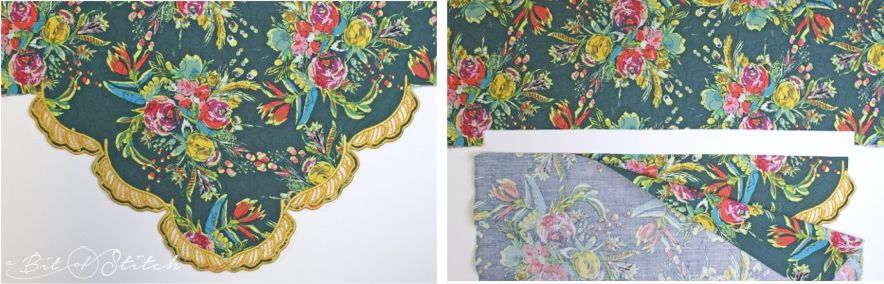
Cut away the excess flap fabric above the border design, leaving at least ½” for the seam at the top of the pillow. The pillow pocket part needs to adequately cover the flap from side to side, as shown above on the right.
Sew a quarter inch hem on one short end of the pocket fabric.
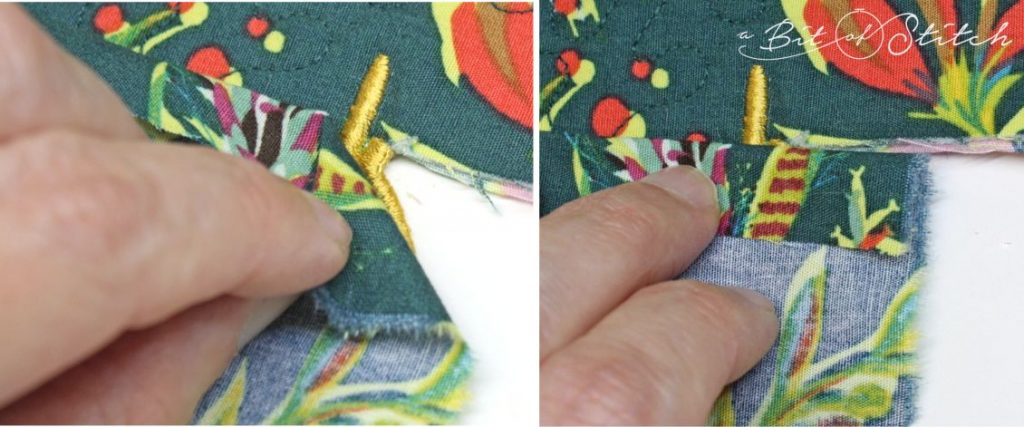
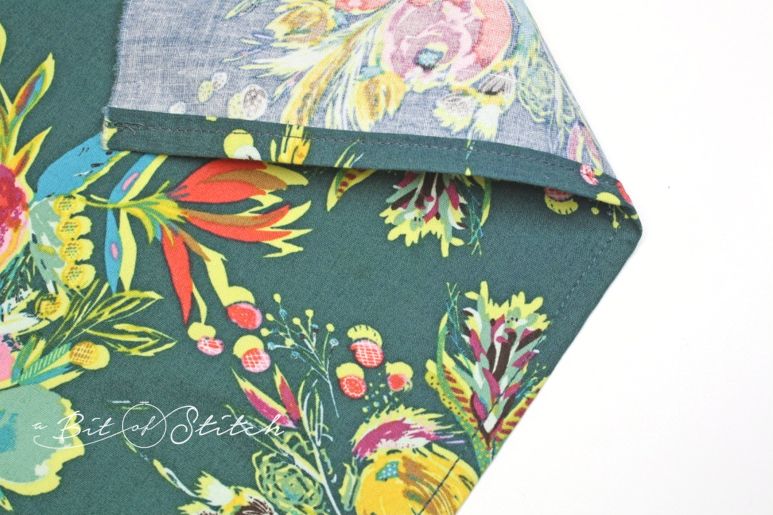
You will need to sew your pocket fabric (the un-hemmed end) to the flap, but before you do, check where this seam needs to go according to the finished edge of your embroidered border. As you can see in the photos above, I needed my seam to sew across a tiny bit of the finished border – the ends of the feathers – so I made sure that’s where my seam would go before I began sewing.
Just to be neat and pretty I decided to make a French seam. To do so, place the flap fabric and pocket fabric WRONG sides together and sew with a ¼” seam allowance. Trim that seam allowance a bit (to about 1/8”) and press. Then fold the fabrics right sides together and sew again ¼” away from the first seam, enclosing the selvages. You can see in the photo below on the right that the finished edge is very neat and clean!
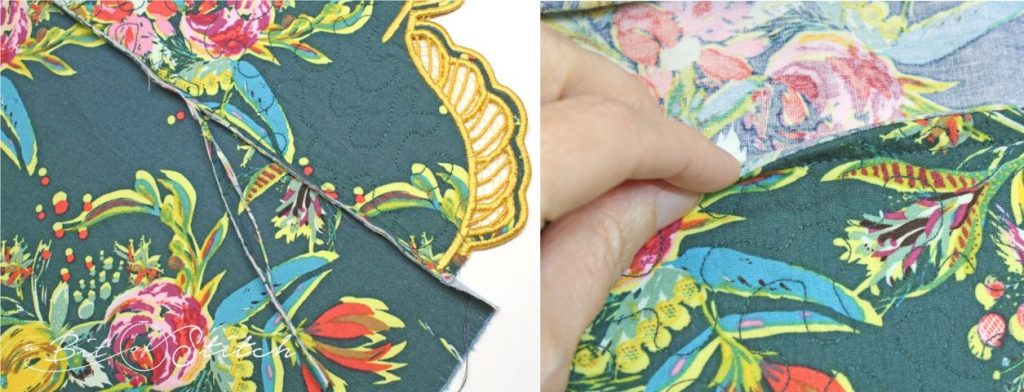
Now it’s time to fold the hemmed end of the pocket fabric up and over the wrong side of the flap and sew up the pocket side seams.
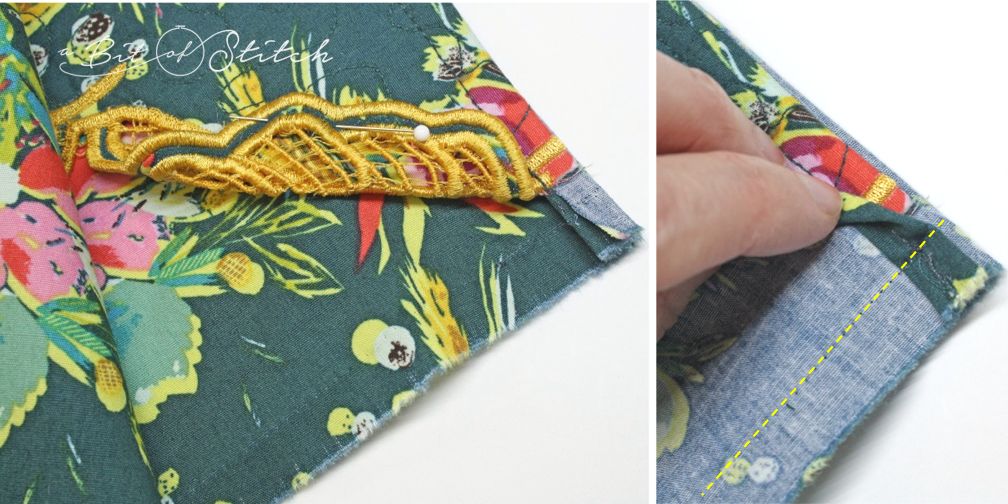
If you have used border designs that may extend into the seam allowance area as my feather borders did, make sure you push that part out of the way and secure before you stitch the side seam (see photo above on the left).
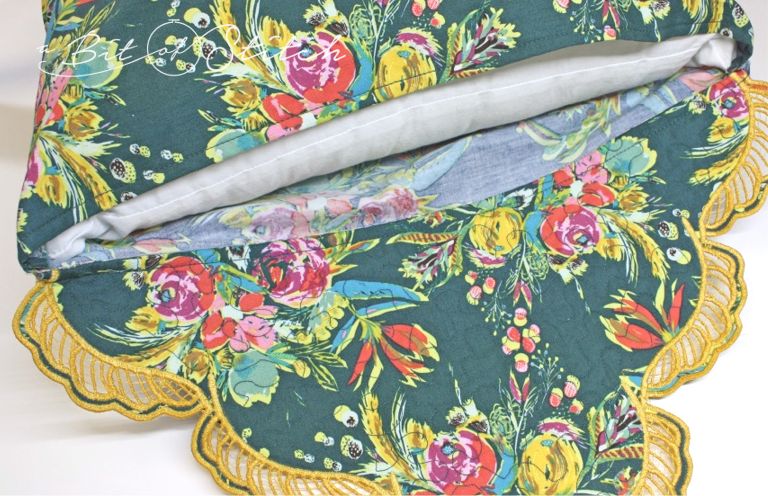
Finish the side seams as desired; you may wish to serge or zigzag stitch the selvages to make them tidy. Turn the pocket portion right side out. Insert the pillow form and pull the flap down over the front. If you wish to add a bow, audition the placement of it. I found that it was necessary to sew one part of the bow about 1” below where the point of the flap rested in order to make the flap lie nicely when the bow was tied. If you are using ribbon or a narrower tie, you may not need to sew it that far down.
Sew the bow pieces – ribbon or fabric ties – to the pillow. One piece needs to go on the pillow pocket front part. You can hand or machine sew that piece in place. The other half needs to be attached as close to the tip of the flap (on the wrong side) as you can get it. That piece will probably look best hand sewn in place.
I made my ties 1.5” wide by sewing 3.5” bias cut strips of fabric into casings with a ¼” seam allowance, pointed at one end and about 22” long. I used Robert Kaufmann’s “go create and Shimmer” fabric by Jennifer Sampou in gold. It exactly matched my embroidery thread color! Satin ribbon ties would be lovely too.
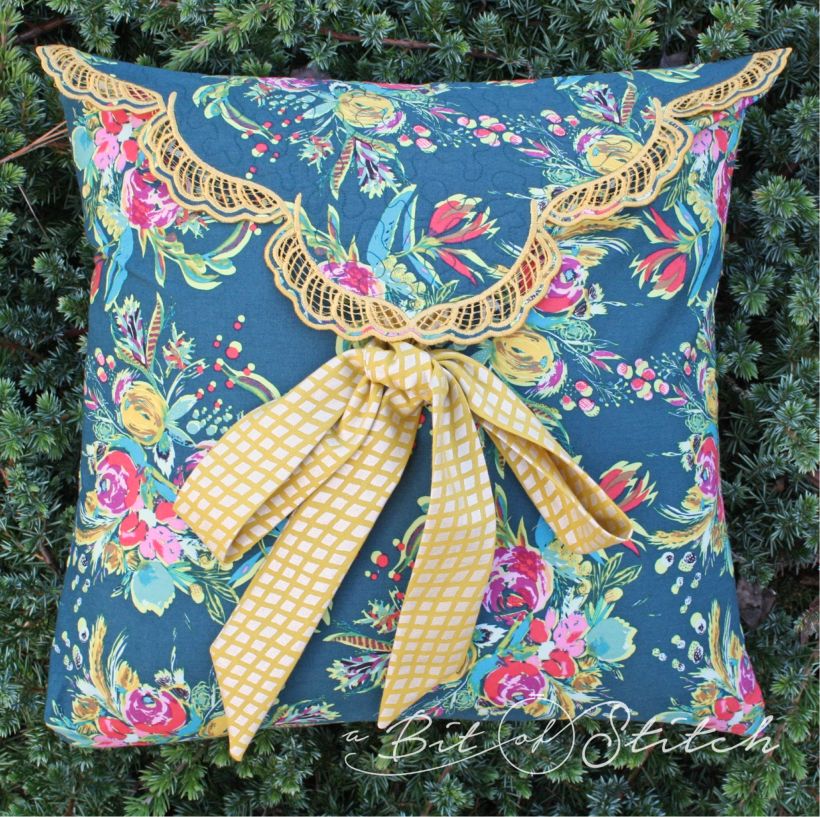
Tie up your pretty winged pillow and show it off!
Thanks for reading! I hope you enjoyed this project!
Evy