
Did you know your embroidery machine can “sew” in the hoop? Yep. Not only does your machine do lovely embroidery, but it also can SEW things together for you – right in the hoop! (Now if it would just do my ironing too, ha!)
This is a fun, calorie free, sugarless Valentine treat, and it’s for YOU. Make a sweetheart sachet with me right now!
You will need:
- The bonus heart design included in THIS design set (or any simple heart outline design that you may have)
- Approximately 16 x 8″of quilt weight cotton, linen, or other nice fabric
- 10” or so of satin ribbon (silk ribbon is nice!) ½” wide or less
- Fabric type wash-away stabilizer (optional see below)
- Embroidery thread to match fabric or to contrast (you can even use good polyester quilting thread or Madeira’s Cotona cotton quilting thread – they have variegated colors!)
- Regular sewing thread in a color that matches the fabric
Load the design into your machine. (The design shown measures 3.82” x 3.15” and fits into most 4×4 hoops. Please note that these instructions follow the stitch sequence pertaining to that design. If you are using a different design, your steps may be different from time to time.)
Cut a piece of project fabric big enough to fit in the hoop. Cut a piece of wash-away stabilizer the same size. Layer the fabric over the stabilizer right side up and hoop both together. (This design is lightly digitized and has no little parts that need to line up so you do not have to worry about adhering the stabilizer to your project fabric.) Remember, when using wash-away stabilizer you need to make sure you begin with pre-shrunk fabric.
OPTIONS – Isn’t it nice to have them! Okay, if you’re a bit like me you might not want to wait till your project fabric dries out from soaking away the wash-away stabilizer. I actually used a piece of cotton organdy to stabilizer my soft pink linen. You can also use sheer cut-away stabilizer or silk organza as a stabilizer. Just remember that you will need to trim away the excess whatever you used as stabilizer from around the lace part of the heart before you cut out the heart. When you do that trim as CLOSE as you can to the seam stitching line – just don’t cut into the stitching line. That being said let’s carry on.
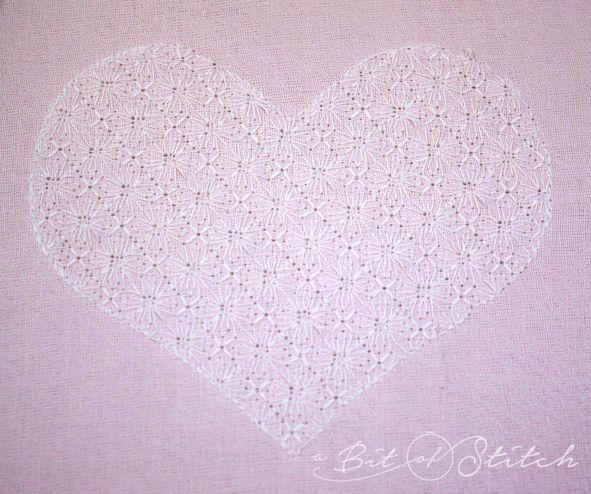
Choose your thread for the lace inside the heart shape. You might like to use quilting thread or regular sewing thread (non-shiny) instead of traditional embroidery thread (shiny.) This makes a really sweet old fashioned looking sachet. Then again, you might like that shiny look. Especially if you plan to add sparkly bits later! Keep in mind that some machines need the same weight and type of thread in the bobbin when using any thread other than embroidery thread in the top. You might want to do a test stitch on a scrap of fabric to see what your machine prefers – bobbin weight or the same weight.
Sew the first stitch sequence.
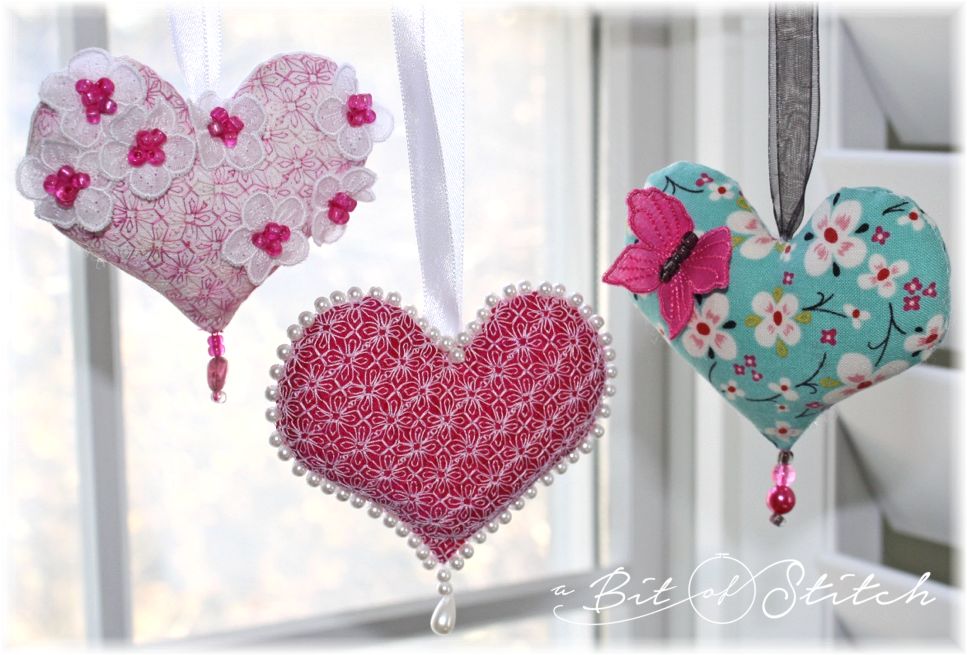
MORE OPTIONS! If you don’t want the lace stitching – for instance you might have some pretty fabric you can’t bear to cover up with the lacy part – just skip forward in the design to the second stitch sequence. Allow it to sew around the heart shape once, stop the machine and cut the thread. Then follow the rest of the instructions to finish, going back to the beginning of the second stitch sequence when you attach the fabric blocks to the heart. That’s what I did for the heart below. That tiny print was just too pretty to cover up and it made an awesome background for my wee butterfly!

Change the thread to regular sewing thread in the top and bobbin in a color that matches the fabric. Don’t remove the fabric from the hoop yet. You’ve still got stuff to do, just set it aside for the moment.
Cut two blocks of project fabric approximately 5” x 4.5” each. Press under ½” on one side of each block along the 5” side.
Place the blocks wrong side up over the lace heart aligning the folded edges with each other in the center of the heart. Use cellophane tape to secure the folded edges in place. Make sure the tape fully covers the areas the machine foot will travel. That means, the top and bottom points. You don’t want the machine foot to catch on the folded fabric as it passes over them. I drew the heart shape on the photo below so you could see what I mean.
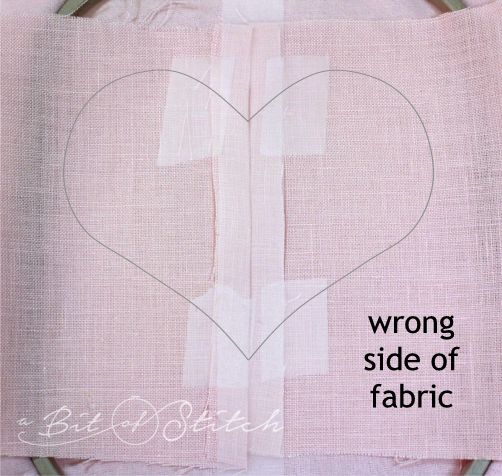
Use Scotch brand “Magic Tape” for best results. This tape tears cleanly when perforated and will not gum up your needle.
Sew the final stitch sequence. This is the seam that sews the layers together and it stitches twice around the heart shaped lace.
Remove the tape. Remove the fabric from the hoop. Soak away the wash away stabilizer if you used that and allow it to dry fully. If you used something else to stabilize the fabric trim away the excess as close as possible to the heart shaped outline. Press and then cut out the heart leaving a ¼” selvage past the heart stitching line.

Clip the curves generously, remove a bit of fabric from the point and turn the heart right side out. Slip stitch the opening closed approximately half way up from the bottom point of the heart. (Getting started is a little tricky. If you can’t get the bottom point to meet properly don’t stress. Just sew a bead on it later, heh.) Secure the thread but don’t cut it off yet. Let your needle dangle and keep an eye on it so it won’t poke you.

Stuff the heart with fiberfill stuffing and add a bit of pretty smelling lavender or other scented bits as you stuff. (Find bulk lavender, perfect for this and other sachet projects at All About Blanks!)
Cut approximately 10” of ribbon; fold it in half and knot the ends together. Tuck the knot into the top of the heart at the inner “V” point. Finish sewing up the opening, enclosing the knotted ends of the ribbon inside the heart.

Now it’s time to add pretties! Buttons, beads, other dimensional embroidery bits – whatever your heart desires! The hearts on the left and bottom above were made using these same instructions and designs from my Valentine Lace collection. The heart on the very bottom has a hand stitched French knot border around it and a little silk flower made in the hoop with a design from my Summer Blooms set.
The hearts at the top of this post are decorated with 3D flowers and butterfly wings from my Sweet Stems collection. All made in the hoop too!
Happy Valentine’s Day! I hope you enjoyed this project 🙂
Evy
P.S. Isn’t that letter box (3rd photo from the top) awesome? It was decorated by my talented youngest daughter, sweet thing!
6 replies on “Heart Sachet”
Hello, Thank you for the pattern..and the tutorial…I do not have a machine,,but I love to see your work…And you have a very talented paint can foot propped daughter…..
Thank YOU RosieGma, for your sweet note 🙂
Thank you for the pattern. I love your style, your color choices, and the way all you put out into the world feels like warm sunshine to me. Thank you for all the wonderful inspiration.
Thank YOU Betty for such a sweet comment 🙂 You've made my day!
Your hearts are beautiful! So delicate… I would love to see more photos of the letter box and perhaps instructions on how she made it. Talent must run in your family!
Thank you for your kind words! I'll pass that compliment along to my sweet daughter, hopefully she will get her own blog going again – that letter box would make a great blog project 🙂