Let’s make a continuous border using that super-cool Connect Tool feature on your Baby Lock Destiny II. It’s so easy!
Easier than catching a toddler, that’s for sure! Hopefully you have already had a chance to watch me demo this project in video. If not, you can find that HERE.
This is what you will need to follow along and make a border of your own:
Find the border designs I used HERE. You can use any suitable border designs. (Sorry, the free download has expired, but sign up for email notices of new blog posts so you won’t miss the next free offers!)
Print out the PDF design templates.
You will need Baby Lock Dissolve-Away Mesh (self-adhesive or non) or another brand of wash-away fabric type stabilizer.
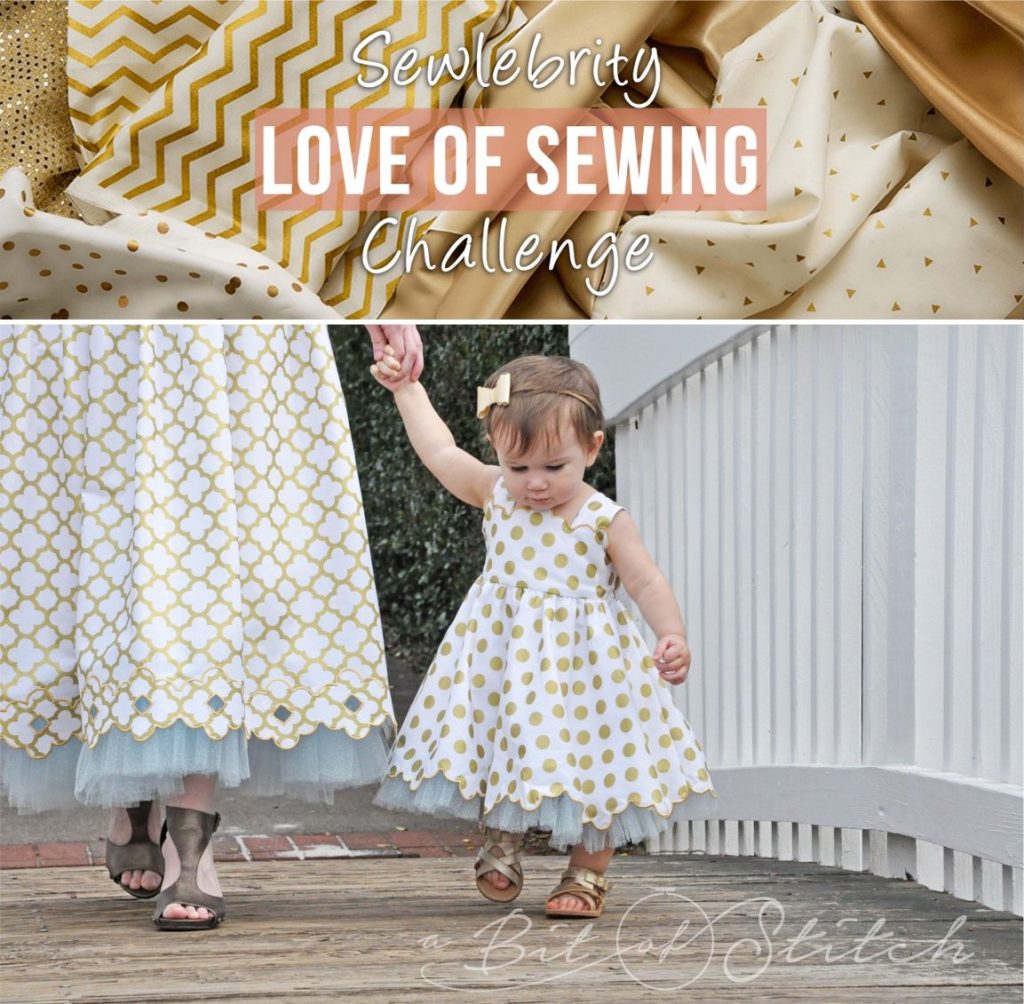
Choose your fabric. For this project, I used Riley Blake Designs Sparkle Cotton Gold Medium Dot and Sparkle Cotton Gold Quatrefoil.
Find an embroidery thread in a color of your choice for the border. I used Sulky’s Rayon #942-1070 which matches the gold on this pretty fabric very nicely. (Just so you know, most rayon embroidery threads work best with non-sticky wash-away stabilizers.) Wind several bobbins with the same embroidery thread.
Then locate the positioning stickers that came with the instruction manuals for your machine. (They look like crazy 8 targets; you should have several sheets.)
I highly recommend that you start with pre-shrunk fabric. So, go get that accomplished! Load the design and thread the machine with the same color and type of thread in the top and bobbin.
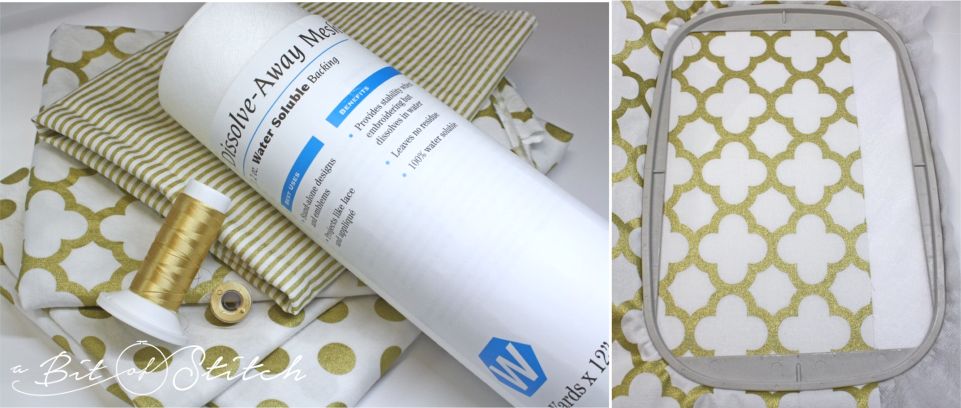
Hoop your fabric on top of two layers of wash-away stabilizer. Make sure you have enough room to work on one edge of the fabric. The design should load facing to the right, which means you will be working on the right raw edge of the fabric. I found it easiest to cut all the fabric pieces for my skirt, join all the seams except the center back, and finish (serge or zigzag) and press the seam allowances open. You may also find it helpful to cut a long piece of stabilizer to begin. As you work you will be moving down the stabilizer, adding extra as needed by overlapping the ends about 4”. Try to keep your border designs about the same distance away from the raw edge as you started with.
If this is the first border design you have tried, start with the 4×4 design and use your 5×7 hoop. That will give you room to maneuver and check your work; you’ll also see results quickly.
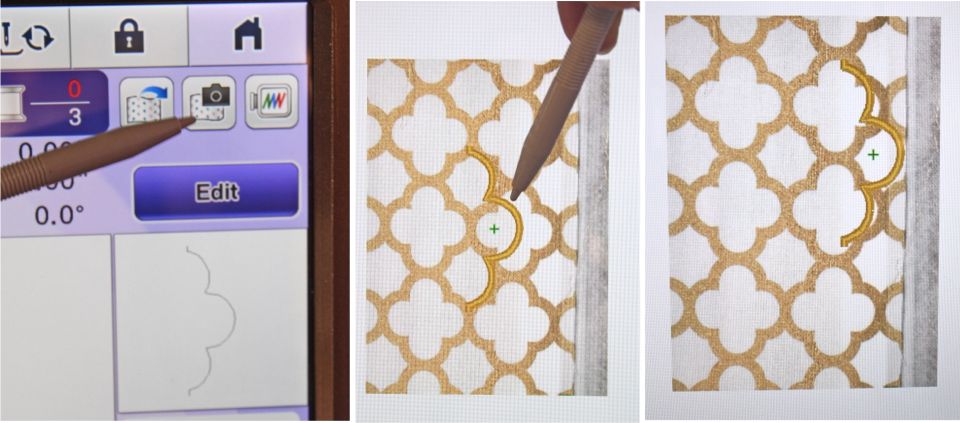
Take advantage of that extra set of eyeballs in your Destiny II by scanning the fabric in your hoop. You will be able to see EXACTLY where you need to place the first border design. You can scan either before or after you set the design; just press the little camera icon. Once the design is on screen, you can move it where you want by touching and dragging it with your stylus or using the on-board arrow keys. Place it approximately as shown in the photo above on the right. Make sure it is completely on the fabric, but still close to the raw edge.
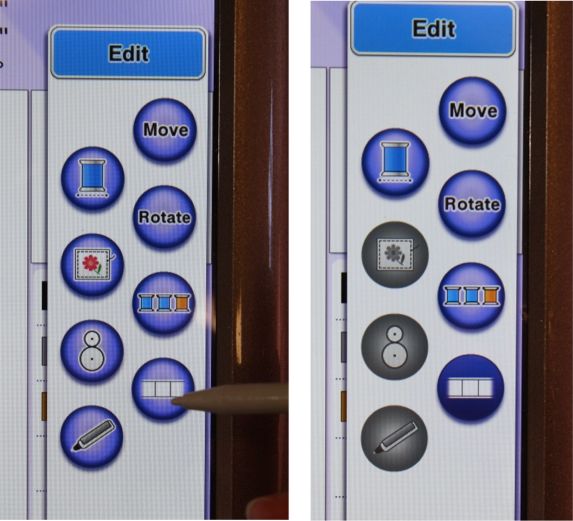
Next, press “Edit” and look for the Connect Tool – the little button on the lower right that looks like a film strip. Press that button and then press OK.
Sew the first stitch sequence of the design. This is the cutting line for the border. You will notice that it stitches twice; this helps keep the stitching intact as you trim when using this design on fine fabrics such as quilt weight cotton.
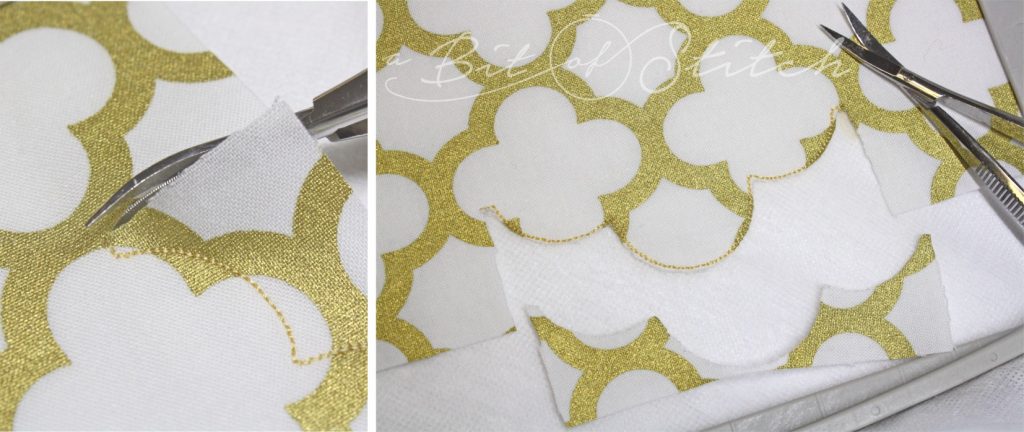
Remove the hoop from the machine and place it on a hard, flat surface. (Ahem, this is not your lap!) Remember to hold the hoop by the hoop – not by the fabric in the hoop – while you take the hoop in and out of your machine.
Make two straight cuts from the raw edge up to each end of the stitching line. Then use your little trimming scissors to cut away the excess fabric along the stitching line. Cut close, but don’t cut the stitches! (Click HERE to find the best trimming snips for this job.)
Put the hoop back in the machine and sew the next stitch sequence. This is a narrow zigzag underlay that helps to stabilize the edge of the fabric AND gives you a chance to check your trimming work. If you see any bits of fabric extending past this little zigzag line, you will want to trim them off. If your trimming looks good, go ahead and stitch the final sequence to finish the design.
Now, this is the magic part! This machine will use its great big brain, perfect vision, and the positioning stickers you will place to perfectly connect the next design. SO COOL.

Your Destiny II screen should say “Embroidery is finished. OK to connect next pattern?” Press OK. It will then tell you not to take the fabric out of the hoop and to press OK to select the next pattern. Press OK again. Now the machine will take you back to the home screen where you can go back into your saved designs and locate the same border again.
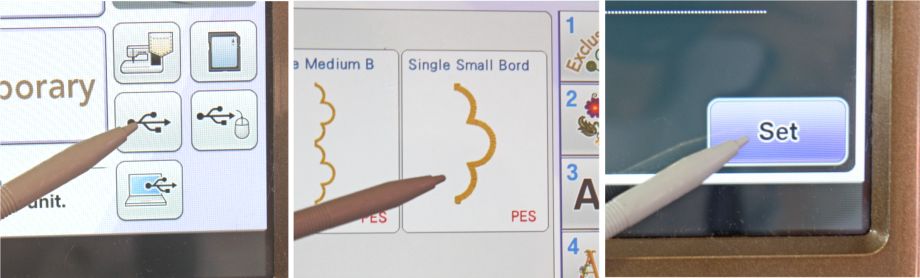
Choose that design and set it.
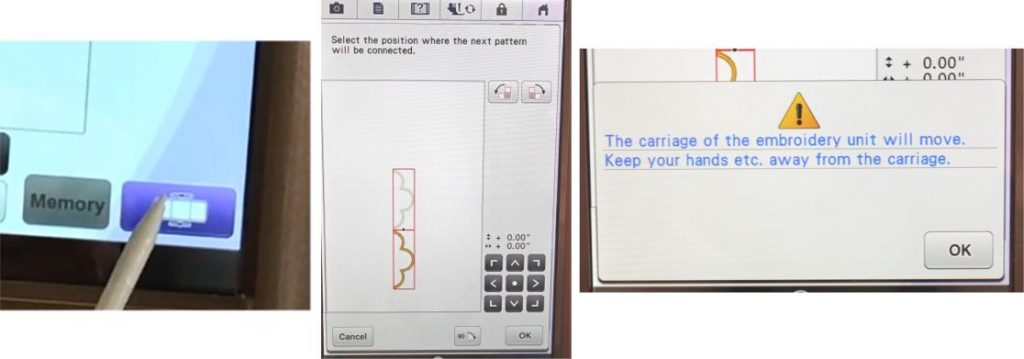
Before you go any further, be sure to press the CONNECT TOOL button at the lower right hand corner of the screen. Ta-Dah! Miss Destiny will automatically put the design next to the one you have already stitched. If you like where it is joined, press OK. If you want it to be somewhere else, use the tools provided on this screen or the arrow keys to move it where you want it to go. For this project, I wanted a long, continuous border, so I needed my designs to join end to end just as shown on the screen.
Once you press OK, the arm of the machine will move. Next you will get a screen that shows you the location for the first placement sticker.
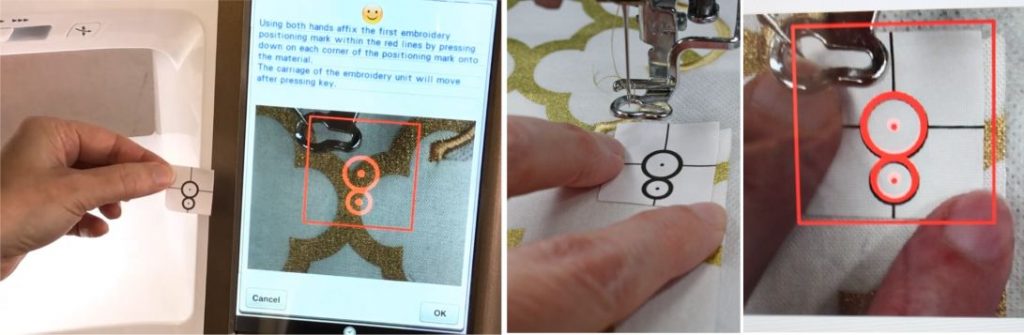
Place the sticker on the fabric in the hoop in the exact spot that is shown on the screen. Watch the screen rather than your fingers as you place this sticker. I found it helpful to use a pair of tweezers to hold the sticker while positioning. Once you have the first sticker in position, press OK. Follow along on the screen to place the second positioning sticker. Press OK.
NOTE: Depending on where your fabric is located in the hoop, your machine may have you place the stickers horizontally or vertically. Don’t worry – either way will work!
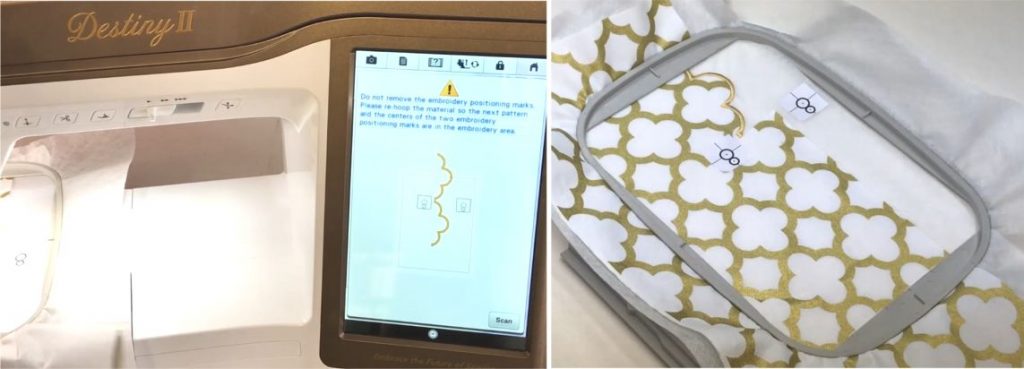
Your screen will now show you a picture of the two border designs connected with the positioning stickers in place. It will tell you that now it’s time to take the hoop out of the machine, take the fabric out of the hoop, and re-hoop the fabric. Take care not to disturb the stickers as you do so, and be sure to keep the positioning stickers within the stitching field when you re-hoop. I found this very easy to do by using the clear plastic hoop placement grid to locate the stitching field and make sure I was putting the stickers and the next design within it. (Use the printed paper template of the design to give you an idea of where it will stitch.)
Put the hoop back in the machine. Oooooooh, you don’t see a picture of what’s in the hoop anymore, do you? Well, I promise that Destiny knows exactly what she’s doing, but it is nice to see, isn’t it? So right now, before you go further, go ahead and press the camera button to take a picture of what’s in your hoop. Voila! Now you see that the two designs are connected EXACTLY how they should be. (If you watched Nancy’s Zieman’s Love of Sewing Challenge videos, you will know that you can press the zoom button on your screen and blow up that shot really big so you can check Miss Destiny’s work. That’s pretty neat!)
Stitch the next border design just as you did the first, and keep on going until you have completed as much border as you need. You can use the 6×10 hoop and the 5×7 border design to cover more ground faster. If I were creating a wider design I’d probably use the bigger hoops, but as this border is narrow, the 5×7 and 6×10 hoops work great and conserve stabilizer.
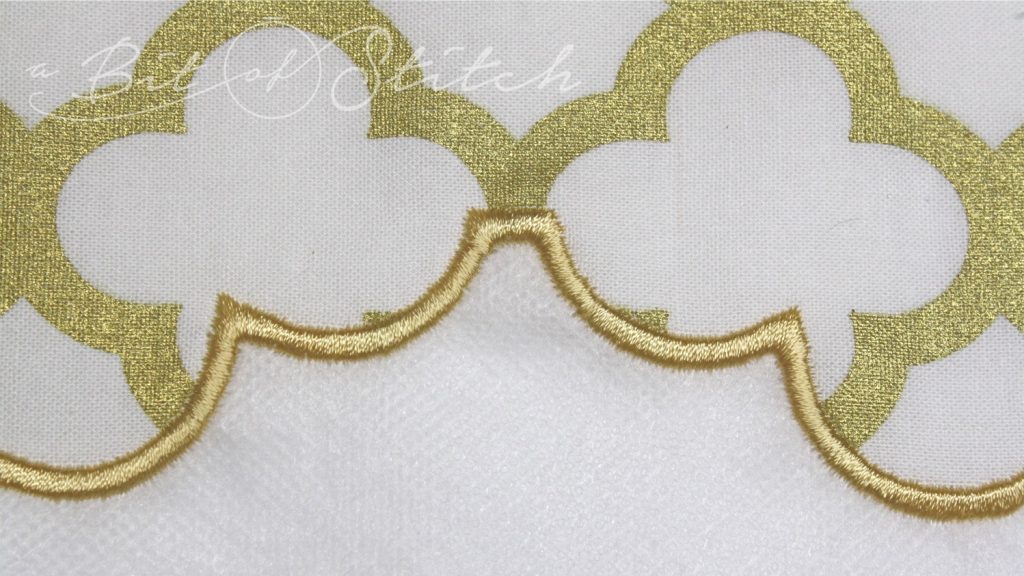
WOW. Look at the perfect joint! Let me tell you, I’m so blown away with Destiny’s connect feature that I may end up putting borders on everything! (Watch out, hubby, better hide your pants.) I had to see it to believe it, but her eyes really do see so much better than mine, and her brain gives mine a much-needed rest. 🙂
Baby Lock once again puts the LOVE into the Love of Sewing, because Miss Destiny takes the guesswork out of stitching and replaces it with fun!

Up next, a wee bit about the finishing touches for border embroideries and some out-takes – because I had way too much fun making these projects and you deserve some grins, right?
Thanks for reading!
Evy
(Part 3 of the Baby Lock Love of Sewing Challenge is up next – read it HERE!)
Click HERE to see the entire Scallop Cutwork Borders collection by A Bit of Stitch!
9 replies on “Baby Lock Love of Sewing Challenge Part 2”
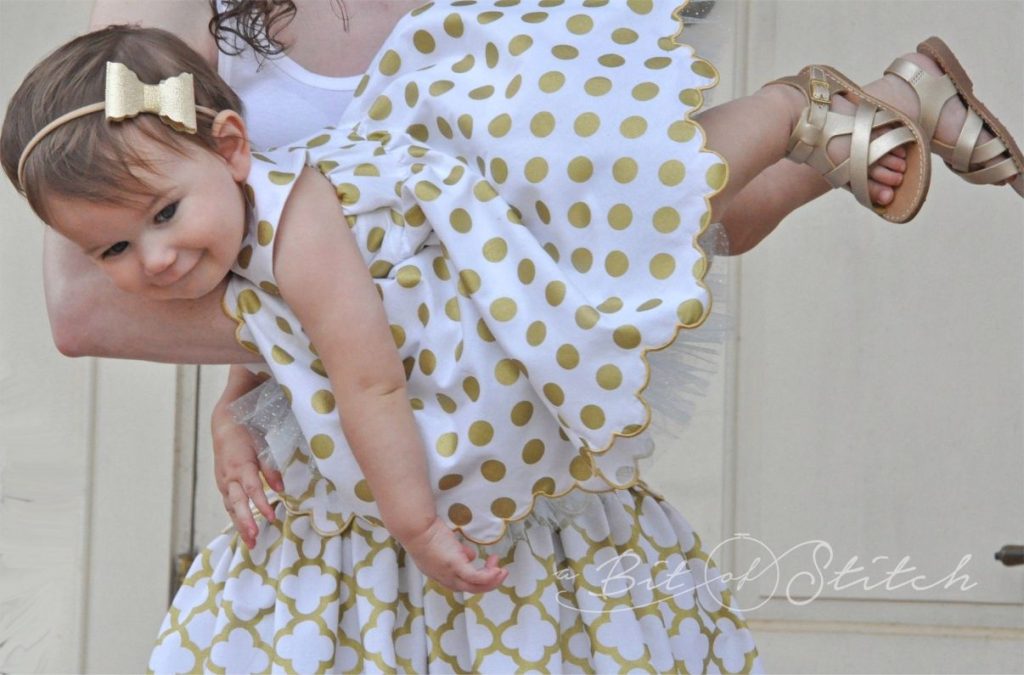
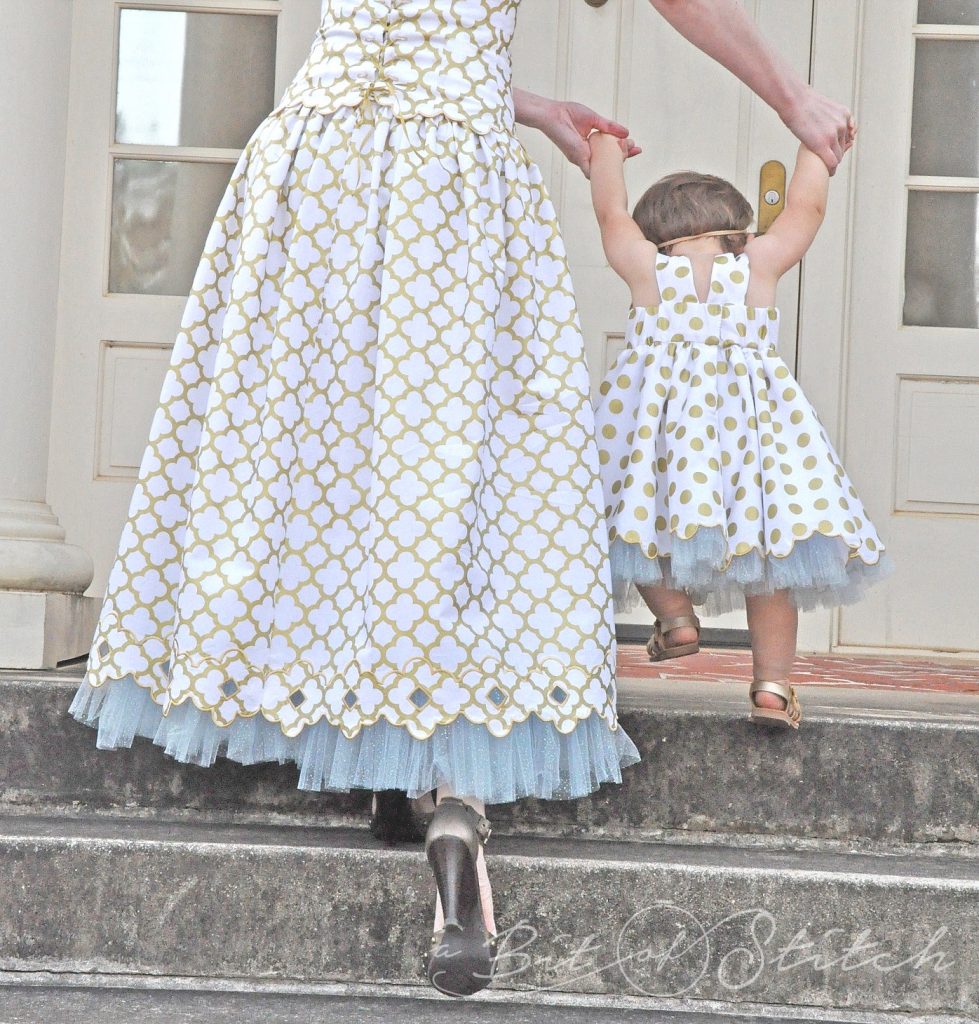
I love the mother or adult and daughter hems….the heels give he adult away. Beautiful dresses
Oh Evy. Darling idea with super instructions. Cannot wait to try this technique!! Glenda in Glen Rose TX
Evy oh how you make me wish my grandgirls were not quite so grown up. I will find someone to make this for!
Hi Evy.
Missed you on your way through Jax. ��
I'm enjoying your blog posts…you make this look and sound so easy. I know, however, that I would benefit much more from a private tutoring session!! XO from the Byrd House
Evy, I just love the look of this border and it would be so cute on my 18 month old granddaughter. I do not own the Destiny II, but I do have an Aventura and a Alliance. With extra work and care, could this border be done on either of my machines? Thank you so much for the time and expertise that you put into your blog. You have been very helpful to me, as to many others I'm sure.
Yes, you sure can! Read the "Borderline Crazy" blog post (you can find the link to it on the right hand side of this page up in the list of posts) and also the "Wing it" blog post. Those should give you some ideas of how to align the borders using printed design templates, your hoop grid and the design perimeter tool on your machine to properly align borders. That's how I did it before Miss Destiny came to live with me!
Evy, are you going to sell these dress patterns?
Those dresses are just lovely! And that is one seriously amazing machine!
That would be smart, wouldn't it 🙂 I might get around to doing Baby Kate's dress pattern, because I want to make it again too!