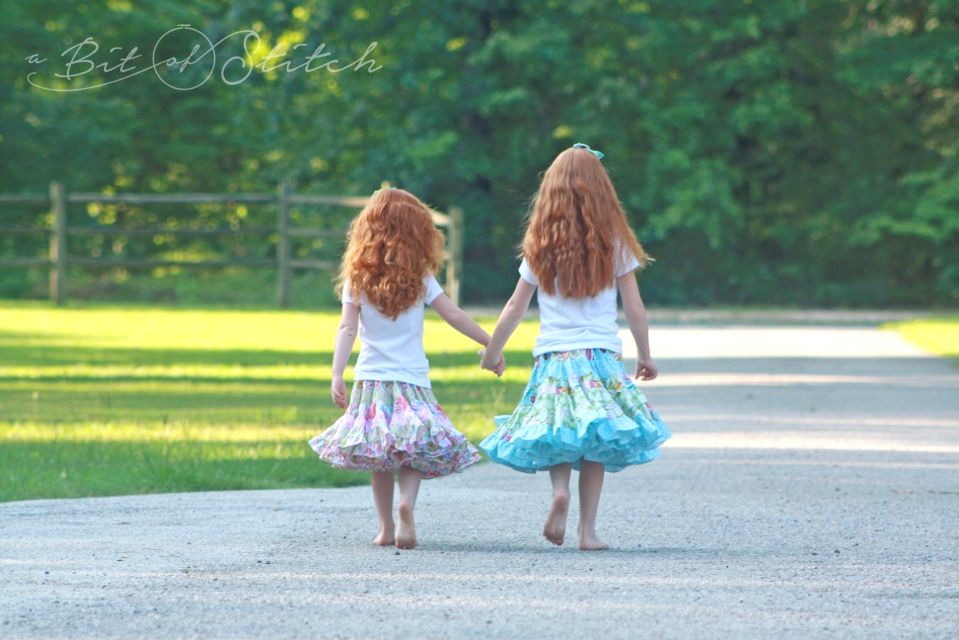
Once upon a time there were two little girls…
Who loved to giggle and loved to twirl!
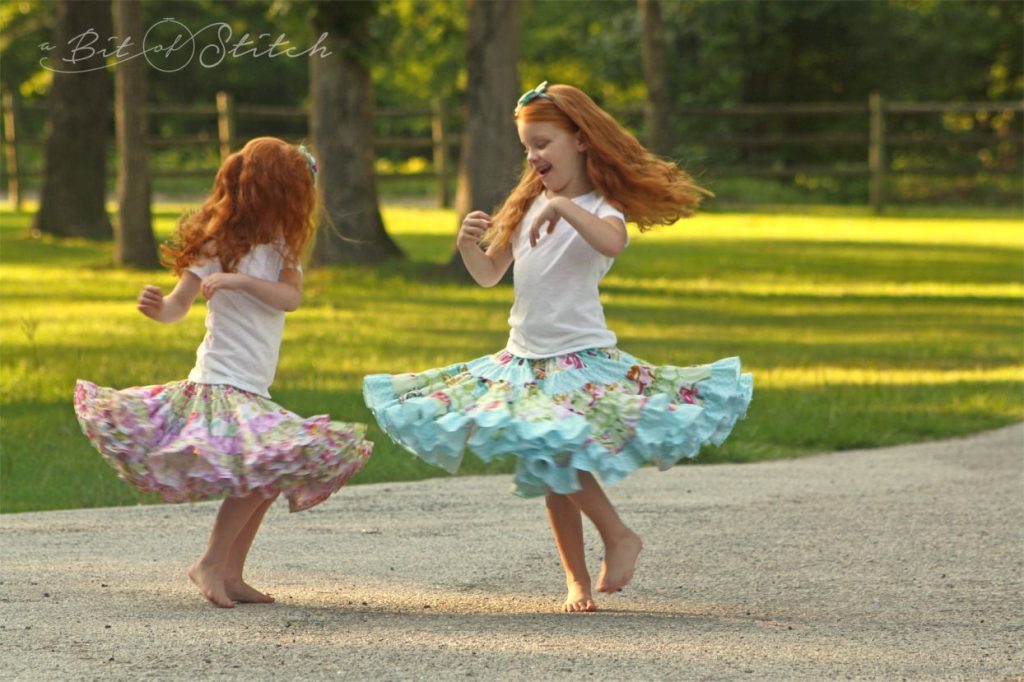
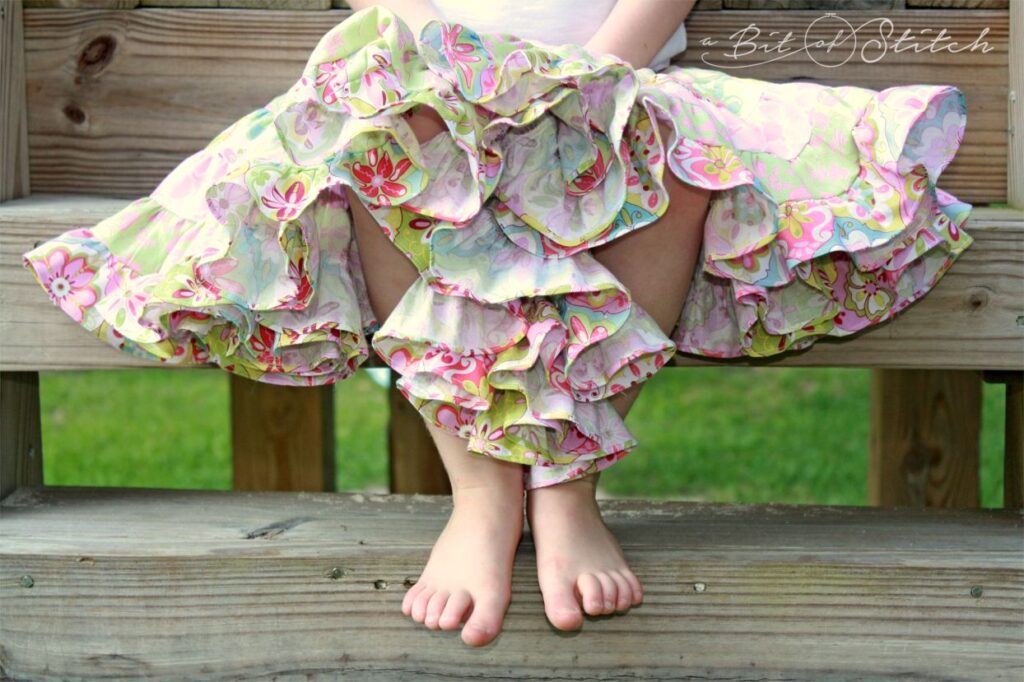
One of my best remembered pleasures of childhood was having a twirly skirt to twirl in, how about you? Thanks to the terrific talent of two of my Baby Lock educator friends – Sue Kostroski and Missy Billingsley – I discovered the wonderful ruffling foot for my Baby Lock serger. I knew a twirly skirt was in my future for sure! (Okay, be honest, am I too old for one now? Ha!)
This foot is awesome. Do you have one? I’m pretty sure that other sergers have ruffling feet too, but Baby Lock’s got me spoiled. Not only can I blow my threads through the threading mechanism (look ma, no tweezers and scary words outta my mouth), but the feet SNAP on and off. How cool is that? Spoiled, yep, I know it. Anyway, if you happen to have a serger that has a ruffling foot, you can make this project too – just keep in mind that the photos show Baby Lock’s Ovation serger and BLE8-RF Ruffling Foot. Check your machine manual for the settings you will need.
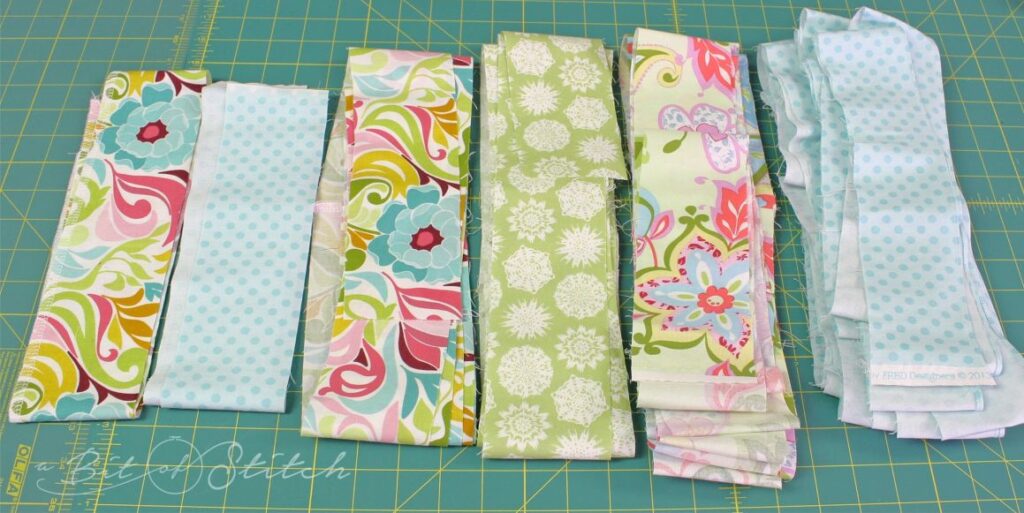
Choose your fabric! I picked several different prints from Riley Blake Fabrics.
You can use Jelly Rolls if you have some getting dusty in your sewing room, or you can cut your own as I did. I used the same fabric to complete an entire row in the skirts shown here, but the rows don’t need to be the same fabric – just mix and match as you please! You’ll need approximately 38 – 40 strips of fabric cut on the straight grain; each strip should be either 2.5″ (Jelly Roll width) or 3″ wide and as long as the width of the fabric.
The skirt in the photo directly above was made with 2.5″ wide strips, and the blue toned skirt shown further above was made with 3″ wide strips.
Here’s the chart for a skirt that fits a tall three- to four-year-old:
Row 1: 1 strip
Row 2: 2 strips
Row 3: 3 strips plus about 12”
Row 4: 6 strips less about 10”
Row 5: 10 strips less about 6”
Row 6: 15 strips plus about 22”
(Add more rows for a taller child and lessen the number of rows for a shorter child.)
Keep in mind that your stitch length and how much tension you put on the fabric as it feeds into the foot may change how tight your ruffles are. Usually – for a 2 to 1 ratio ruffle – you would need to double the number of strips for each consecutive lower row, but I discovered that it took less than that. It may be the way I was holding the fabric, but I think it had something to do with the weight of all the fabric as the skirt grew. You may want to have extra strips prepared, just in case you need them.
Serge the strips in each row together (short end to short end) to make one long strip for that row. A four-thread overlock works nicely.
Serge the first (single strip) row along one long edge. Narrow hem or narrow roll hem the last row along one long edge.
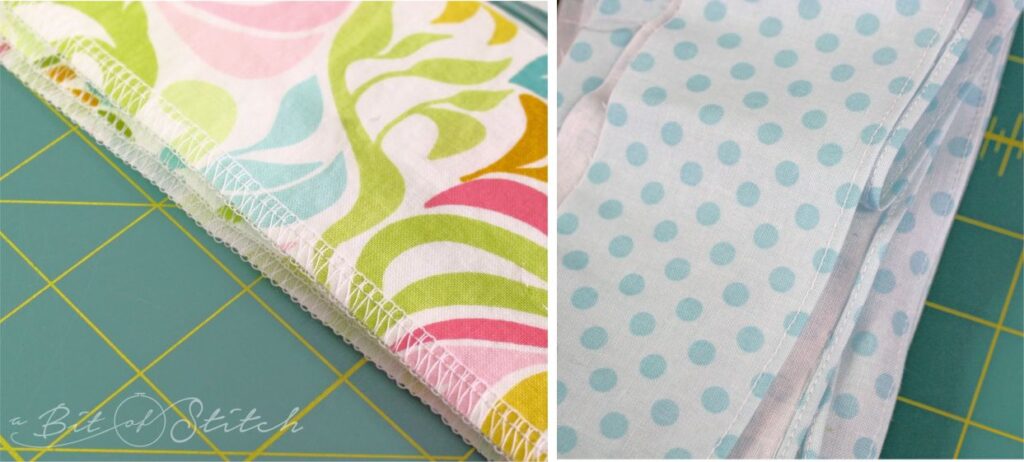
Got a narrow hem foot? This is the PERFECT time to use it! (See this foot in action on my Instagram pages!)
You definitely want to hem this last row before you begin. (Ask me how I know that! Ha!) Makes for a pretty hem, doesn’t it?
Arrange the fabric strip rows in order on your table.
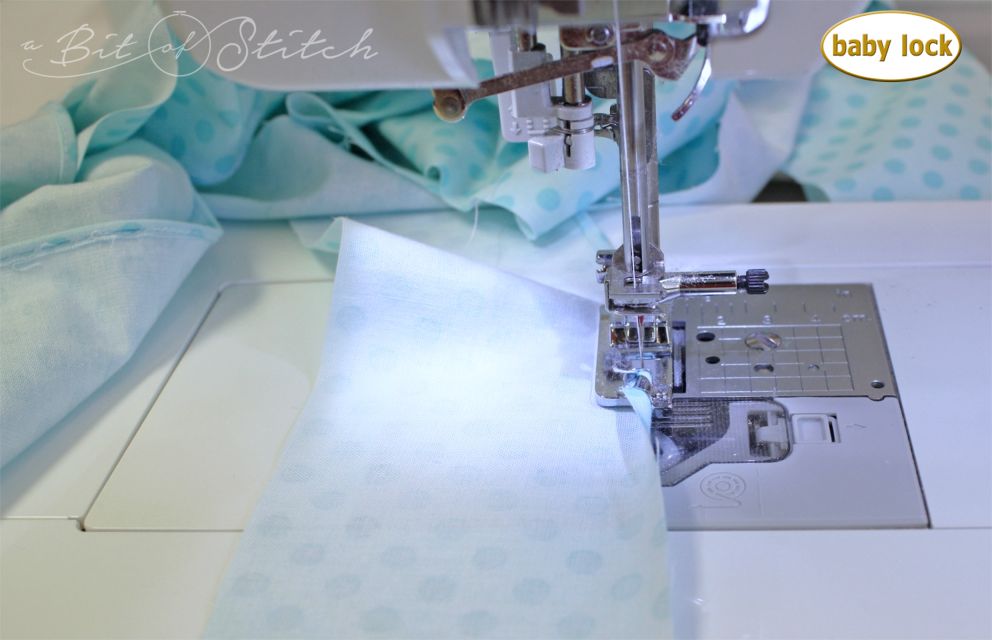
Pop on your ruffling foot and follow the directions found in the package with the foot to set up the machine correctly for ruffling. (Watch Pam Damour’s demo of this sweet foot HERE. She’s got lots of good tips for machine settings, etc.!)
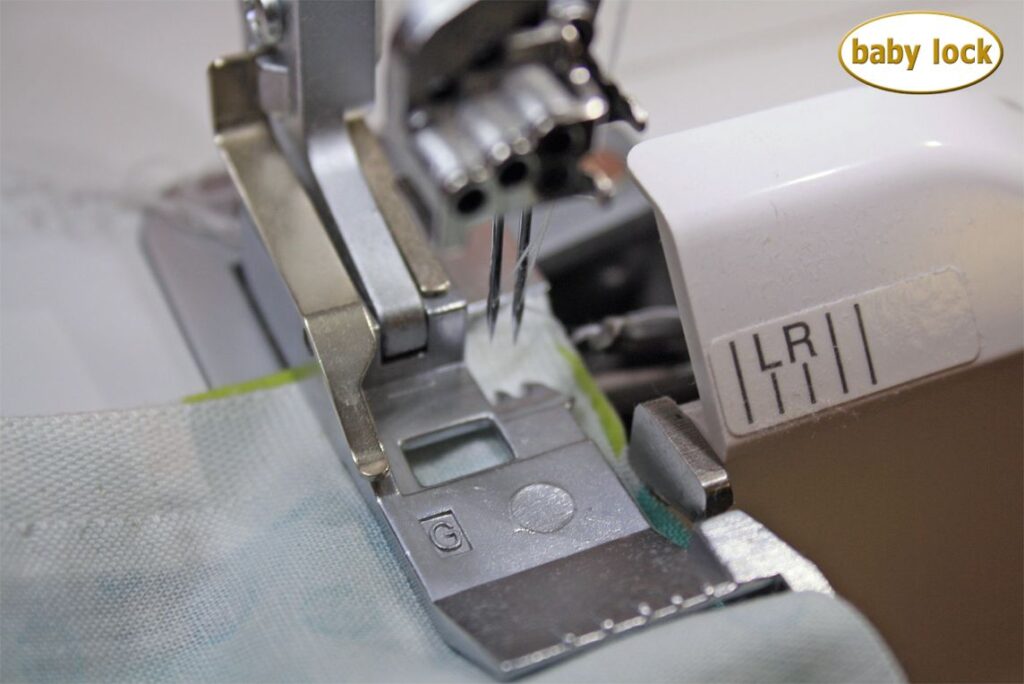
The ruffling foot works by serging two strips together while gathering the one underneath the foot. To begin, insert Row 2’s strip RIGHT SIDE UP under the foot. (I found it helpful to raise the foot, gently tug up the toe of the foot and push the fabric under it.) Then put Row 1 into the slot on top of the ruffling foot WRONG SIDE UP with the finished serged edge on the left.
Crank the fly wheel a few times to take a few stitches to secure the two rows of strips together. Then go for it! As you ruffle, take care that you do not hold back on the fabric, especially the fabric under the foot. Also, don’t go so fast that you wander over into the fabric strip. Try not to cut off more than a whisker as you serge. You want to let the feed dogs do the work so the ruffles form prettily. (I’ve posted a clip of this foot in action on my Facebook page, in case you want to watch!)
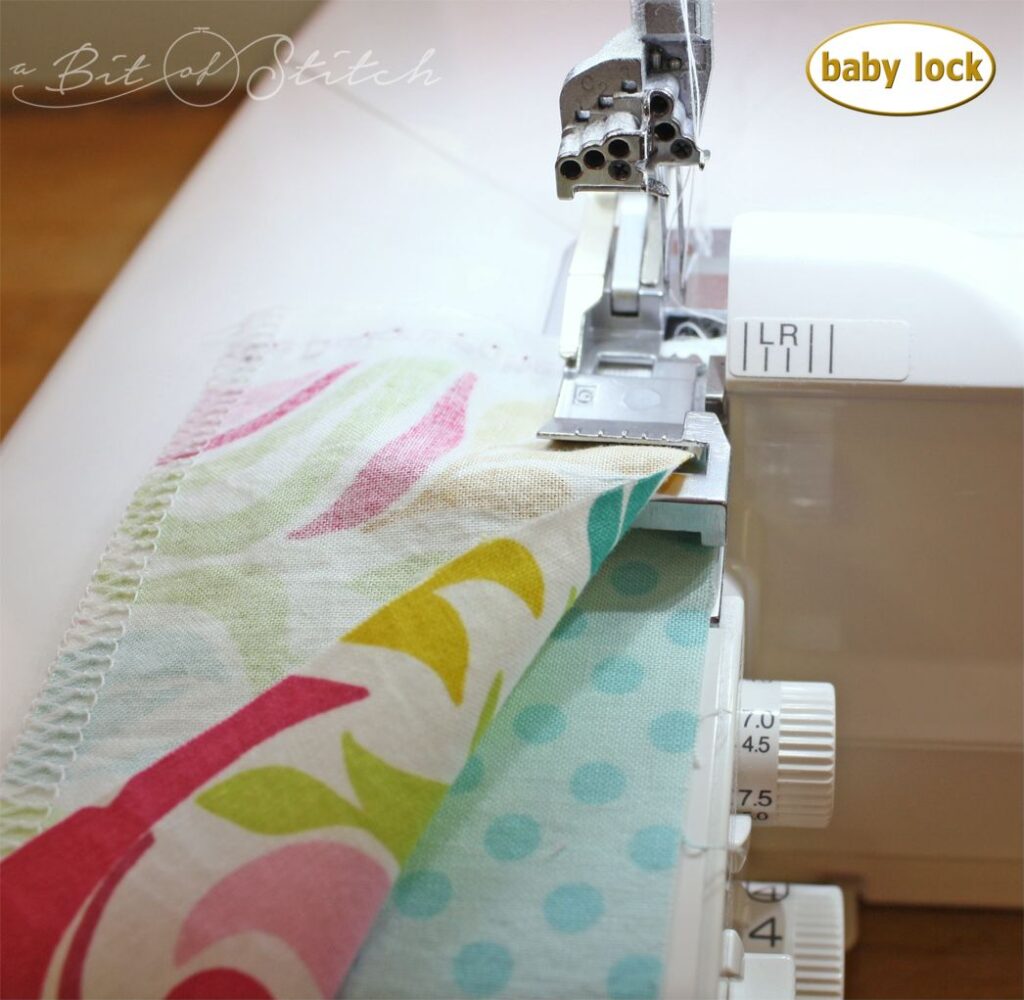
Add Row 3. Remember that this one will be RIGHT SIDE UP under the foot with Row 2’s ruffle WRONG SIDE UP in the slot on top of the ruffling foot.
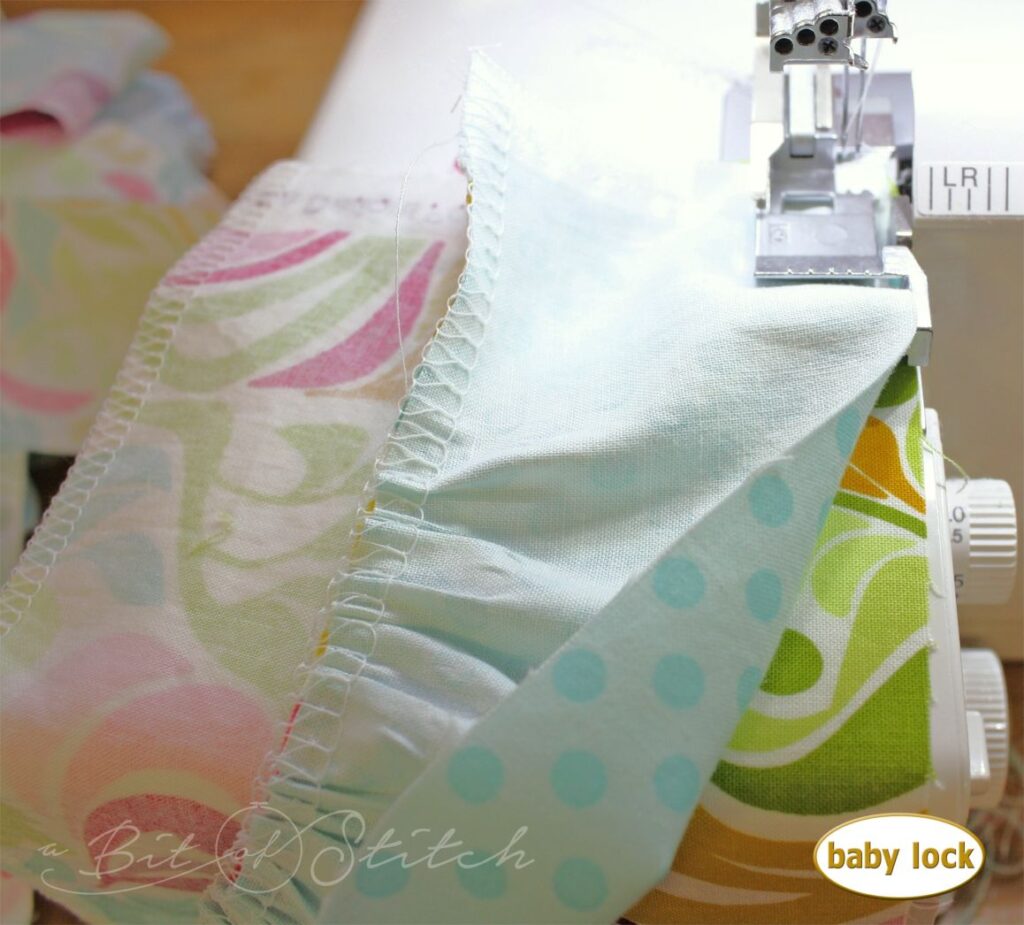
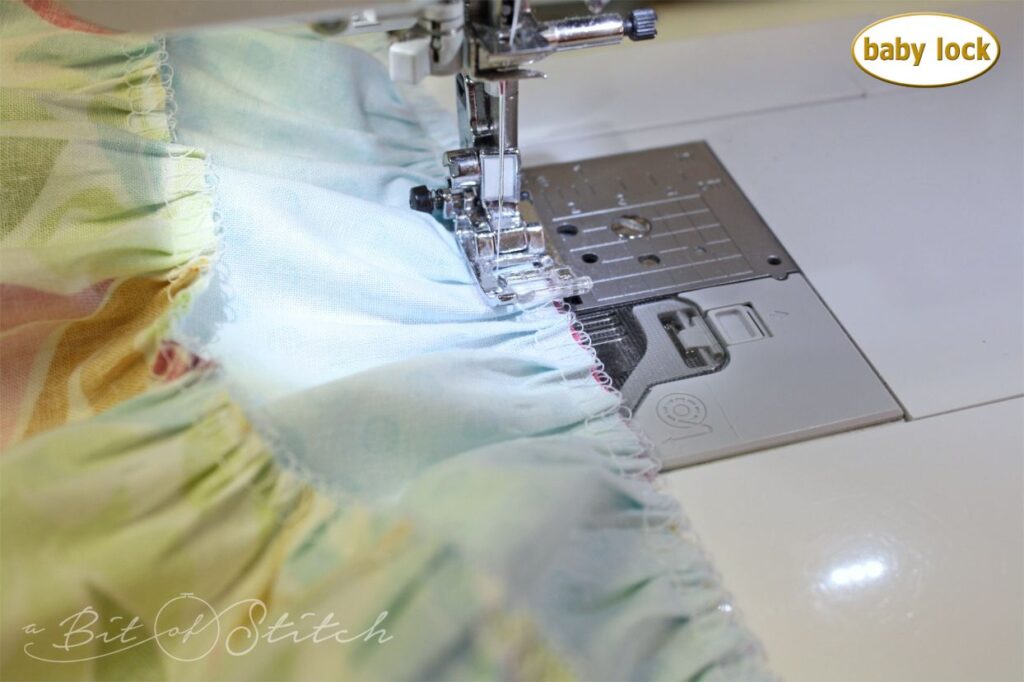
You will need to straight stitch (on your regular sewing machine) along the top of each row of serging to secure the ruffles nice and firmly. You may choose to attach all the rows and then sew those lines of stitching, but I find it easier to do it as you go… that’s why we have swivel chairs!
Repeat the process, row by row, until you are finished. The final row you add will be the narrow hemmed row. Make sure you have that piece under the foot with the narrow hemmed edge on the left.
If some of your rows don’t end up flush with the one above or below, just whack it off evenly along that side. Don’t worry – your skirt will still be plenty full!
Measure around your child’s waist and subtract one inch. Then cut a piece of 1.5” or 2” wide elastic to match this length. (Why subtract an inch? You will want a snug fit since this skirt has a bit of weight to it. Just be sure it’s comfortable for your little dancer!)
You can find pretty colors of wide elastic now, which is cool. Riley Blake Fabrics has added some wide elastic to coordinate with their fabrics (woo-hoo!). Find it at many fine retailers. Farmhouse Fabrics also has a nice line of wide elastics perfect for waistbands.
Mark the top edge of the skirt to divide it into 8-10 equal parts. Then divide the elastic into the same amount of equal parts. Pin the elastic to the skirt, right sides together, so that the skirt is distributed evenly on the elastic according to the marked divisions.
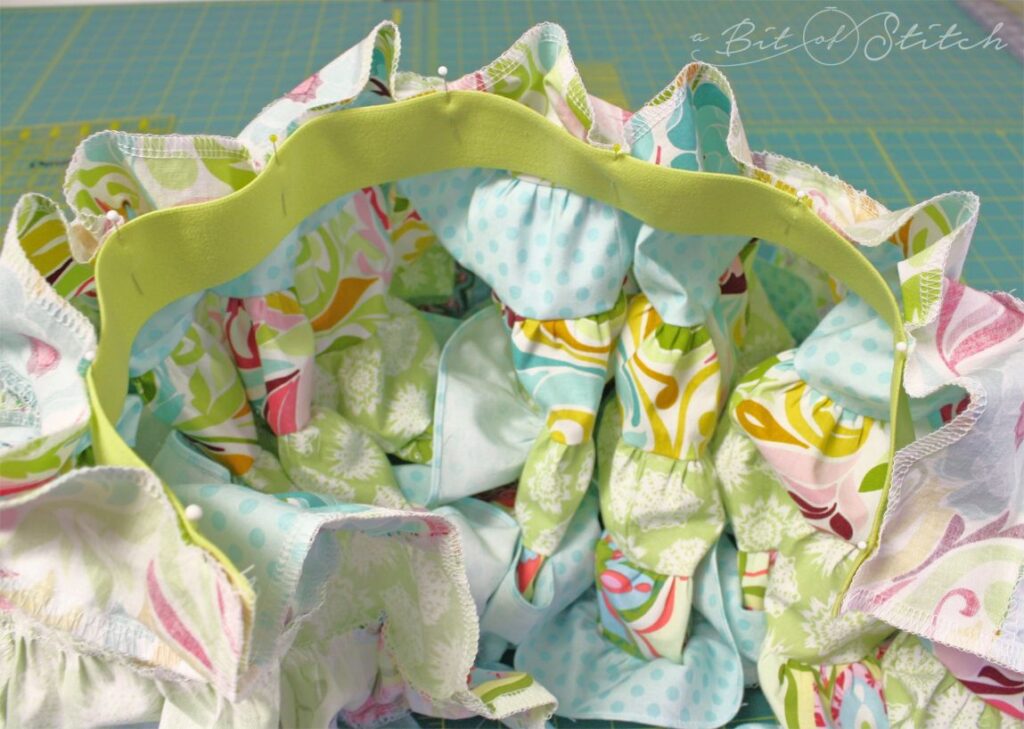
Serge the elastic to the skirt, gently stretching the elastic as you serge from marked point to point to fit the two together neatly. You may want to turn the blade to the down position so you don’t cut off any elastic.
Now you are ready to serge up the seam at the back of the skirt! A four-thread overlock works great. Align the ends of the elastic and each row of ruffles down to the hem. Pin right sides together and serge the skirt back seam.
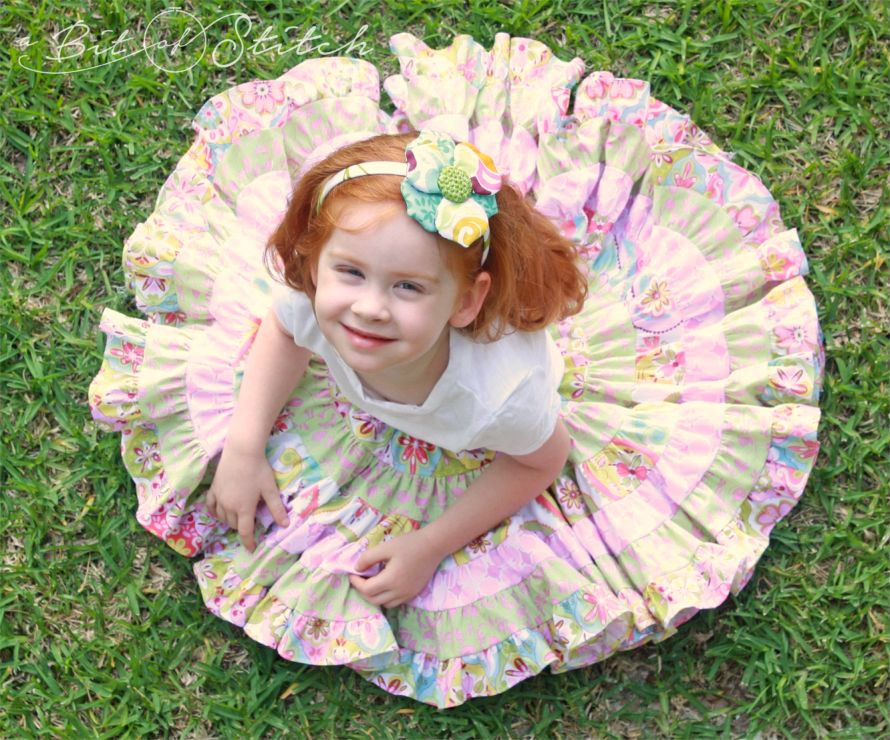
At your sewing machine, sew along the serging to further secure the seam. Fold the seam allowance of the elastic over to one side, neatly tucking the serge tail beneath it, and top stitch in place to secure. Do the same for the seam allowance at the hem. Sweet little blossom! You can see why I call this the carnation skirt! 🙂
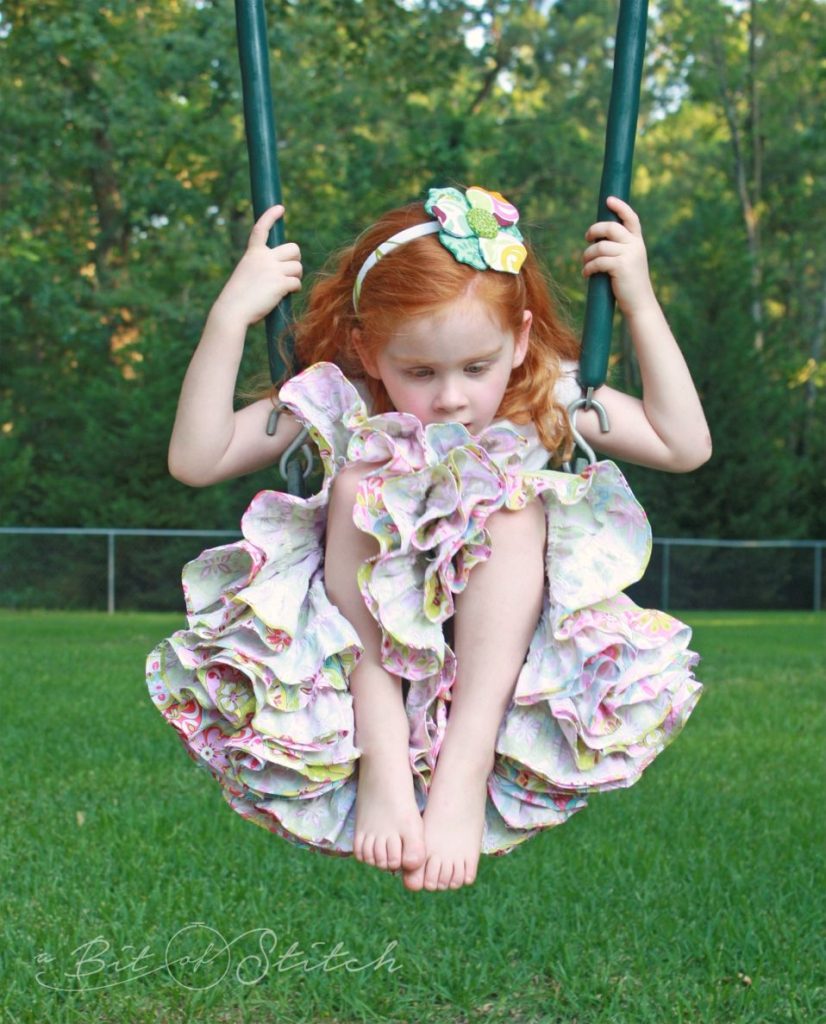
This was so fun I had trouble stopping – just wanted to keep making them! Here’s hoping that you’ll have as much fun as I did with this skirt project and that your little sweeties will have a blast swirly twirling. Click HERE to watch a fun video showing the steps in action to make this skirt by Lydia Maria of Telafante!
Till next time, thanks for reading!
Evy

Like the flower headbands? That’s another blog project – click HERE to check it out!
Photos by Amber Purcell
19 replies on “Carnation Skirt – a Serger Project!”
Sweet project Evy! I would love to be able to have a little girl to sew it for, but I may just have to do it for fun anyway!
I have 2 little girls that would love these. Maybe I need to get one if those fabric cutter rulers that cut strips.
Thanks Evy.
If you use a jelly roll, you don't have enough of one color to make each row or even enough to make the skirt. Is this right? you say you need 23 strips, but then it says you need 37. Don't understand.
Whoops! That number was a typo. I've fixed it and added a more generic number. Depending on how your machine's ruffling foot ruffles you may need more or less strips. If you use a jelly roll you would probably need more than one roll and no, the fabric strips would not be the same for all the rows – but that could be very interesting!
Evy,
I love this skirt! I have 5 granddaughters who will need this skirt so I will be making some very soon! Thanks for posting the instructions!
I think I need to make one for myself! Even if it means I only wear it in my sewing room or in my backyard!! 🙂 These skirts are precious…..including the "red head" models!!
What size would I need for a 2 yr old toddler? Thank you.
It would depend on your 2 year olds height. If you cut the rows 3" wide the finished width ends up being about 2" except for the bottom ruffle which (using a narrow hemmer that makes a 1/4" doubled hem) would be 2.5". So measure your child, add up the finished width of the rows and see how many you will need. For 2 year olds I've been cutting the strips 2.5" wide and 6 rows work fine. It is longer on some, but that gives them growing room :-)You can cut the strips any width you wish – customize them!
Thank you. I have a 35 yr old serger with one foot. That being said, I would do it the old fashioned way, pin the rows to make pleats/ how far apart? Or do you have another easier method?
Hmmmm, well as I haven't tried that I'm not exactly sure I would be telling you the right thing, but if you gathered up each row to fit the proceeding row that should be about right. Have you tried zigzag stitching over a skinny cord and pulling up the cord to gather? This is a fast non-gathering-foot way and might work best for such a long gathered piece. Just be sure not to catch the cord in your zigzag stitching and when sewing the gathered "pulled up" row to the next be sure not to sew in the cord so you can pull it out. Hope that helps!
Wow thanks..no I have never zigzag over skinny cord. I always pin/fold pin/fold to make pleats. Then sew it on an 80 yr old metal Viking sewing machine in a cabinet. old fashioned lol. However, my husband just bought me a Babylock, still learning how to use all the stuff.
Wow thanks..no I have never zigzag over skinny cord. I always pin/fold pin/fold to make pleats. Then sew it on an 80 yr old metal Viking sewing machine in a cabinet. old fashioned lol. However, my husband just bought me a Babylock, still learning how to use all the stuff.
I am confused by the “add /subtract” measurements. If it is 3″ x WOF how can you add any more to a fixed width? Or is this to be another strip cut 3″ x 22″ etc.??
Also, I am even more confused how to ‘add rows’ for 5 and 6 year old. You stated to ‘double’ strips for each additional row. If you used 6 rows for a 2 year old then would that mean I have to make 12 rows for a 5-6 year old??
Sorry for my confusion, if you can answer me I would love to start this project but it requires a huge investment in fabric ($$$) I need to understand how many I need to cut and how to ‘add/subtract’ the additional rows/
Sorry for the confusion! Depending on how tightly your machine and your ruffling attachment ruffles the fabric you may need more or less fabric. (No way to predict as every machine and user seems to “ruffle” at a different tension, hope that makes sense.) What I mean by add more is use as much as you need of another strip – you may only need 8″ more or 18″ – just use whatever you need to get the row you are attaching to complete the row you are attaching it to. For an older child what I mean by adding rows is this: If your child is tall and you need to add another row then you will probably need at least double the amount of strips you used for the last row on the skirt so you can add another row of ruffling. You don’t need to double the entire amount of rows, just double the amount of strips you used for that last row to create another row…and then another if you need to. Yes, this skirt takes an awful lot of fabric…eep! Keep in mind tho that you do not have to have matching fabrics for a whole row. If you have pieces of fabrics in your stash that are similar in color/prints you can combine those strips into a row and the effect will still be pretty. I’ve used up so many pieces from my stash doing this! Because the skirt is so full you can’t really tell I’ve used different fabrics on each row. I hope this helps! If not, feel free to email me via the contact link on our website and I’ll be glad to help via emails!
I am new to serger and recently bought a Baby Lock Celebration serger. This skirt is just what I was looking for my next projects. I have 5 great nieces ranging from 1-3 years old. I plan to start with one for the 2 year old.
I like the idea of using jelly rolls, but my overall image is to do rainbow color gradation which fits just right with 6 rows (red, orange, yellow, green, blue, purple). So I will be cutting my own strips.
Will you please give me guidance for how much fabric I need (allowing extra of course) for each of the 6 rows (using 2.5″ strips)?
And alternatively, would 2 jelly rolls provide enough strips for the skirt?
Thank you!
I think I figured out the answer to my own question about how much fabric for each row. 😉
I am accustom to pre-washing fabric before using it for projects.
I presume if using Jelly roll(s), you would not prewash the Jelly roll strips. In that case, do you then wash the skirt before sewing the elastic on? Or does that not matter since the elastic is not being prewashed…?
Glad you figured that out! It’s really a guess, so be sure to have more fabric than you think you need just in case. When ruffling using the serger and ruffling foot attachment everyone seems to ruffle at their own pace. Some may ruffle tighter, some looser but keep in mind it won’t matter one bit…they’ll all be just as pretty! Don’t worry about pre-washing for this project. There’s nothing that will be subject to the “drawing up” that some fabrics can do if not prewashed as it’s all ruffles with an elastic band that won’t shrink anyway and is stretched to fit the fabric. No worries there! Good luck! I hope we will get to see your projects!
Hi Evy,
Wonderful, fun project. Thank you!!! I have a new Baby Lock Triumph. I ended up with a bunch of excess fabric on this one as it was my first attempt. Now that I know what this machine does I can adjust accordingly, thanks for the tip mentioned in one of the emails above. My only problem was getting the fabric on the waist band smoothly. Can you tell me how you did that? Did you use your ruffle foot? I managed to gently pull the elastic but had way more fabric, so I ended up just sort of scrunching it under the foot. It worked but it was a chore. I plan on making this again. Any help would be appreciated.
Thank you! I’m so glad you are enjoying that. I ended up with extra fabric a time or two and then I figured out how to make it ruffle more by adjusting that plate on the bottom of the ruffling foot. That sure helps! I just stretched the elastic and it worked great. But I had purchased my wide waistband elastic from Farmhouse Fabrics and it was pretty stretchy. I’ve noticed that not all waistband elastic, especially the metallic ones, are as stretchy. You could try running a gathering stitch around the top first to help ease in the excess. Divide the sections up even more too, that might help! Good luck! I hope you’ll share some pics, I’d love to see!