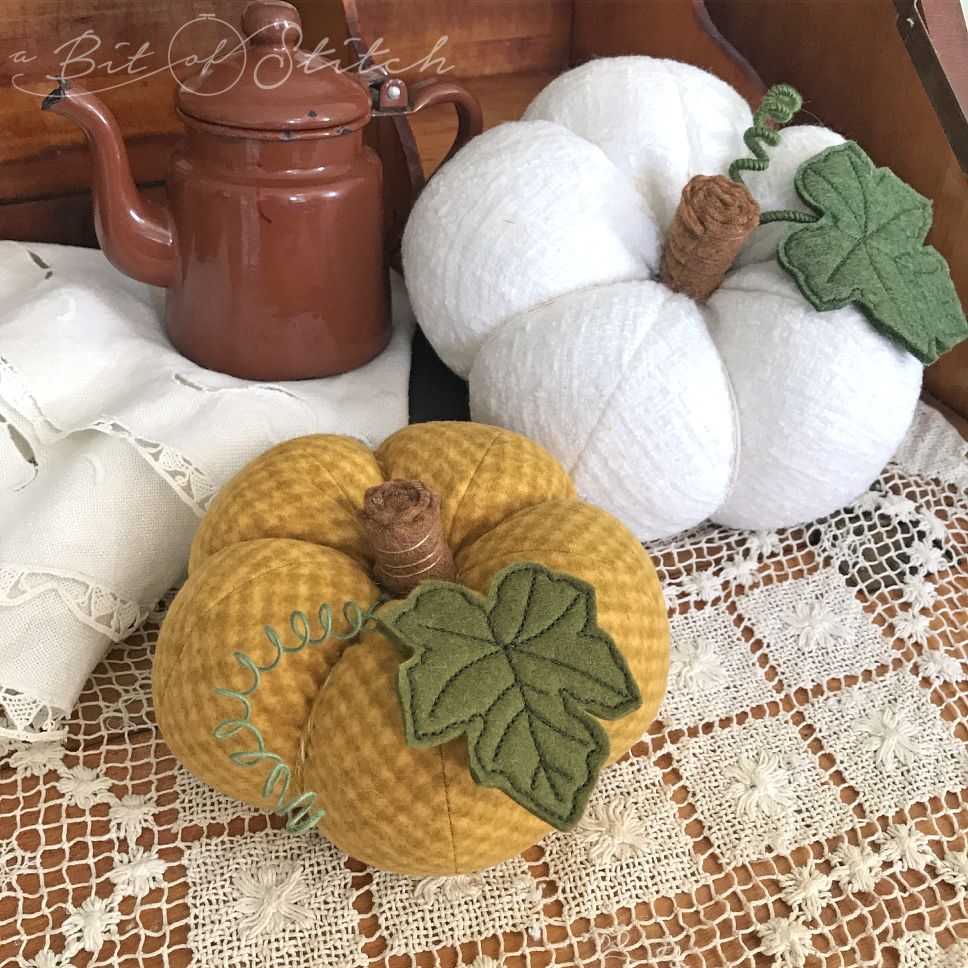
Sew up some perfectly puffy little pumpkins for your parlor this autumn! I rediscovered this old favorite project recently and had so much fun making them that I dusted off my pattern and updated it just for you! Want to make a pumpkin or six?
Materials you will need:
- Free Puffy Pumpkin Pattern—click HERE to find the free download.
- 1 fat quarter of fabric for the pumpkin—choose a fabric with a bit of a stretch, especially on the bias of the grain. Wool crepe, bouclé, challis, melton or flannel work great. (Check out Farmhouse Fabrics for a great selection of those.) Cotton flannel can work nicely, too… or even sweater knits!
- Tricot knit fusible interfacing (THIS is my favorite type, and it’s perfect for projects like this.)
- Fiberfill stuffing
- Brown & green felt for the stem and leaf: Use good quality wool/rayon felt like THIS for best results!
- Sulky 12 wt. cotton thread or heavy buttonhole thread—you’ll want to match or at least blend the thread color to your pumpkin fabric. (You’ll need the 12 wt. thread for the hand sewing parts of this project, but you can substitute yarn for the thread when it comes to wrapping/shaping the pumpkin.)
- Green fabric covered florist wire
- Fabric glue (Fabri-Tac by Beacon Adhesives is a great choice!)
- Sewing thread to match the fabric
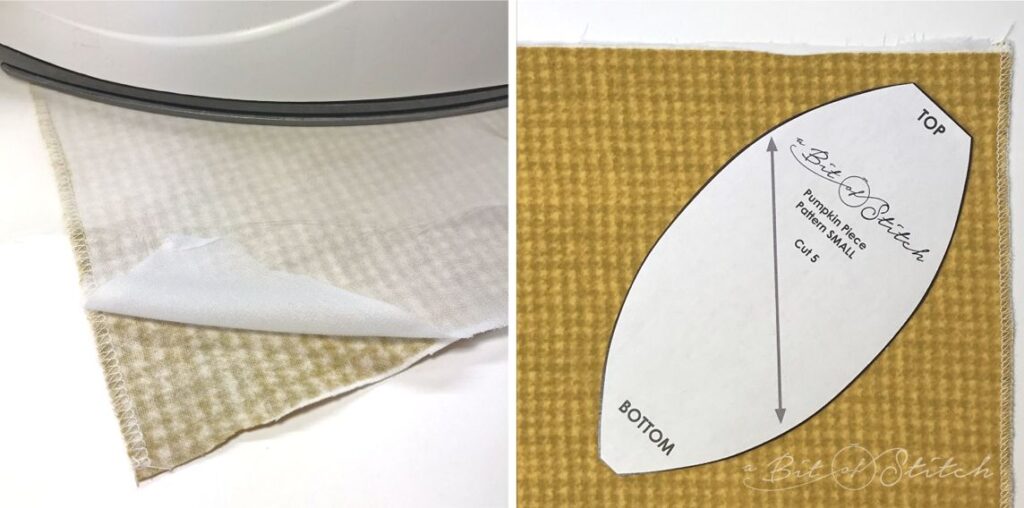
There are two sizes of pumpkin patterns included in the free download. Choose which size you wish to make; then print the pattern at 100% (or “actual size”) and cut it out. Audition the pattern on your fabric to see how much fabric you will need, but don’t cut the fabric yet. This pattern piece needs to be cut on the bias of the fabric, as shown in the photo above on the right. Place the pattern on the fabric so that the straight grain line (marked with a double arrow) follows the straight grain of the fabric. The pattern piece is for one side panel… you’ll need 5 side panels to make a whole pumpkin. Once you have figured out how much fabric you’ll need in order to cut 5 pieces on the bias, cover the back of the fabric with tricot knit fusible interfacing.
Why back the fabric with this type of interfacing? I’m glad you asked! This type of interfacing is super light and will not really change the drape of the fabric, but what it WILL do is help prevent stretching and distortion of the fabric pieces as you work. PLUS, it will also keep the pumpkin smooth once it has been stuffed. This is a neat little trick to use with any stuffed project you might like to make.
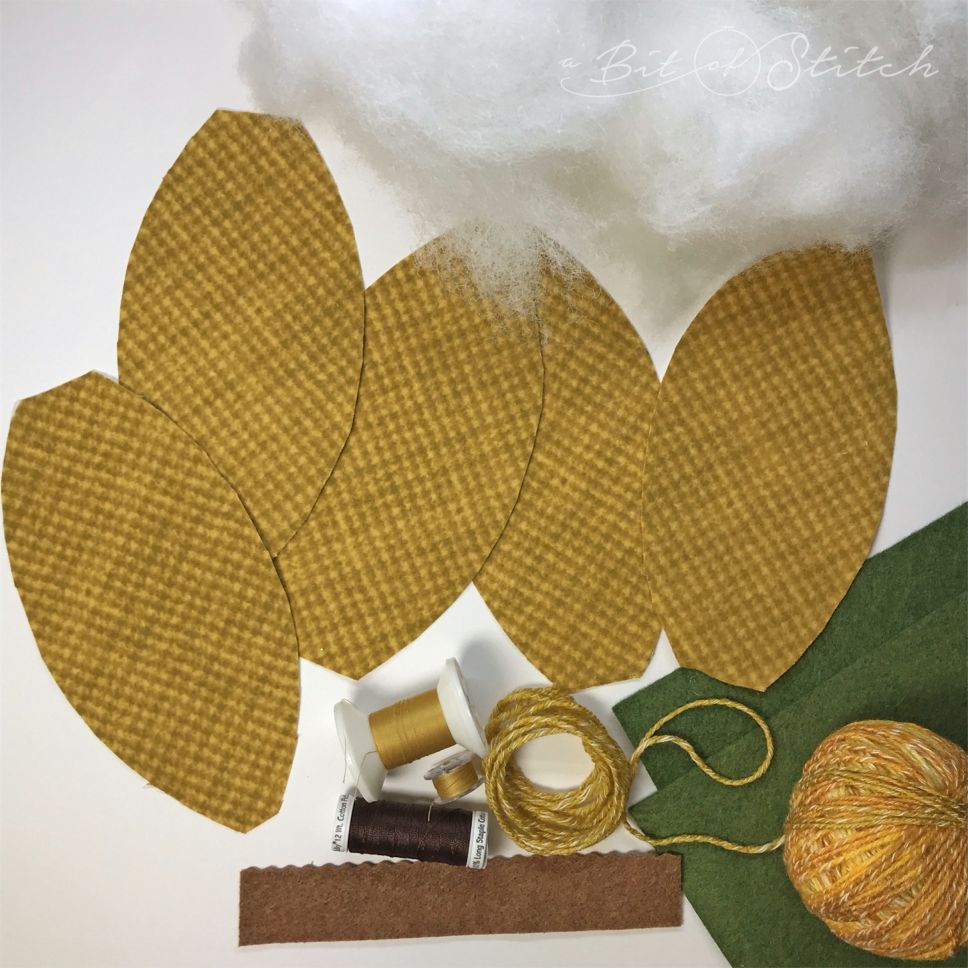
Cut out five pumpkin pieces (cutting on the bias!) and gather the rest of your supplies.
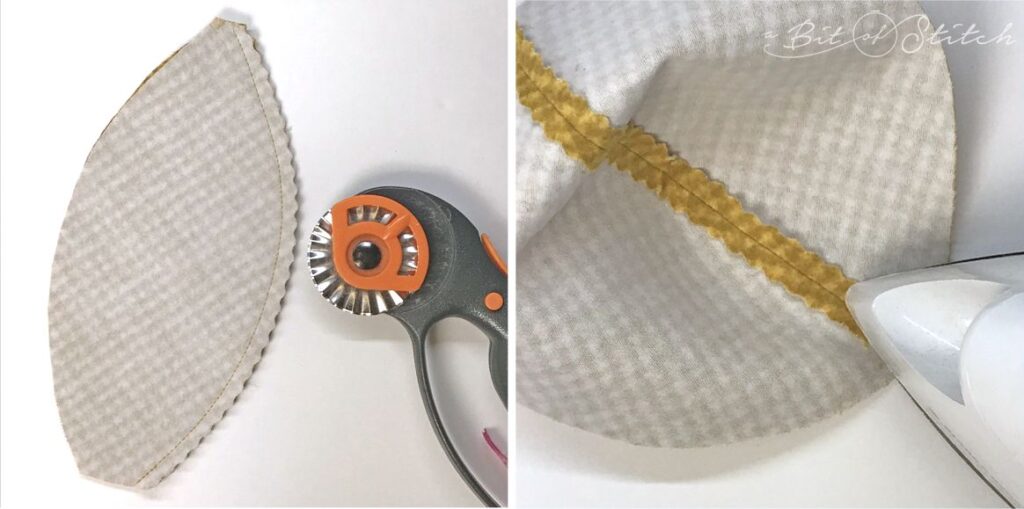
Place two pumpkin pieces right sides together, aligning all edges. (Be sure the top and bottom of the pieces match up—the top of the pumpkin is the wider, straight end; the bottom of the pumpkin is the small, pointed end.) Sew from top to bottom along one long, curved edge with a ¼” seam allowance. Pink the selvages, cutting off the least amount possible, and press the seam open. You’ll find it easiest to do this by pressing from the bottom up toward the middle of the seam and then from the top down. Take care not to iron creases into the fabric. (If your fusible interfacing is sensitive to high heat, use a press cloth or use just enough heat to flatten the seam. A little steam helps.)
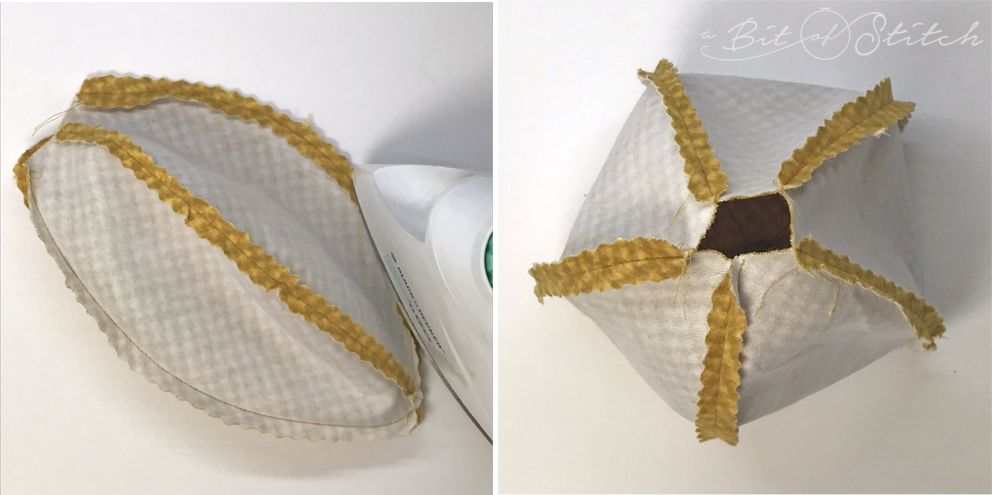
Repeat those steps to add the other pumpkin pieces one at a time, stopping to trim and press open each seam as you sew them. The last seam will be the hardest to press open as it finishes the pumpkin. Place that final seam flat on your ironing board and press one selvage toward the inside (as shown above on the left); then flip the pumpkin over and press the other selvage toward the inside again.
When viewed from the top (open) end, your pumpkin should now look like the one above on the right.
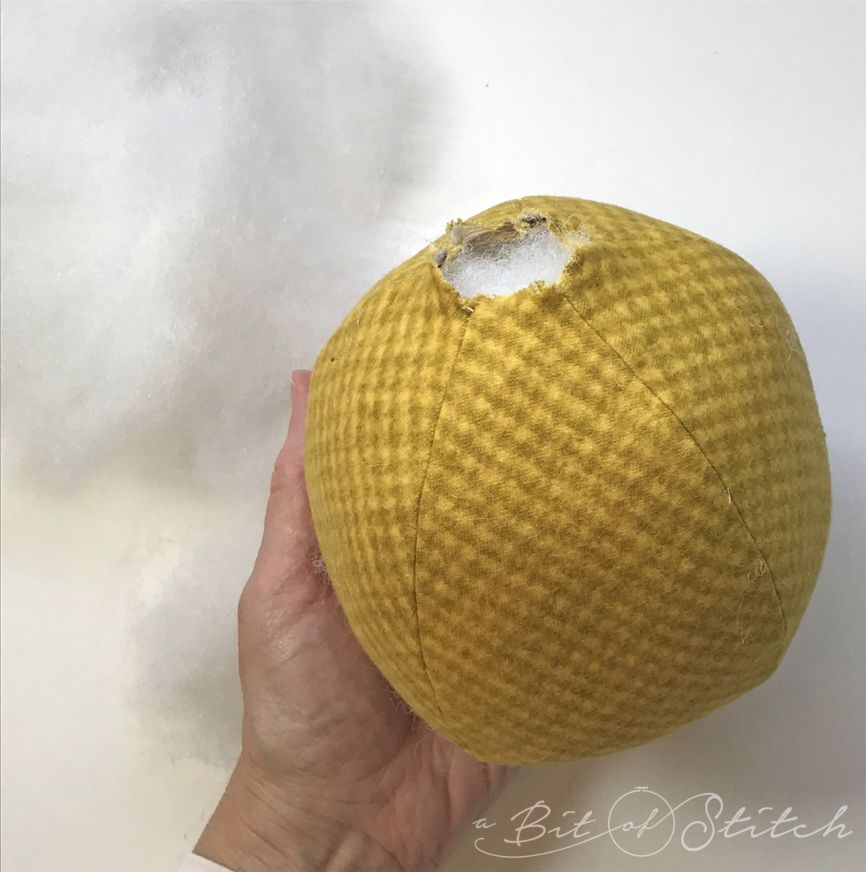
Now it’s time to stuff the pumpkin! Fill it firmly, but not packed tight. You need to be able to squish it, but you don’t want any places that are uneven as that would cause wrinkles.
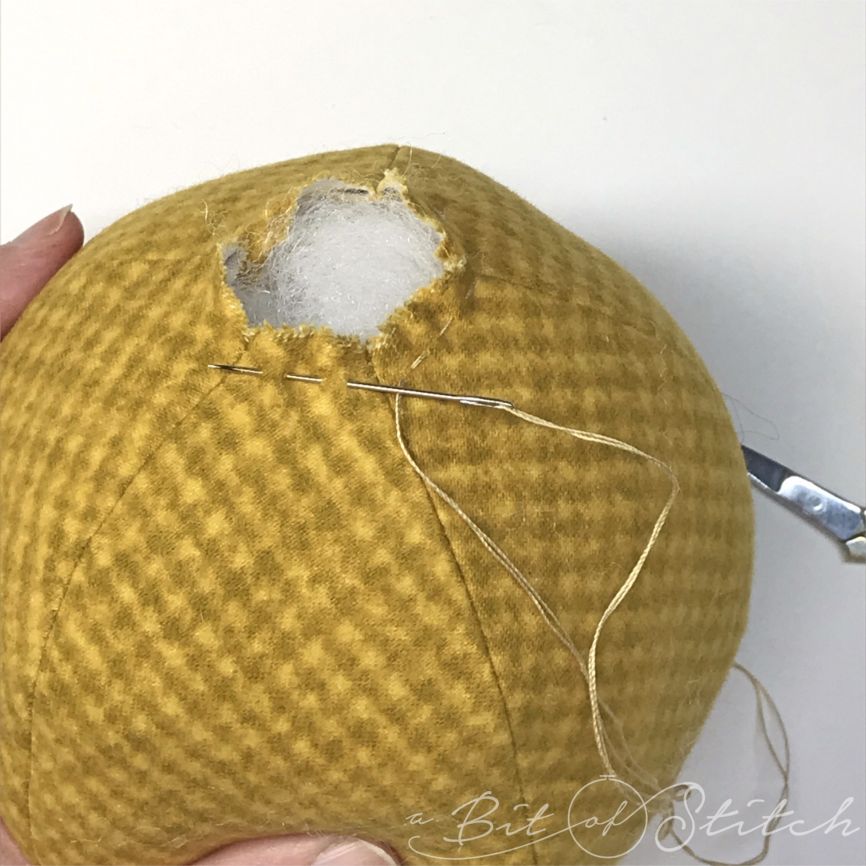
Thread a hand sewing needle with a double strand of 12 wt. thread or buttonhole thread. Sew a circle of running stitches around the opening of the pumpkin, as shown above.
Pull up the thread and gather the opening closed. Secure the thread. The top of the pumpkin should now look like the photo above on the left. The bottom of the pumpkin should look like the photo above on the right.
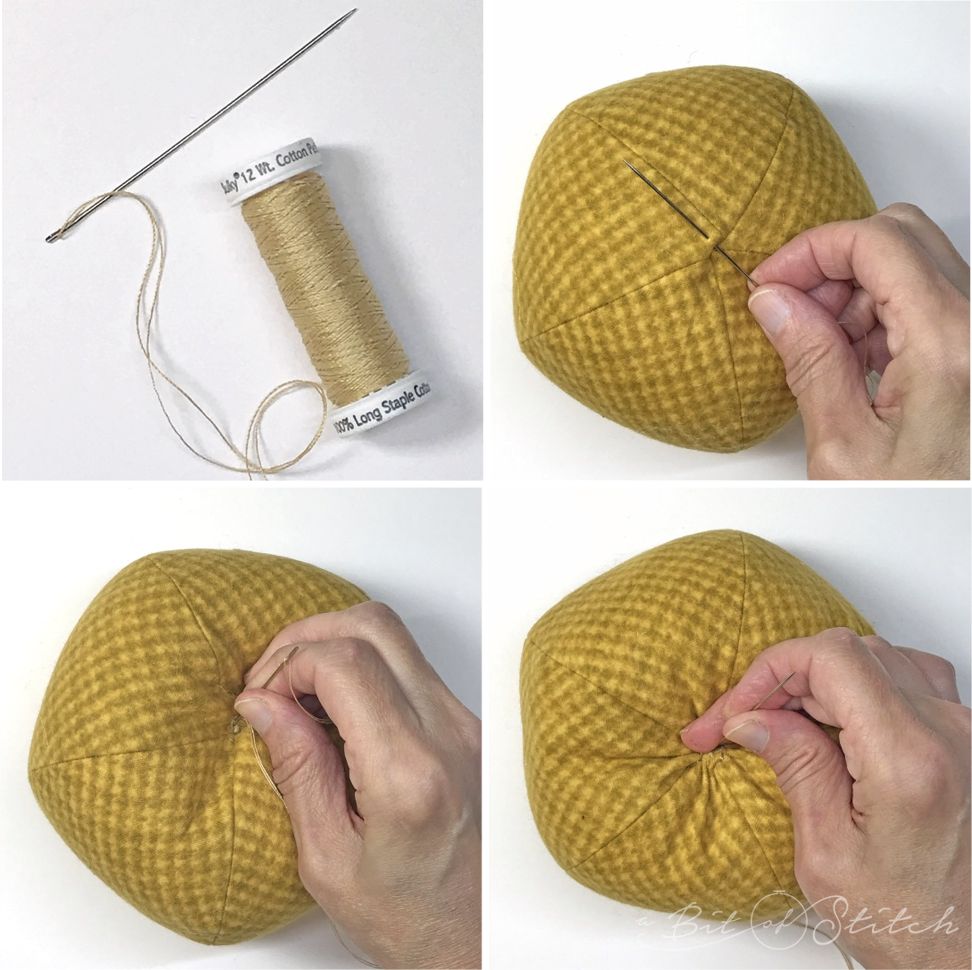
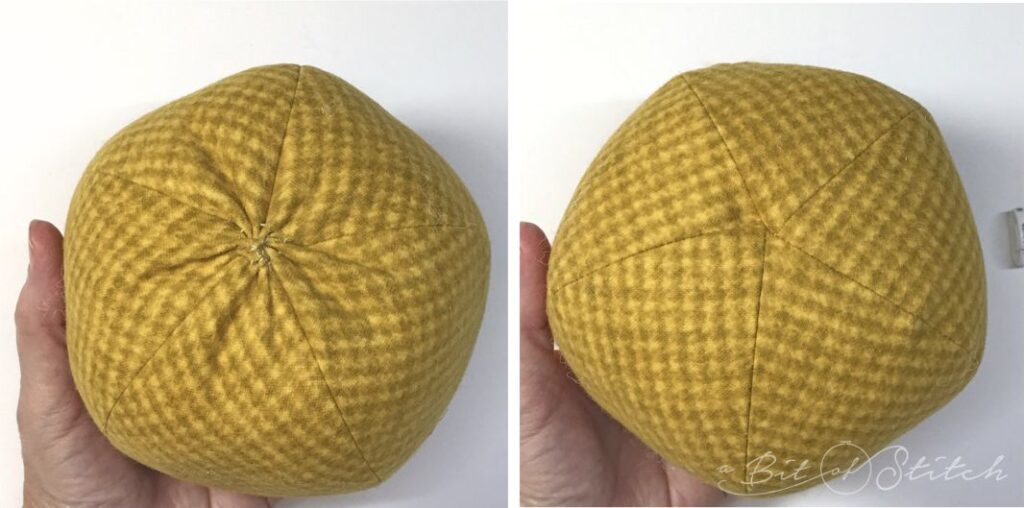
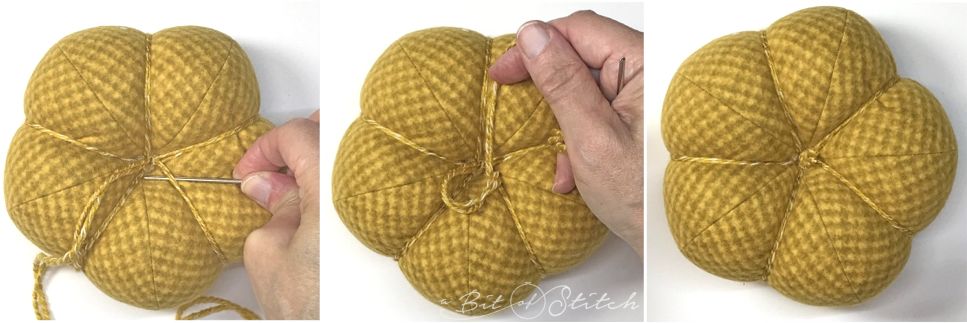
Now thread a LONG needle with a double strand of the same sturdy thread. You will need a long length of thread for this step! Secure the thread at the bottom of the pumpkin and then insert the needle into the very center bottom of the pumpkin. Squeeze the pumpkin with one hand while you push the needle all the way through the center of the pumpkin and bring it out the other side (at the center top of the pumpkin).
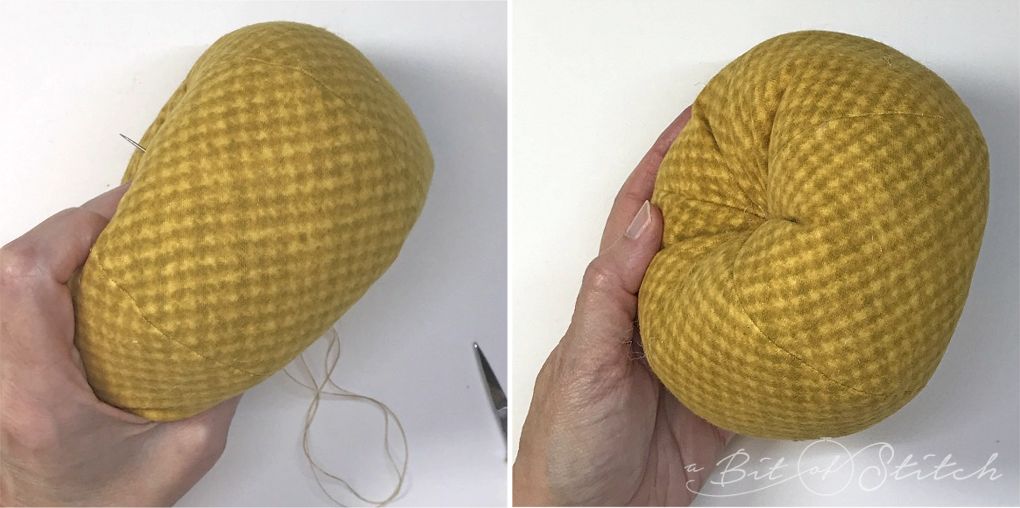
Hold the thread taut and reinsert the needle back into the top. Bring it through the pumpkin and back out the center bottom. Pull up on the thread, squishing the pumpkin together at the center from the top to bottom. Repeat those steps, taking several stitches back and forth through the center of the pumpkin until you have firmly secured a nicely squashed pumpkin shape (such as the one shown in the photo above on the right).
At this point you can call your pumpkin “finished” if desired—and indeed, this shape of pumpkin is perfect to make from embellished fabric like these embroidered pumpkins…
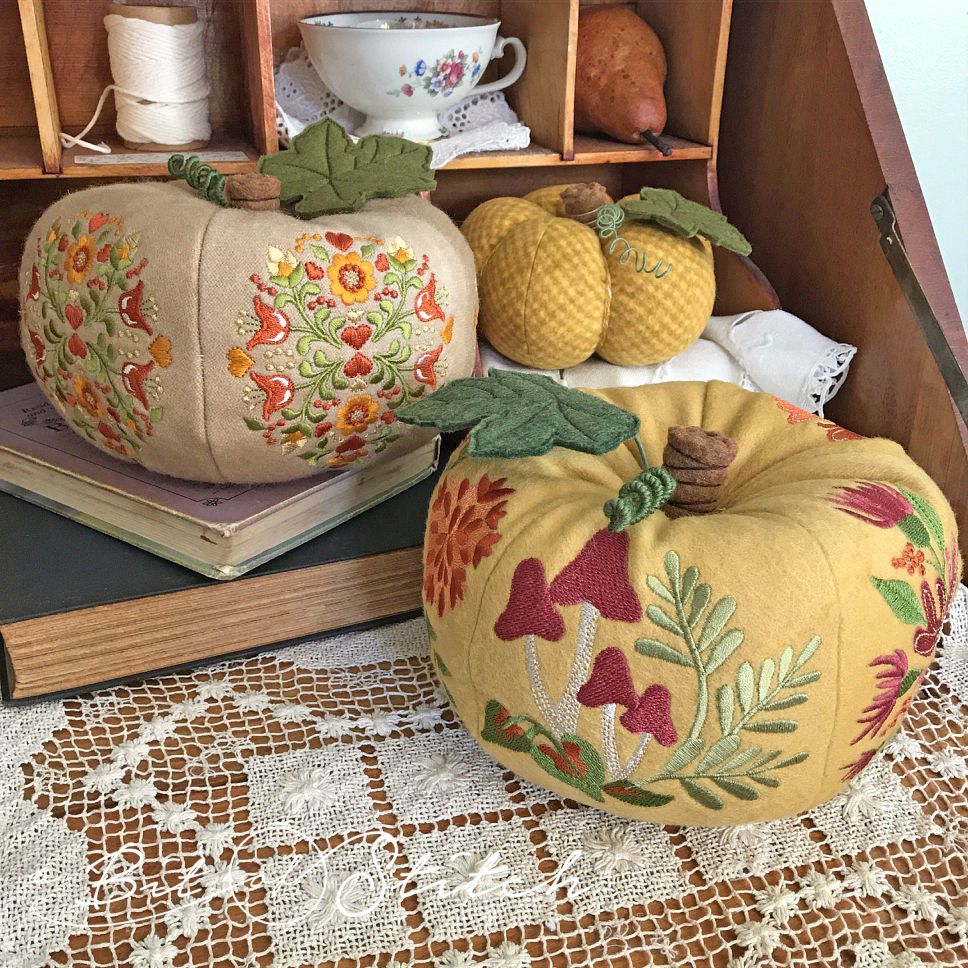
(You can find the machine embroidery designs for those beauties HERE. Or, if you are into hand embroidery or other surface embellishment, you might want to fancy up your pumpkin sides a bit before you sew them together!)
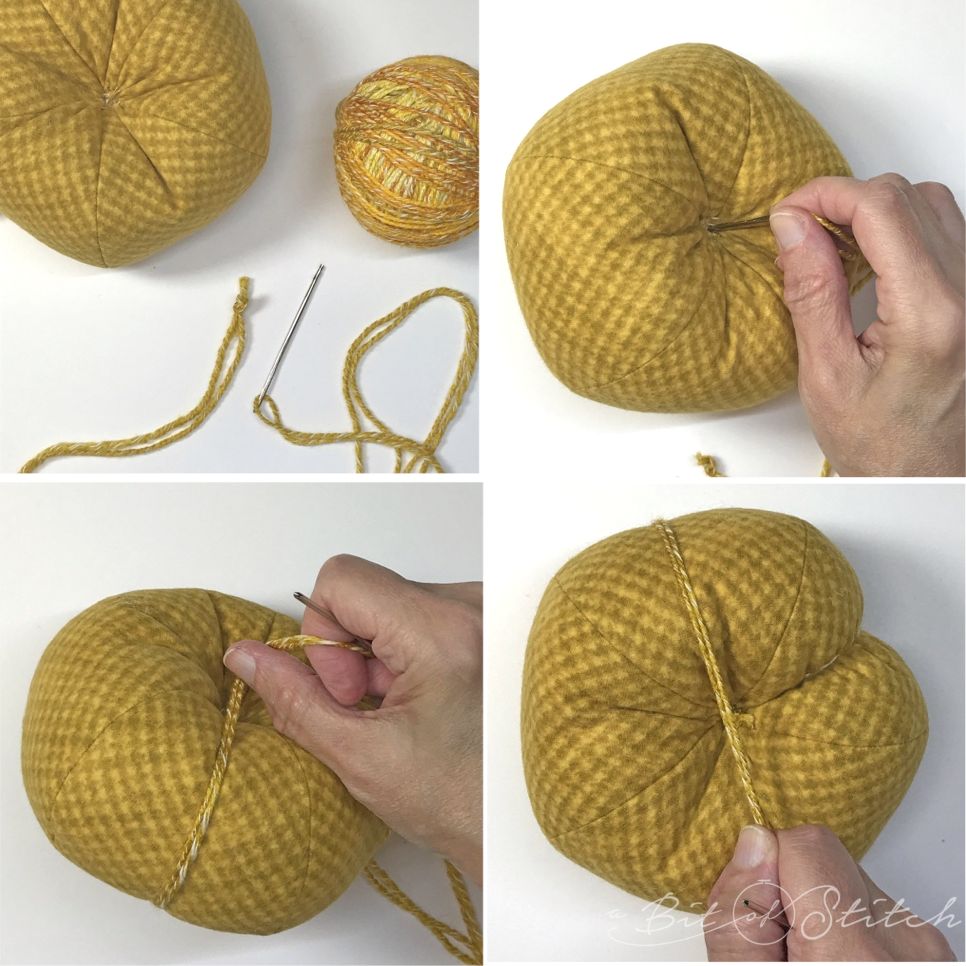
…BUT if you’d like to make a gourd-like pumpkin with a little more texture, all you need to do is section it up with some more squishing. Start with a nice long needle and either heavy-weight thread (a double strand) or yarn in a color that blends with, matches, or slightly contrasts the pumpkin color. Secure the thread or yarn to the center top of the pumpkin. Poke the needle down through the pumpkin and bring it out the center bottom. Pull the yarn up against the outside of the pumpkin, positioning it in the center of one pumpkin side panel. Keep the yarn snug against the side as you insert the needle back into the center top of the pumpkin. Pull the yarn, squishing the pumpkin side. You can squish a lot or a little – whatever suits your fancy! Repeat those same steps to section off the center of each side panel.
It will be a little difficult to tie off the yarn or thread when you are done sectioning the pumpkin, but here’s what I found did the trick: Bring the needle under one piece of the yarn (photo above on left); then make a loop and bring the needle through the loop (photo above in the middle). Pull the looped yarn snugly against the center bottom. Repeat that step at least once more and then make a knot, pulling it close and tight against the pumpkin bottom.
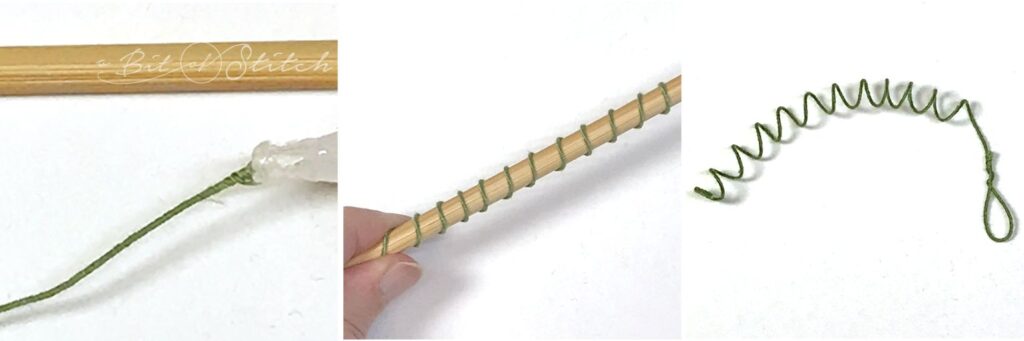
Now make a curly vine or two for your pumpkin, if you’d like. It doesn’t really matter what weight of florist wire you use, and you can even cover it with yarn if you’ve a mind to. (Visit me @evysews on Instagram and check out my highlights for a little video of me doing that!) Thicker, stiffer wire will hold its shape better… but softer, thinner wire is easiest to work with. Whichever weight you use, just be sure it’s the fabric covered type of florist wire. If you can’t find green fabric covered florist wire, buy white and color it green with a felt marker. Cut a piece of the florist wire about 12” long. Apply a drop of fabric glue to one end to secure the fabric covering the wire there. Once it begins to set, squeeze the glue drop slightly to flatten; then let it dry. Wrap the wire around a pencil, wooden dowel, or thick knitting needle (center photo above). Gently pull the wire off and then form a loop from the un-glued end, as shown above on the right. Twist the loop a few times to secure.

I made felt leaves for my pumpkins using THIS FELT and the leaf embroidery design included in my Plentiful Pumpkins design set. However, you can use the leaf pattern included with the free Puffy Pumpkin Sewing Pattern to trace and cut out a felt leaf or two. If you’d like to add veins, draw them on with a fine tipped permanent marker. Make a stem for your leaf by twisting a doubled piece of green fabric covered florist wire together (or use one piece if your wire is thick) and making a loop at each end. Sew or glue one loop onto the back of the leaf. Apply some glue to the center top of the pumpkin (down in the little gathered well) and insert the looped end of the curly vine and leaf stem into it. You may need to bend the loops to make them lie flat. Add a little more glue on top.
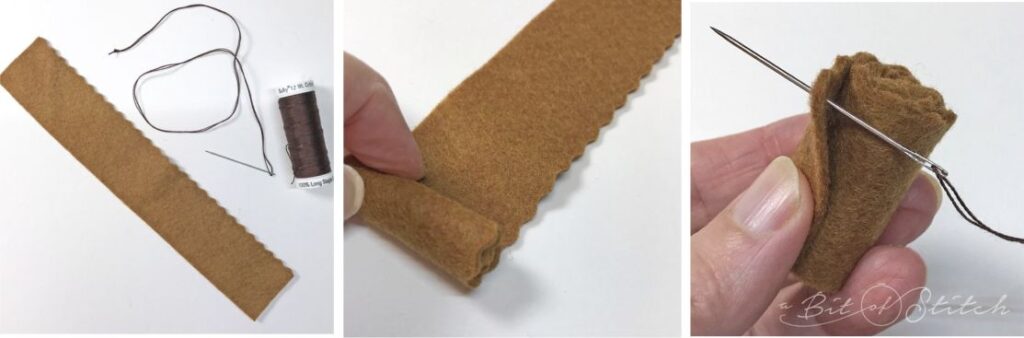
Feel free to use a bit of tree branch, cork, or whatever you have on hand for a pumpkin stem… OR make a quick little stem with some brown felt like I did. For the large size pumpkin, you’ll need a 1.25″ x 7.5” strip of felt; for the small size pumpkin, you’ll need a 1″ x 6” strip of felt. Pink one long side and roll it up snug. Thread a hand sewing needle generously with a double strand of heavy-weight thread in a color that contrasts but compliments the felt. Knot the thread and insert the needle into the underside of the exposed short end of the felt strip, near the pinked edge. Hide the knot under the edge of the felt.
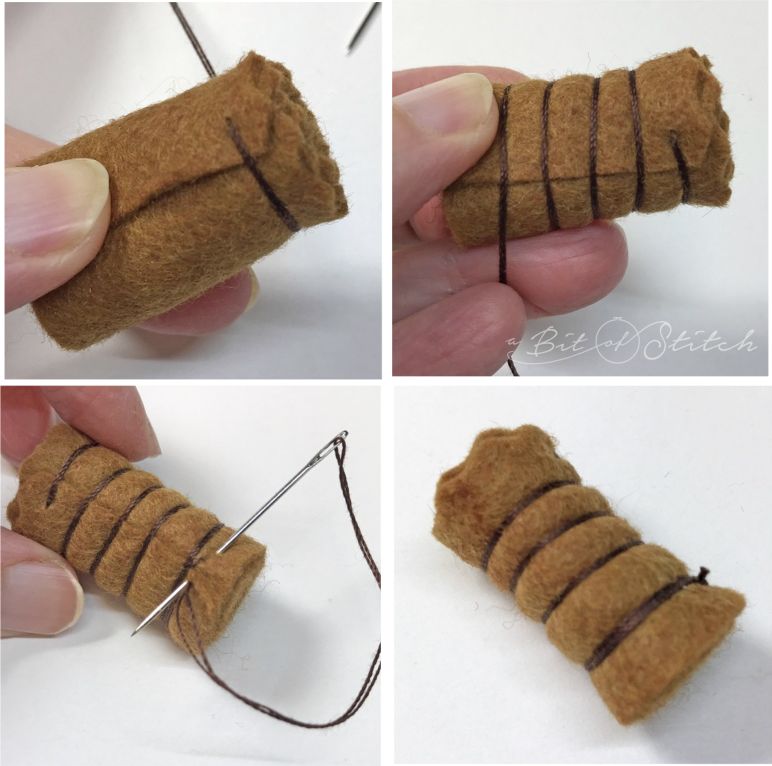
Wrap the thread snugly around the roll, pulling the thread to dent the felt slightly. Space the wraps evenly apart. Secure the thread at the bottom of the stem (the non-pinked edge).
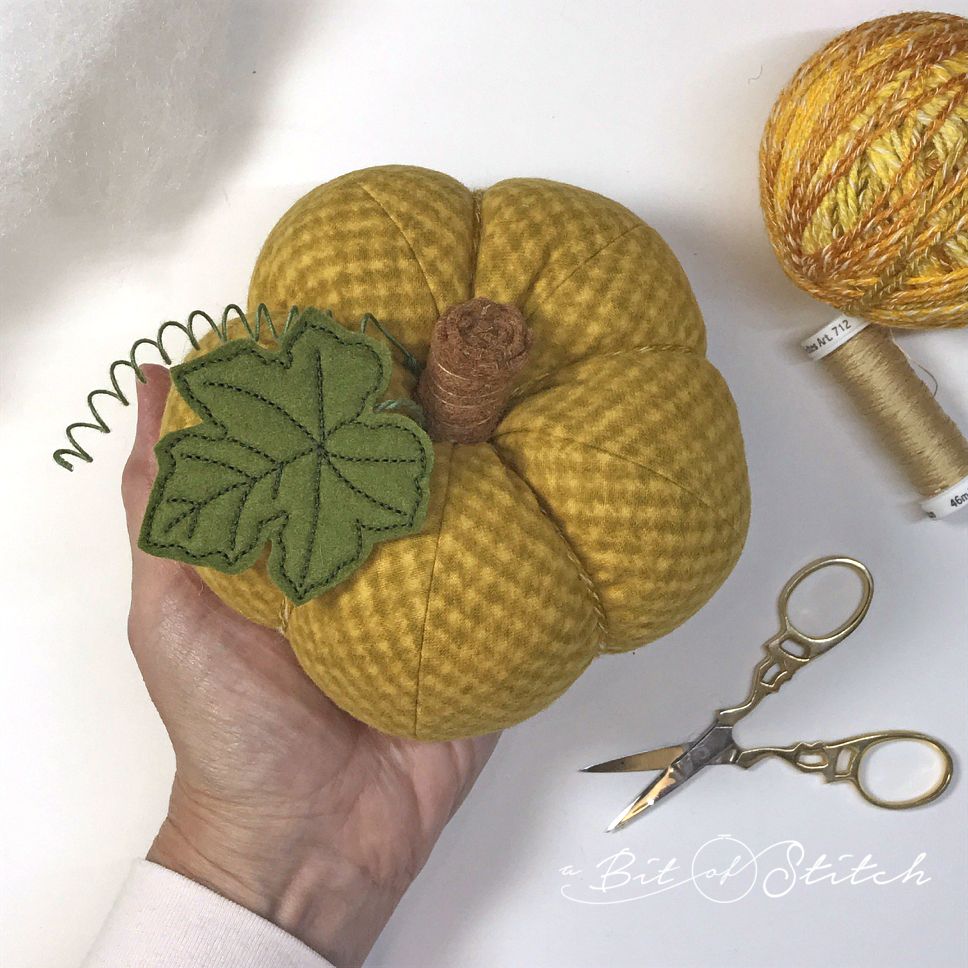
Apply fabric glue to the end of the stem and pop it in place right on top of the glued-on curly vine and leaf stem. Done!
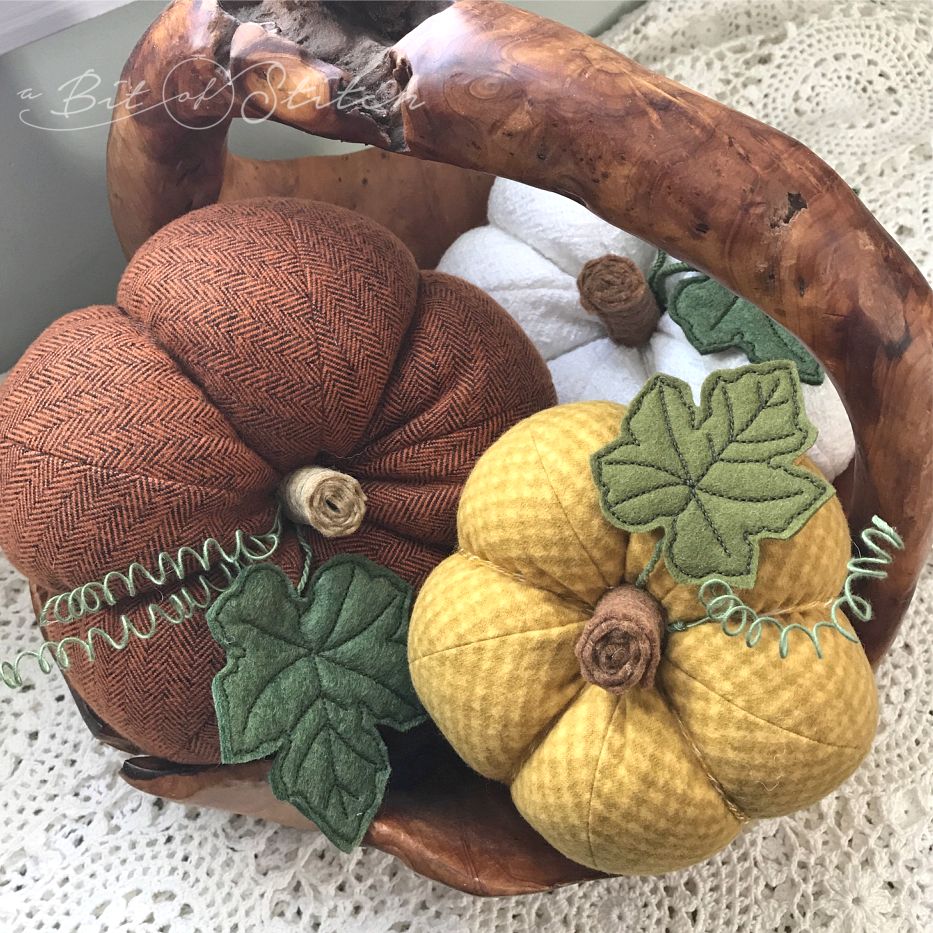
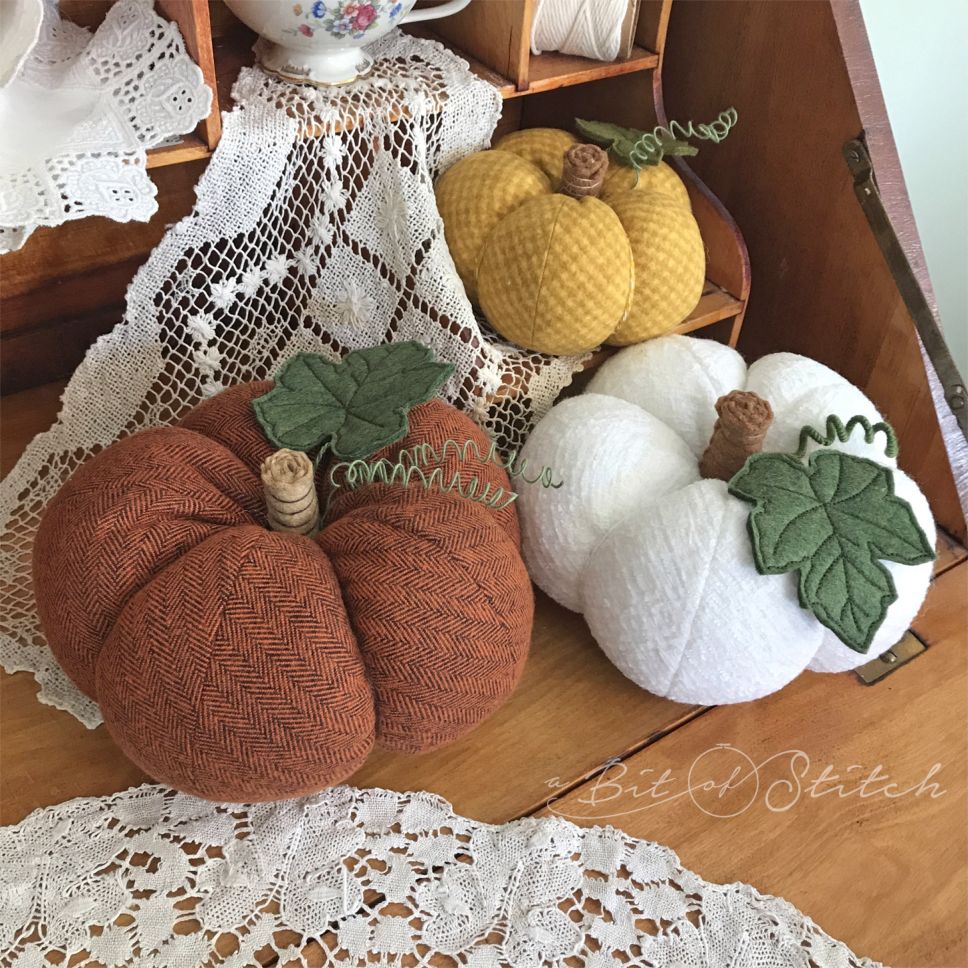
You’re going to want a basket full! Aren’t they cute?
4 replies on “Sew a Pumpkin!”
I love these! I want to try them right now…
Go for it! And then send us pictures! 😍
Lovely & great job, thanks.
So glad you like the pumpkins! 😁